Bloom with Creativity: Welcome Spring with Handmade Crafts
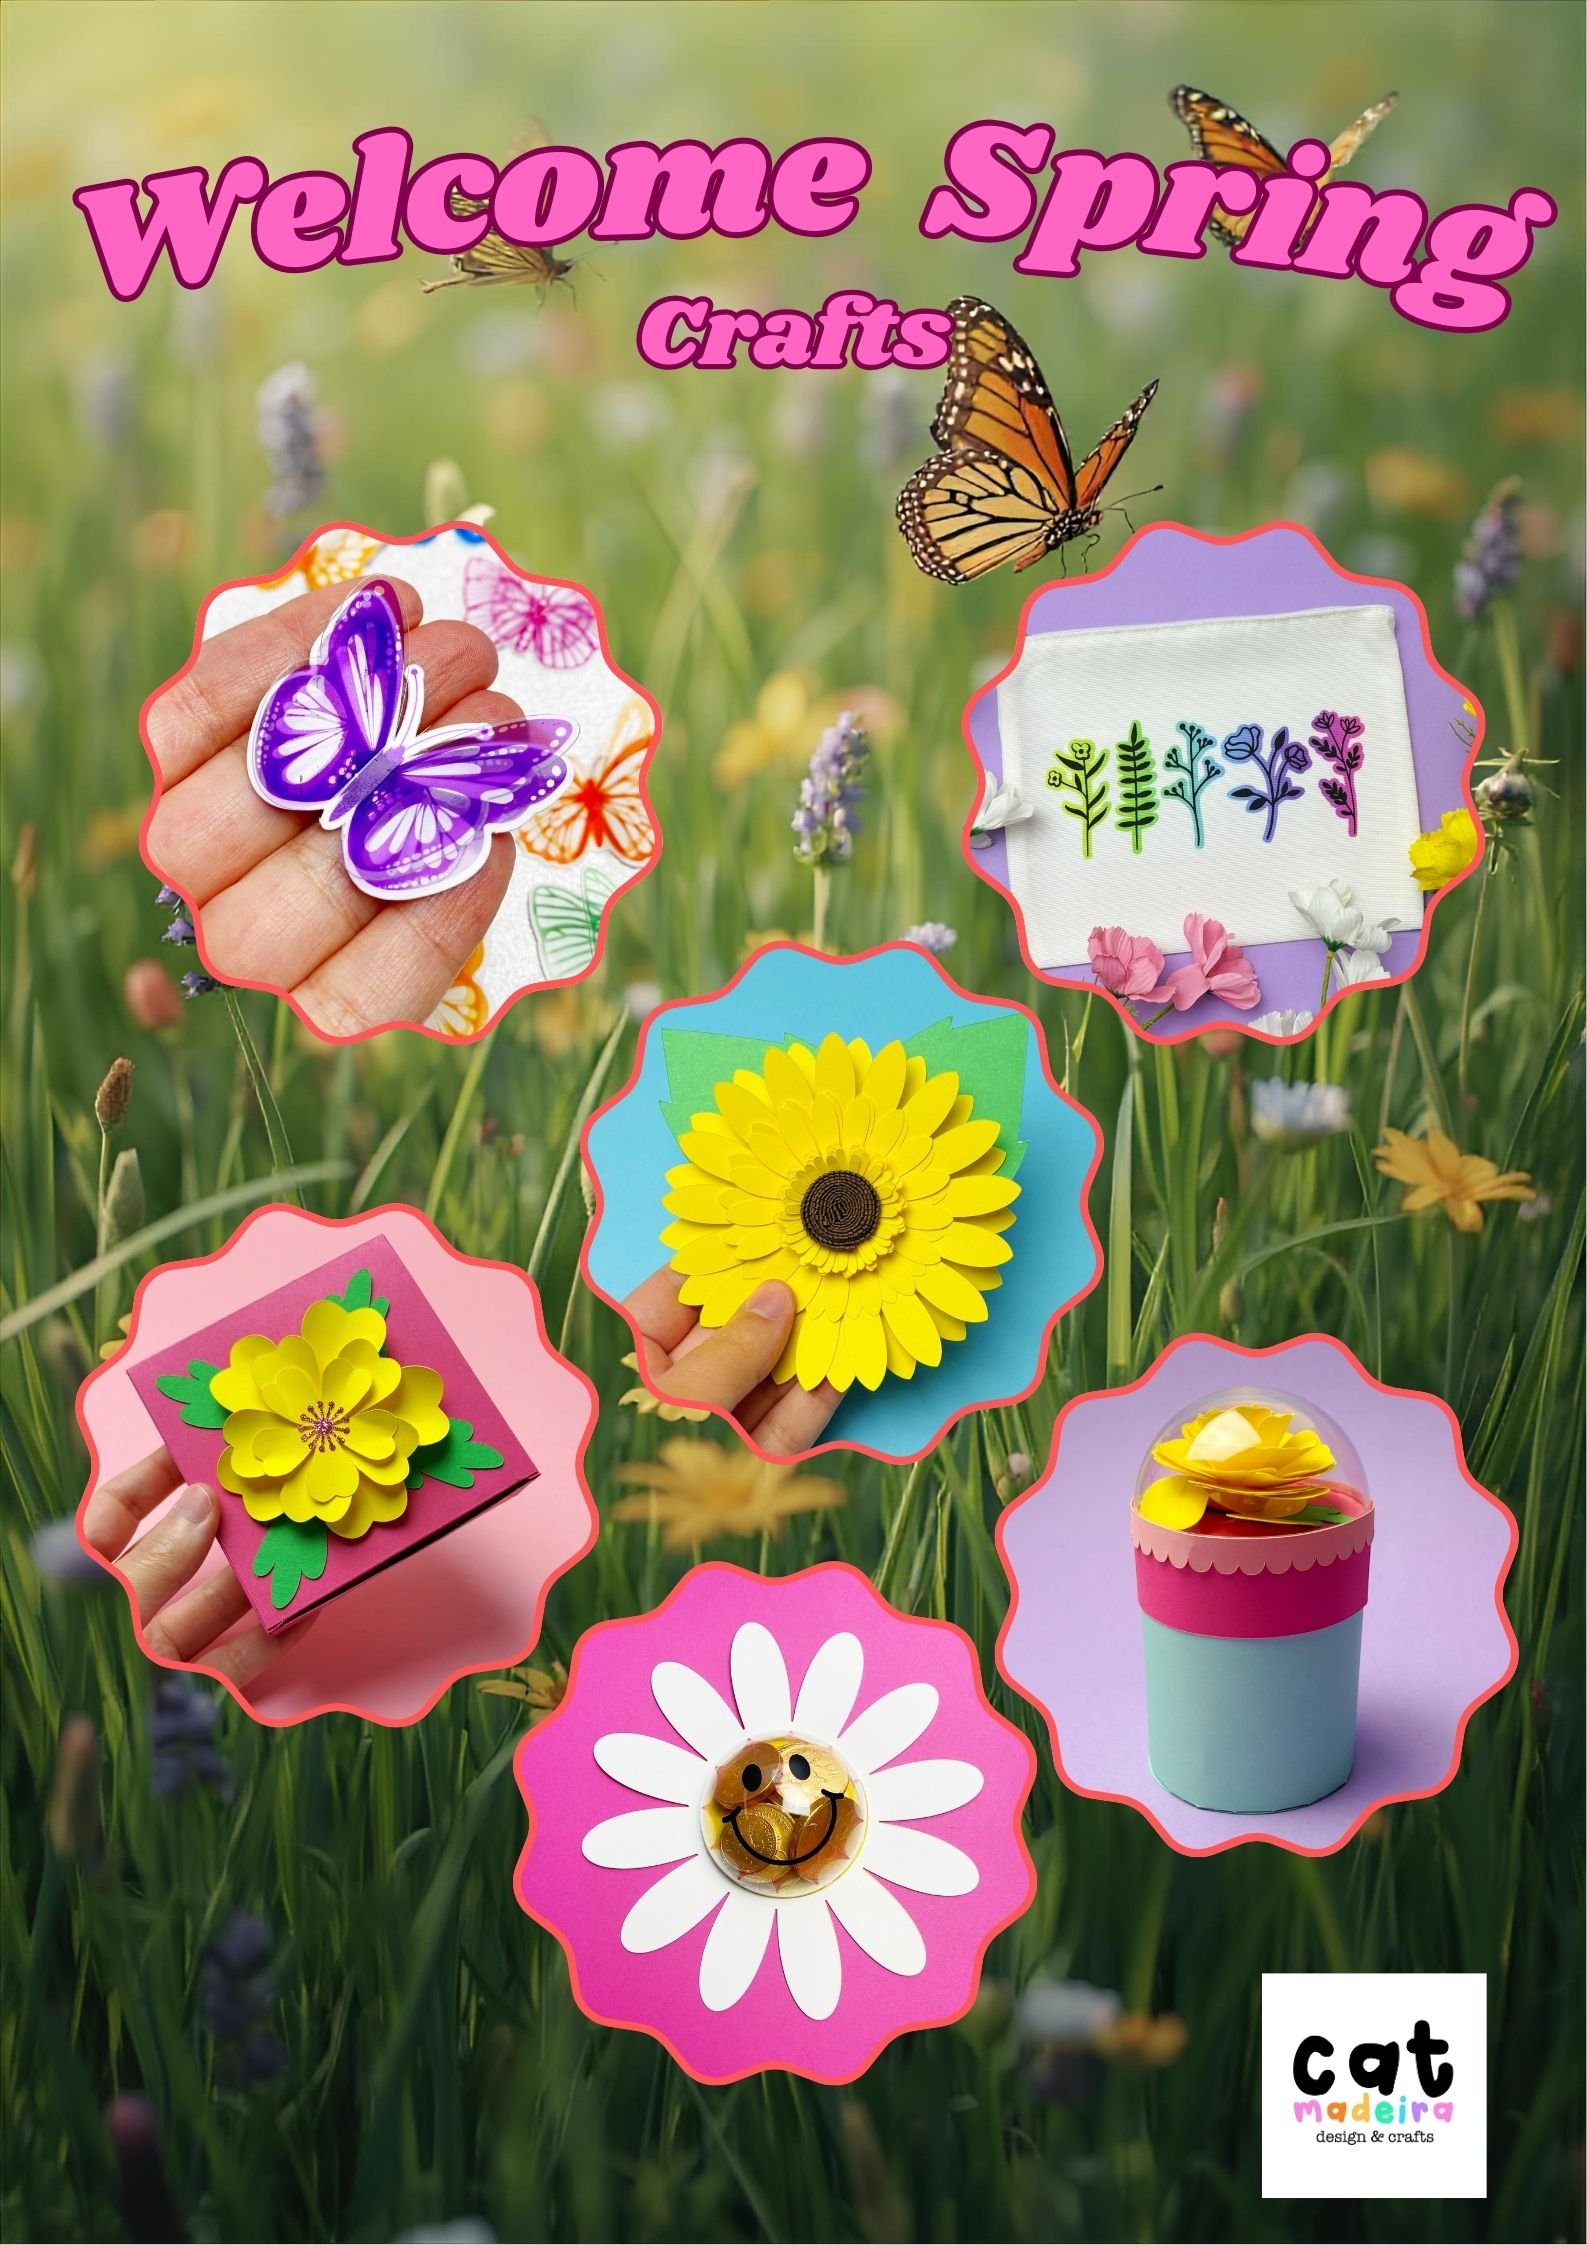
Spring is a season of renewal, colour, and inspiration—the perfect time to let your creativity blossom with handmade crafts that celebrate the beauty of nature. Whether you’re looking to brighten up your home, create thoughtful gifts, or simply enjoy a relaxing crafting session, these spring-themed projects are designed to bring joy and a touch of whimsy to your life. From delicate butterflies and cheerful sunflowers to charming daisies and blooming paper flowers, each craft is an opportunity to embrace the vibrant energy of the season. So, gather your supplies and let’s welcome spring with open arms and a burst of creativity!
The image above is a delightful showcase of spring craft ideas that are as fun to make as they are beautiful. Imagine crafting a colorful butterfly that seems to flutter right off the page, or creating a radiant sunflower that brings a smile to your face every time you see it. You could also design a cheerful daisy with a playful center or assemble a charming basket filled with paper flowers. These projects are perfect for crafters of all ages and skill levels, making them ideal for solo crafting or a fun activity with family and friends. Each creation is a celebration of spring’s vibrant colors and the joy of making something with your own hands.
Handmade spring crafts do more than just decorate your space—they bring a sense of renewal and happiness that only comes from creating something unique and personal. Picture your home adorned with your handmade butterflies, sunflowers, and daisies, each piece telling a story of creativity and the beauty of the season. These crafts are perfect for adding a touch of spring to your décor, creating heartfelt gifts, or simply enjoying the therapeutic benefits of crafting. So, let your imagination take flight, experiment with colors and textures, and enjoy the process of crafting something bright and beautiful. This spring, let your creativity bloom! 🌸🦋
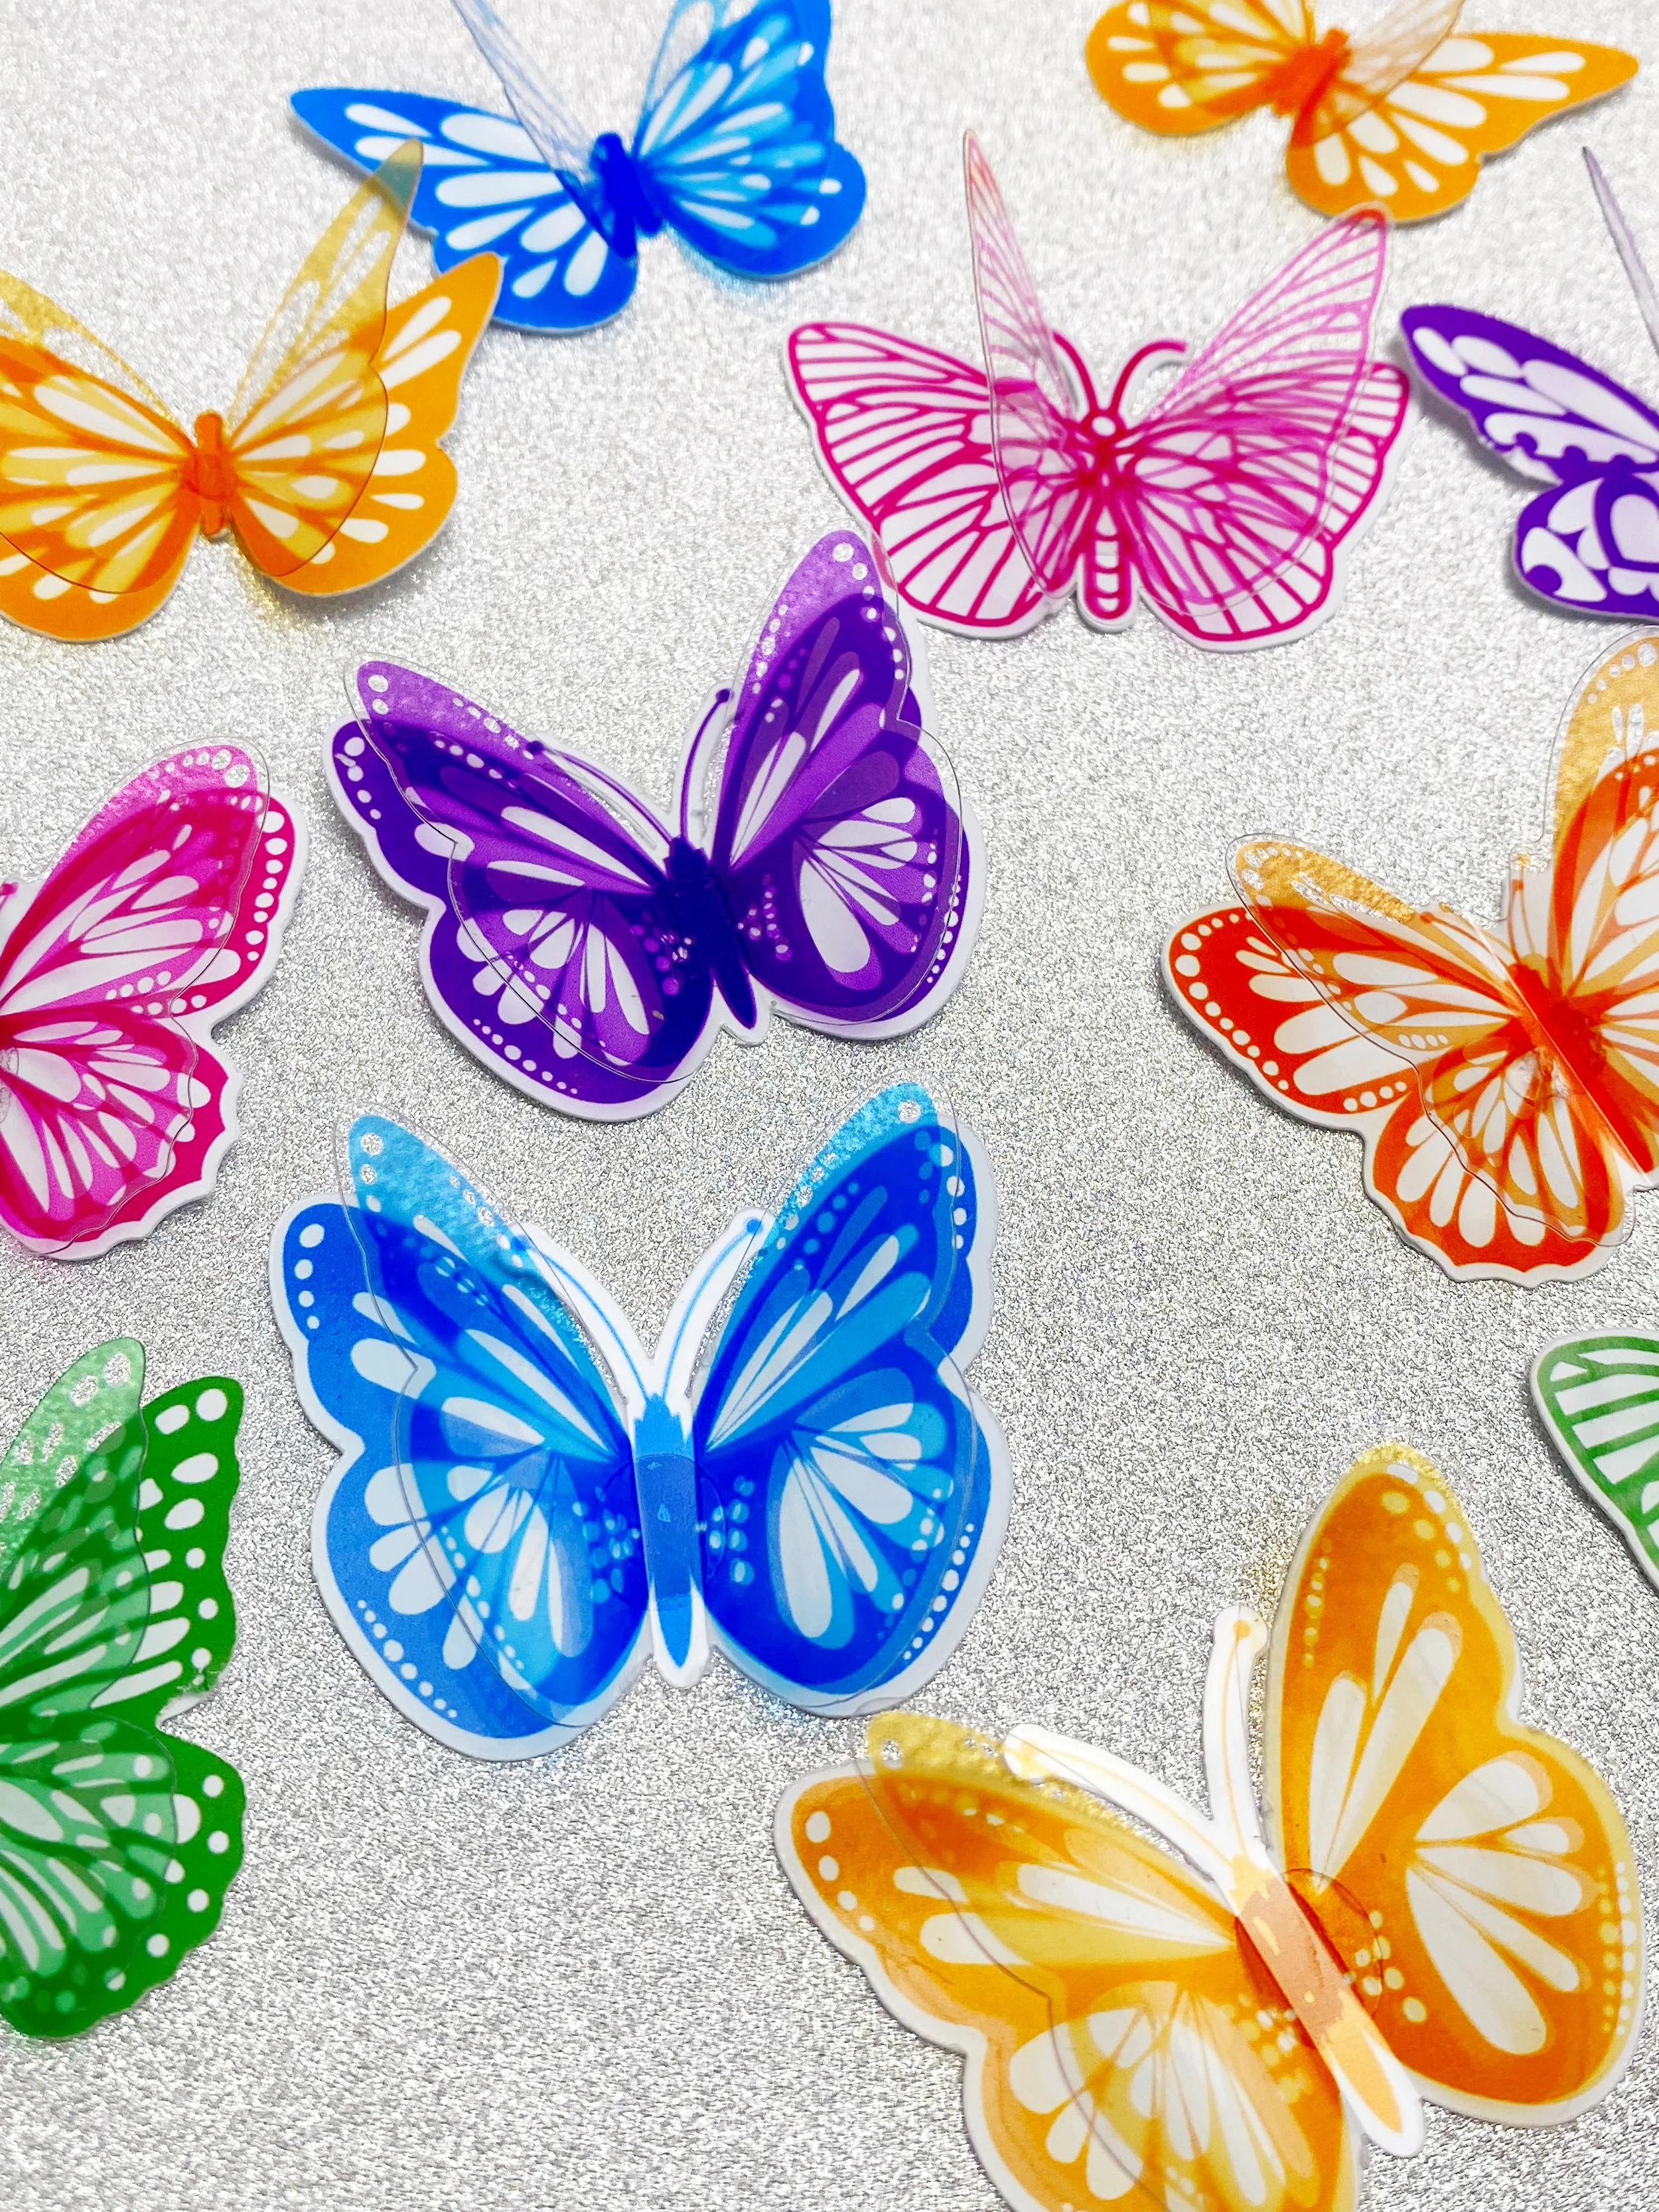
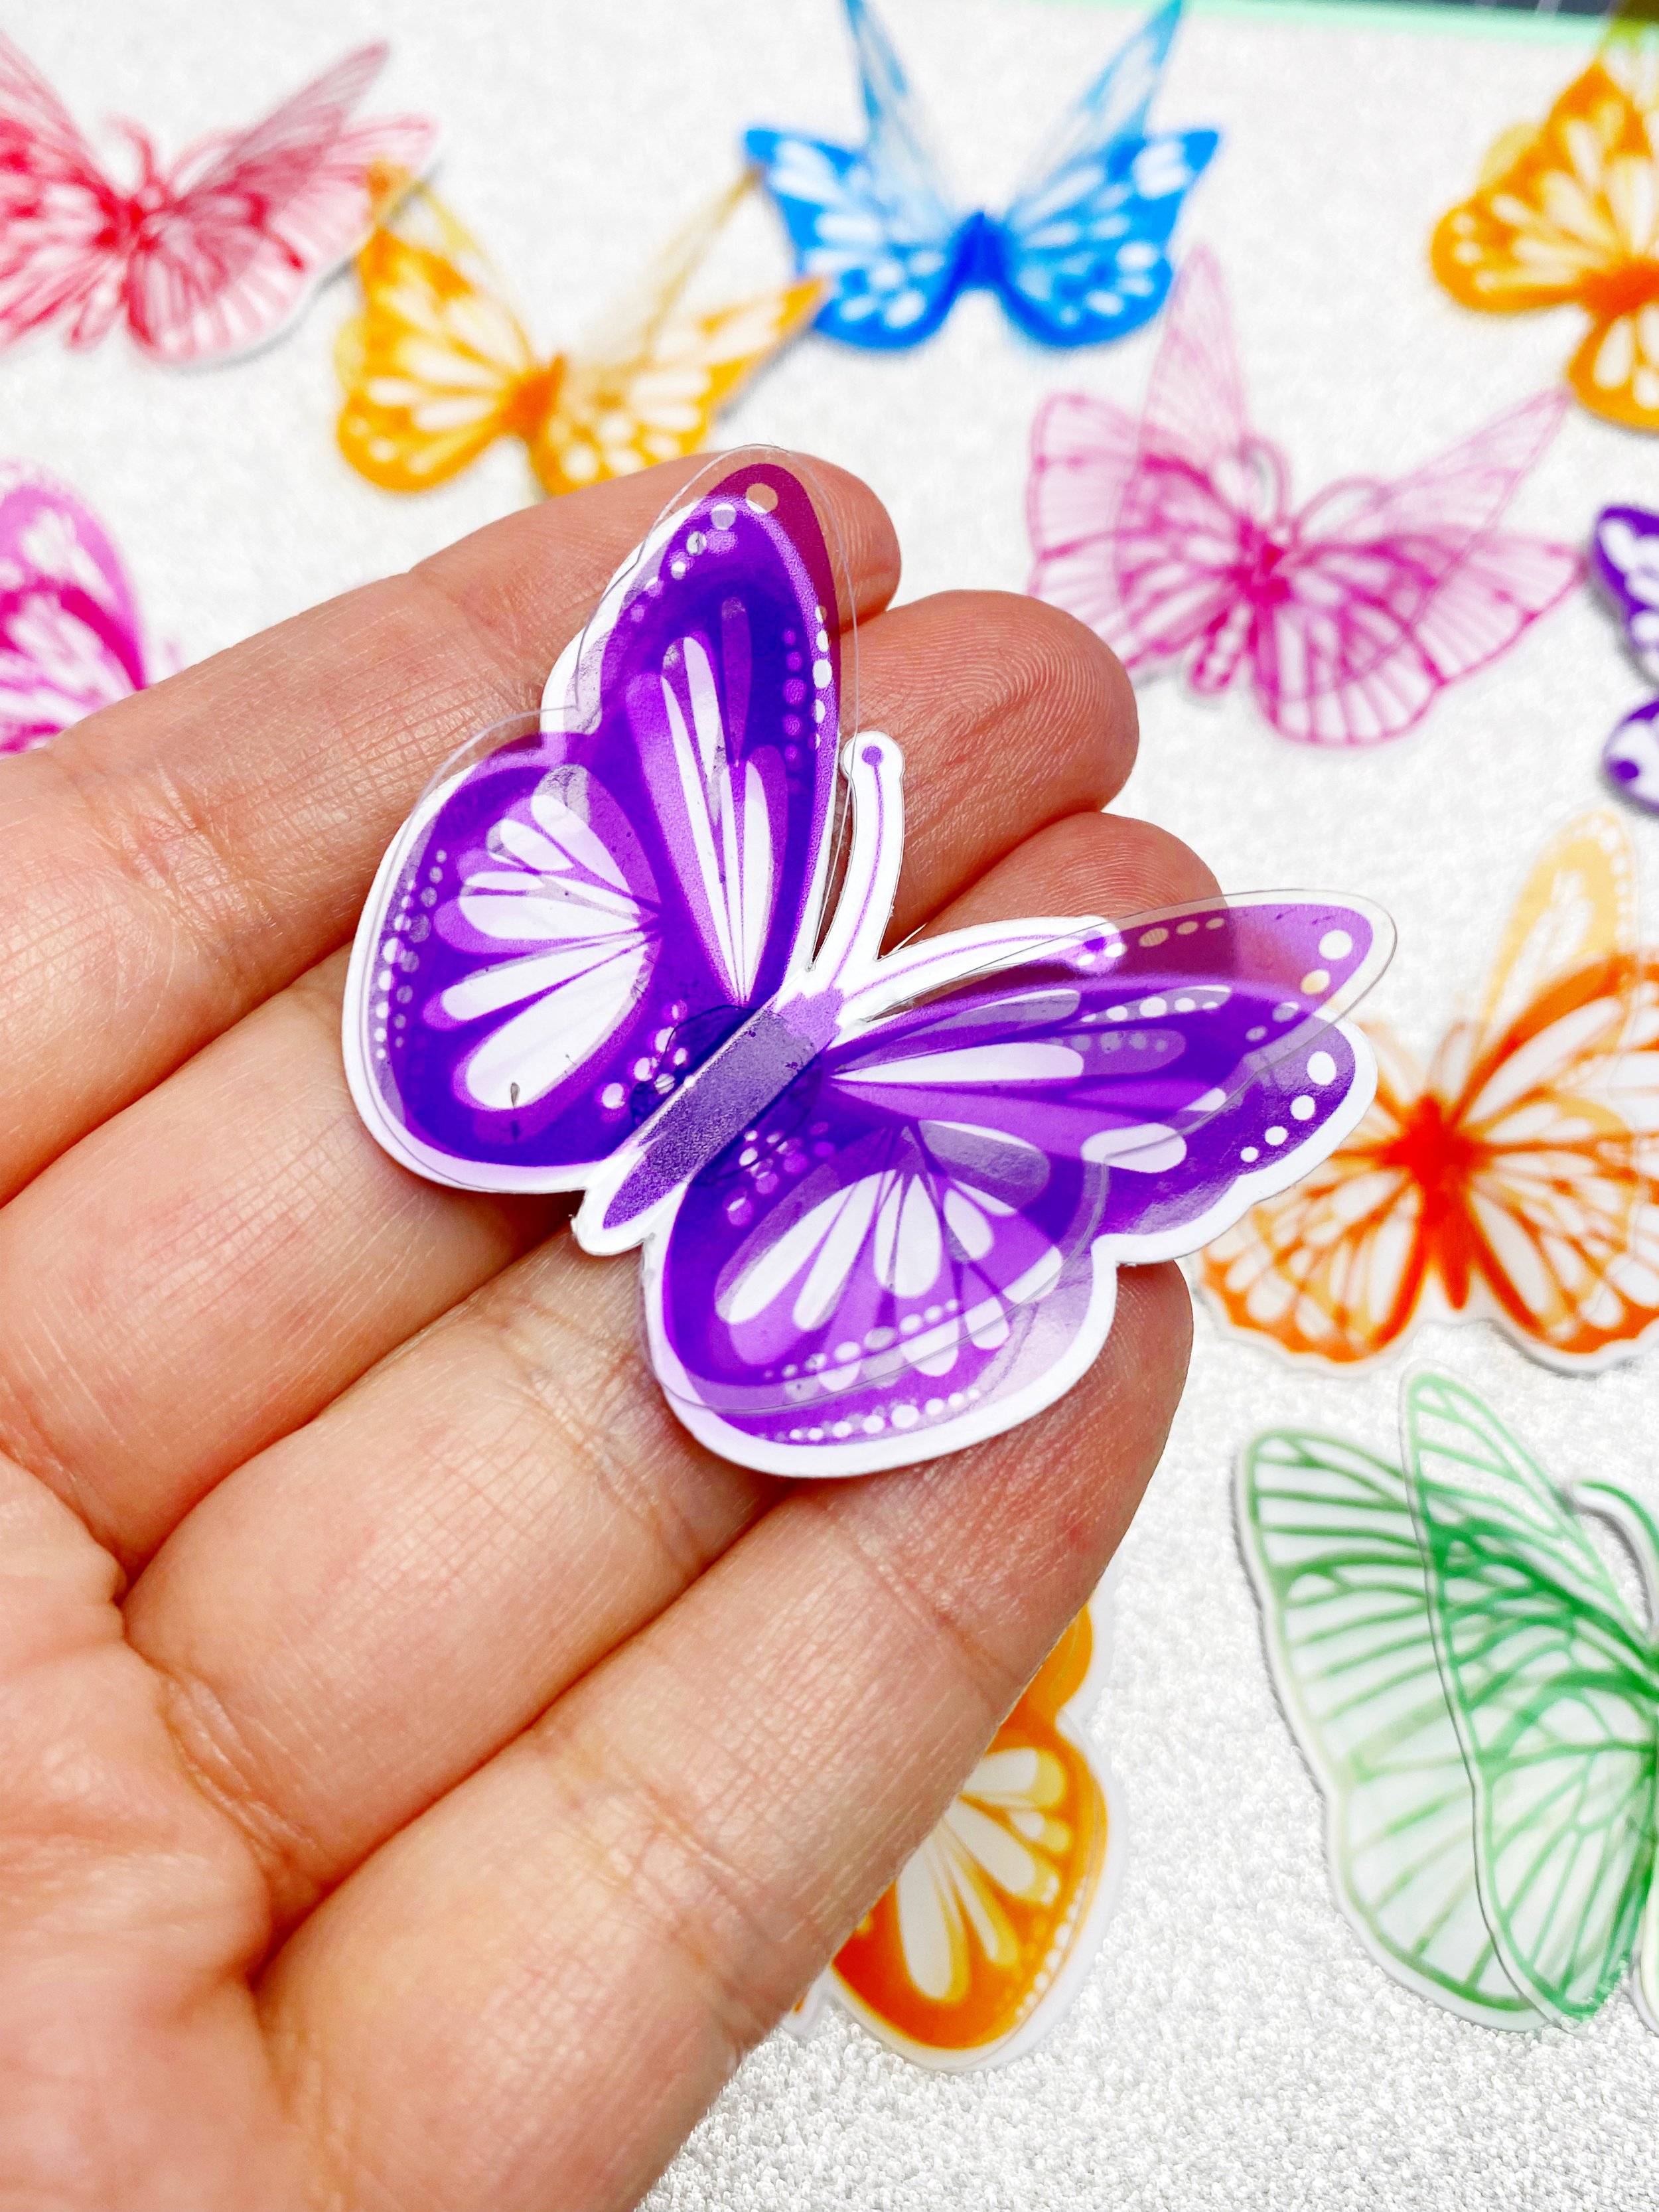
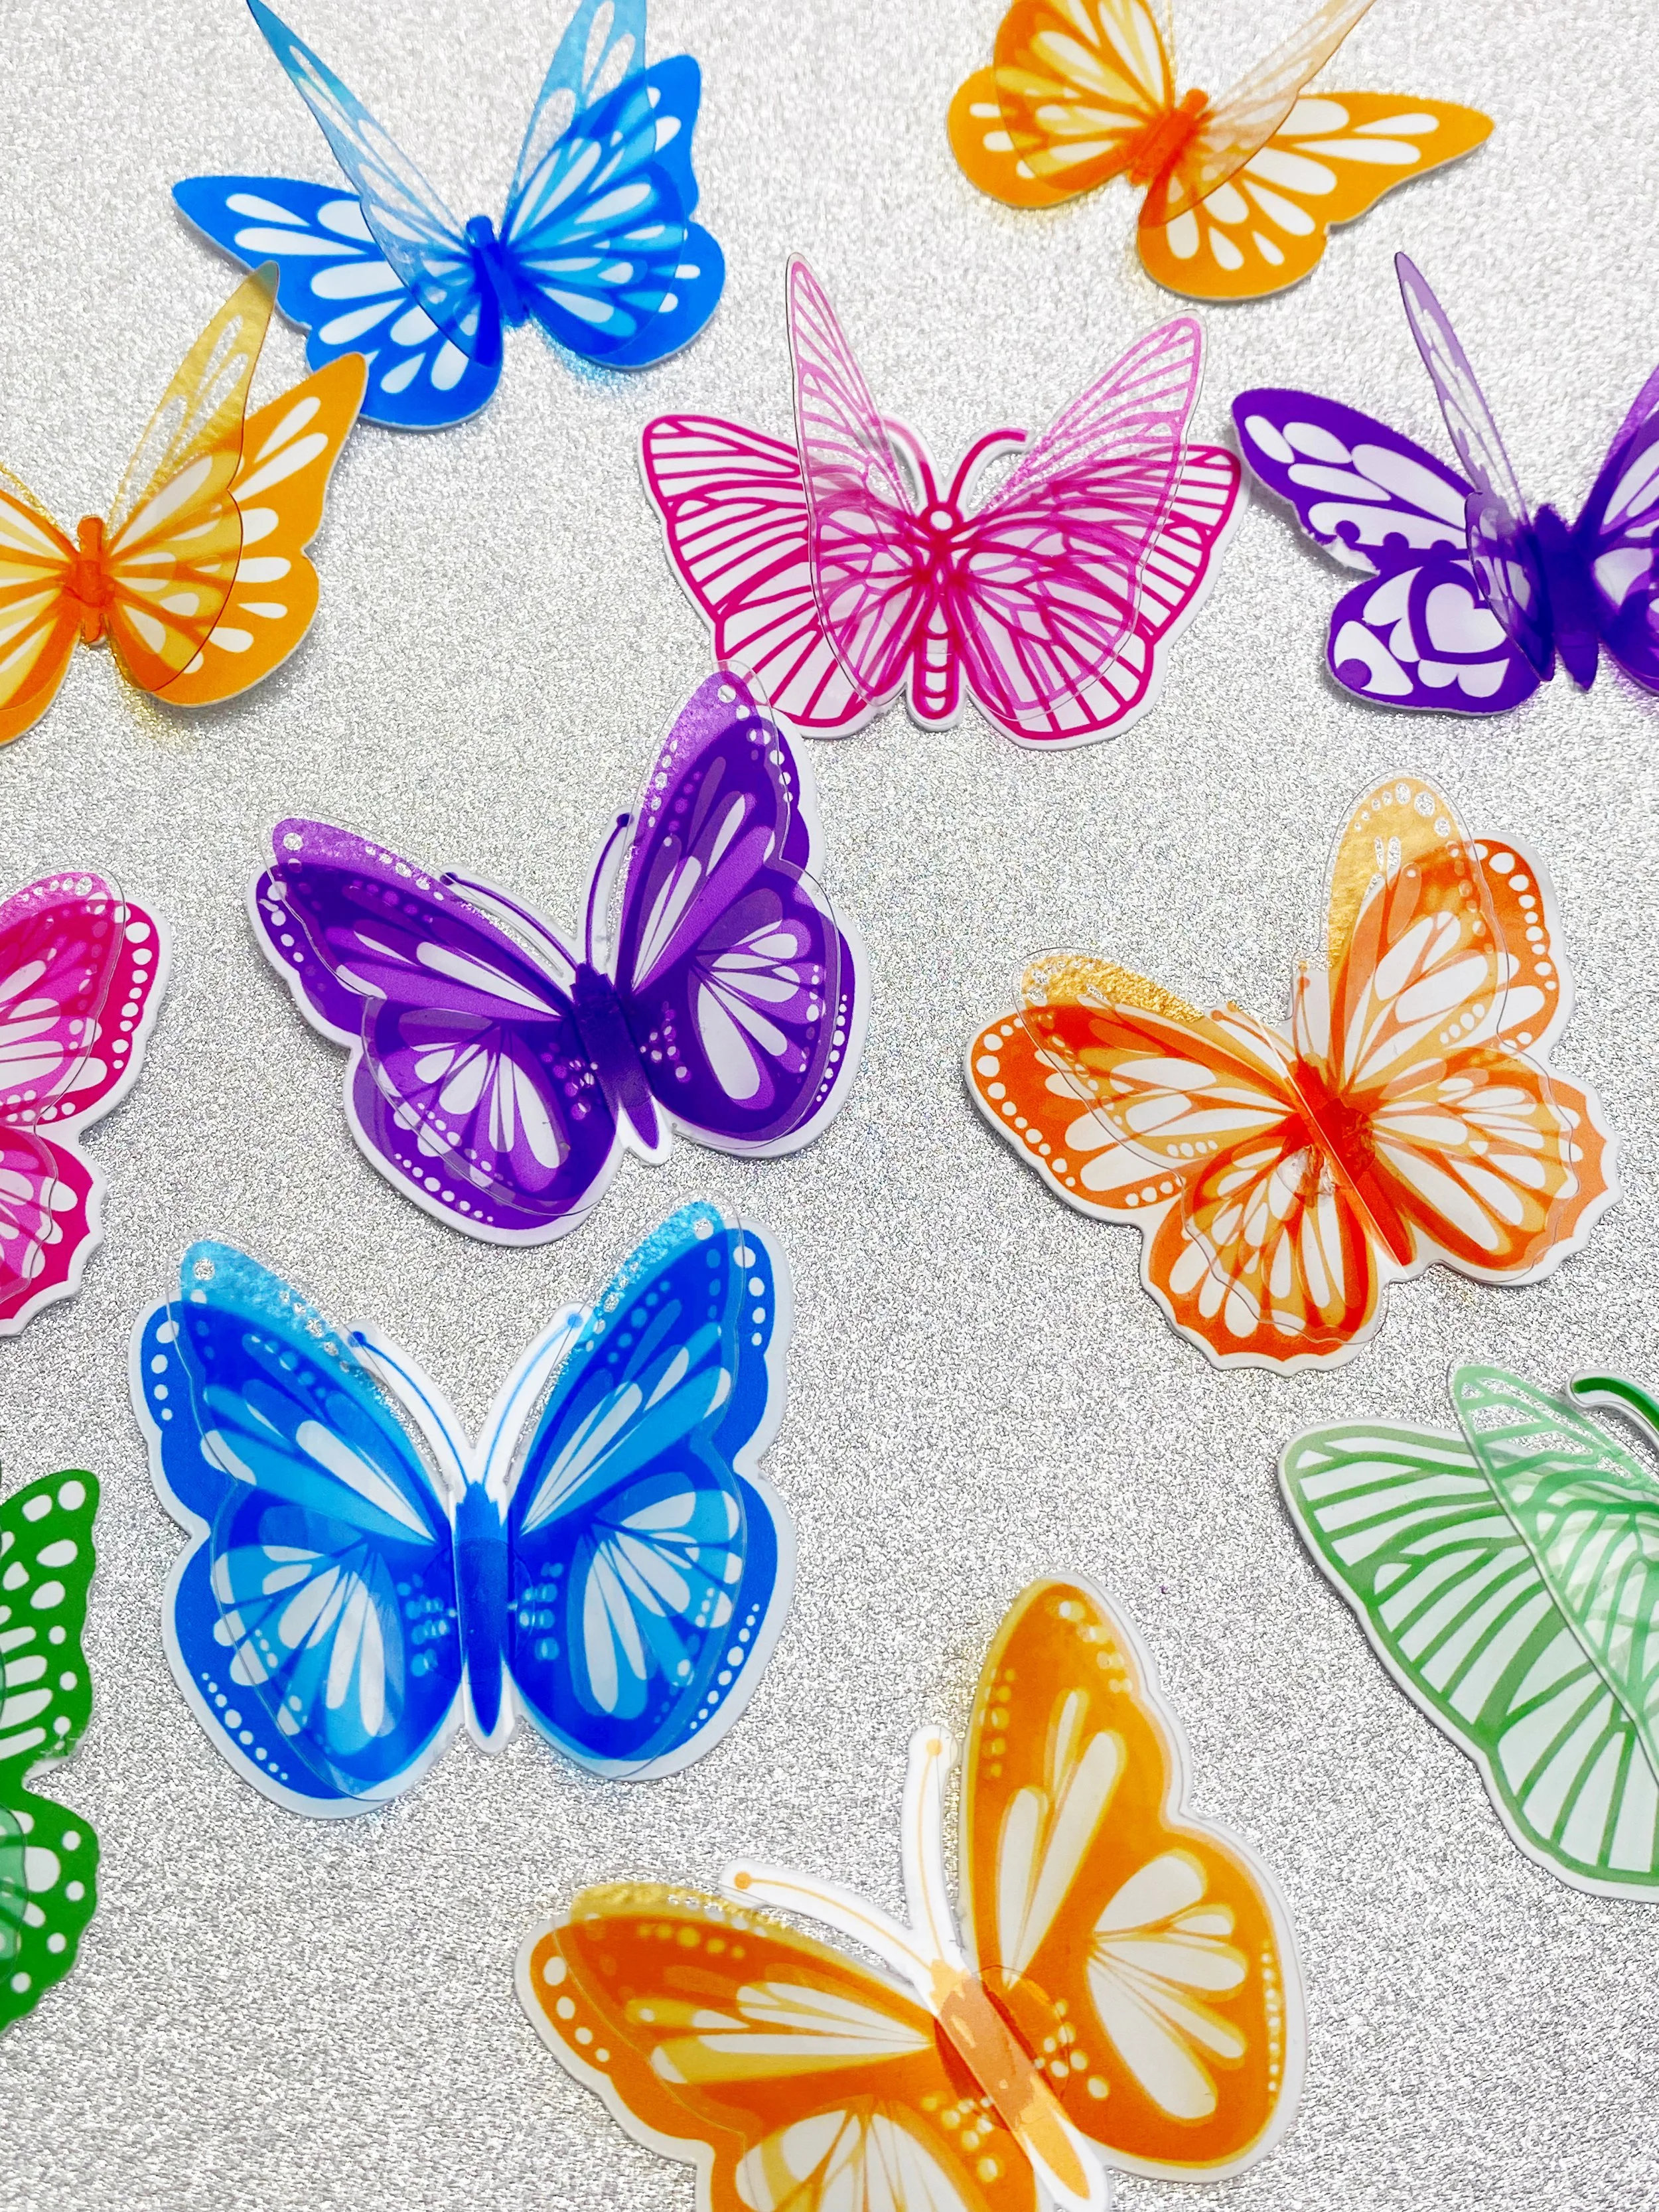
Vibrant Crafting: DIY Transparent Butterflies for Whimsical Decor! 🦋✨
Hello crafters!
Ready to add a splash of colour and whimsy to your crafting projects? Let me introduce you to these enchanting DIY transparent butterflies! Whether you're decorating for a special event, creating unique embellishments for your handmade items, or looking to brighten up your craft stall, these butterflies are the perfect way to showcase your creativity. Ideal for crafters who love to blend vibrant colours with delicate, eye-catching designs!
Why Crafters Will Adore These Transparent Butterflies 🦋💖
🦋 Stunning Transparent Design – Featuring vibrant, translucent wings with intricate patterns, adding a touch of elegance and whimsy to your projects. ✨ Perfect for Decor – Ideal for embellishing cards, gift boxes, home decor, or even as standalone decorations. 🎨 Customizable – Use your favourite colours and patterns to match your unique style or theme. 💡 Easy to Make – Simple to create, making it a great project for crafters of all skill levels.
Follow Along with the Video Tutorial!
For a step-by-step guide, check out this helpful YouTube tutorial that walks you through the entire process. Follow along and enjoy creating your very own transparent butterflies!
📹 Watch the tutorial here: https://www.youtube.com/shorts/p3bHh4MWg-o
🖨️ Available on Cricut Design Space: 👉👉Cricut Design Space👈👈
Tips for Styling Your Transparent Butterflies 🦋✨
🦋 Use them to decorate cards, gift boxes, or scrapbook pages for a whimsical touch. ✨ Pair them with matching ribbons or other embellishments for a cohesive look. 🦋 Create a set of different colours and patterns for variety in your craft inventory. ✨ Gift them to fellow crafters or customers for a heartfelt and colourful surprise.
What You’ll Need to Create Them 🛠️🦋
📄 Acetate or Clear Plastic Sheet – For the butterfly wings: 👉👉Shop Now👈👈 📄 Printable Cardstock – For the base of your butterfly: 👉👉Shop Now👈👈 🖌️ Crafting Glue – To attach the butterflies to your projects: 👉👉Shop Now👈👈 ✨ Optional Embellishments – Glitter, sequins, or metallic markers for extra sparkle
Thinking about getting a Cricut? I use one for all my projects—it’s a total game-changer.
👉👉 Click here to get a Cricut Maker 4👈👈
The Printer I use for all my creations, T-Shirts, Stickers and my print and cut projects.
👉👉 Click here to get an Epson Ecotank👈👈
These are affiliate links, which means we may earn a small commission if you make a purchase—at no extra cost to you. It helps us keep creating more cute designs for you!
Make It Yours, Make It Magical!
These DIY Transparent Butterflies are more than just decorations—they’re a celebration of your crafting skills and the joy of creating something truly unique and vibrant. Whether you’re crafting for your next market, a special occasion, or making a heartfelt surprise for someone special, this project is sure to bring smiles and a touch of creativity to your handmade creations!
Ready to Get Crafting?
🦋 Gather your supplies, follow the tutorial, and let your creativity take flight!
I can’t wait to see your creations! Share your masterpieces with me @catmadeira on social media. Need more inspiration or have questions? Let’s connect—I’m here to help fuel your creative journey!
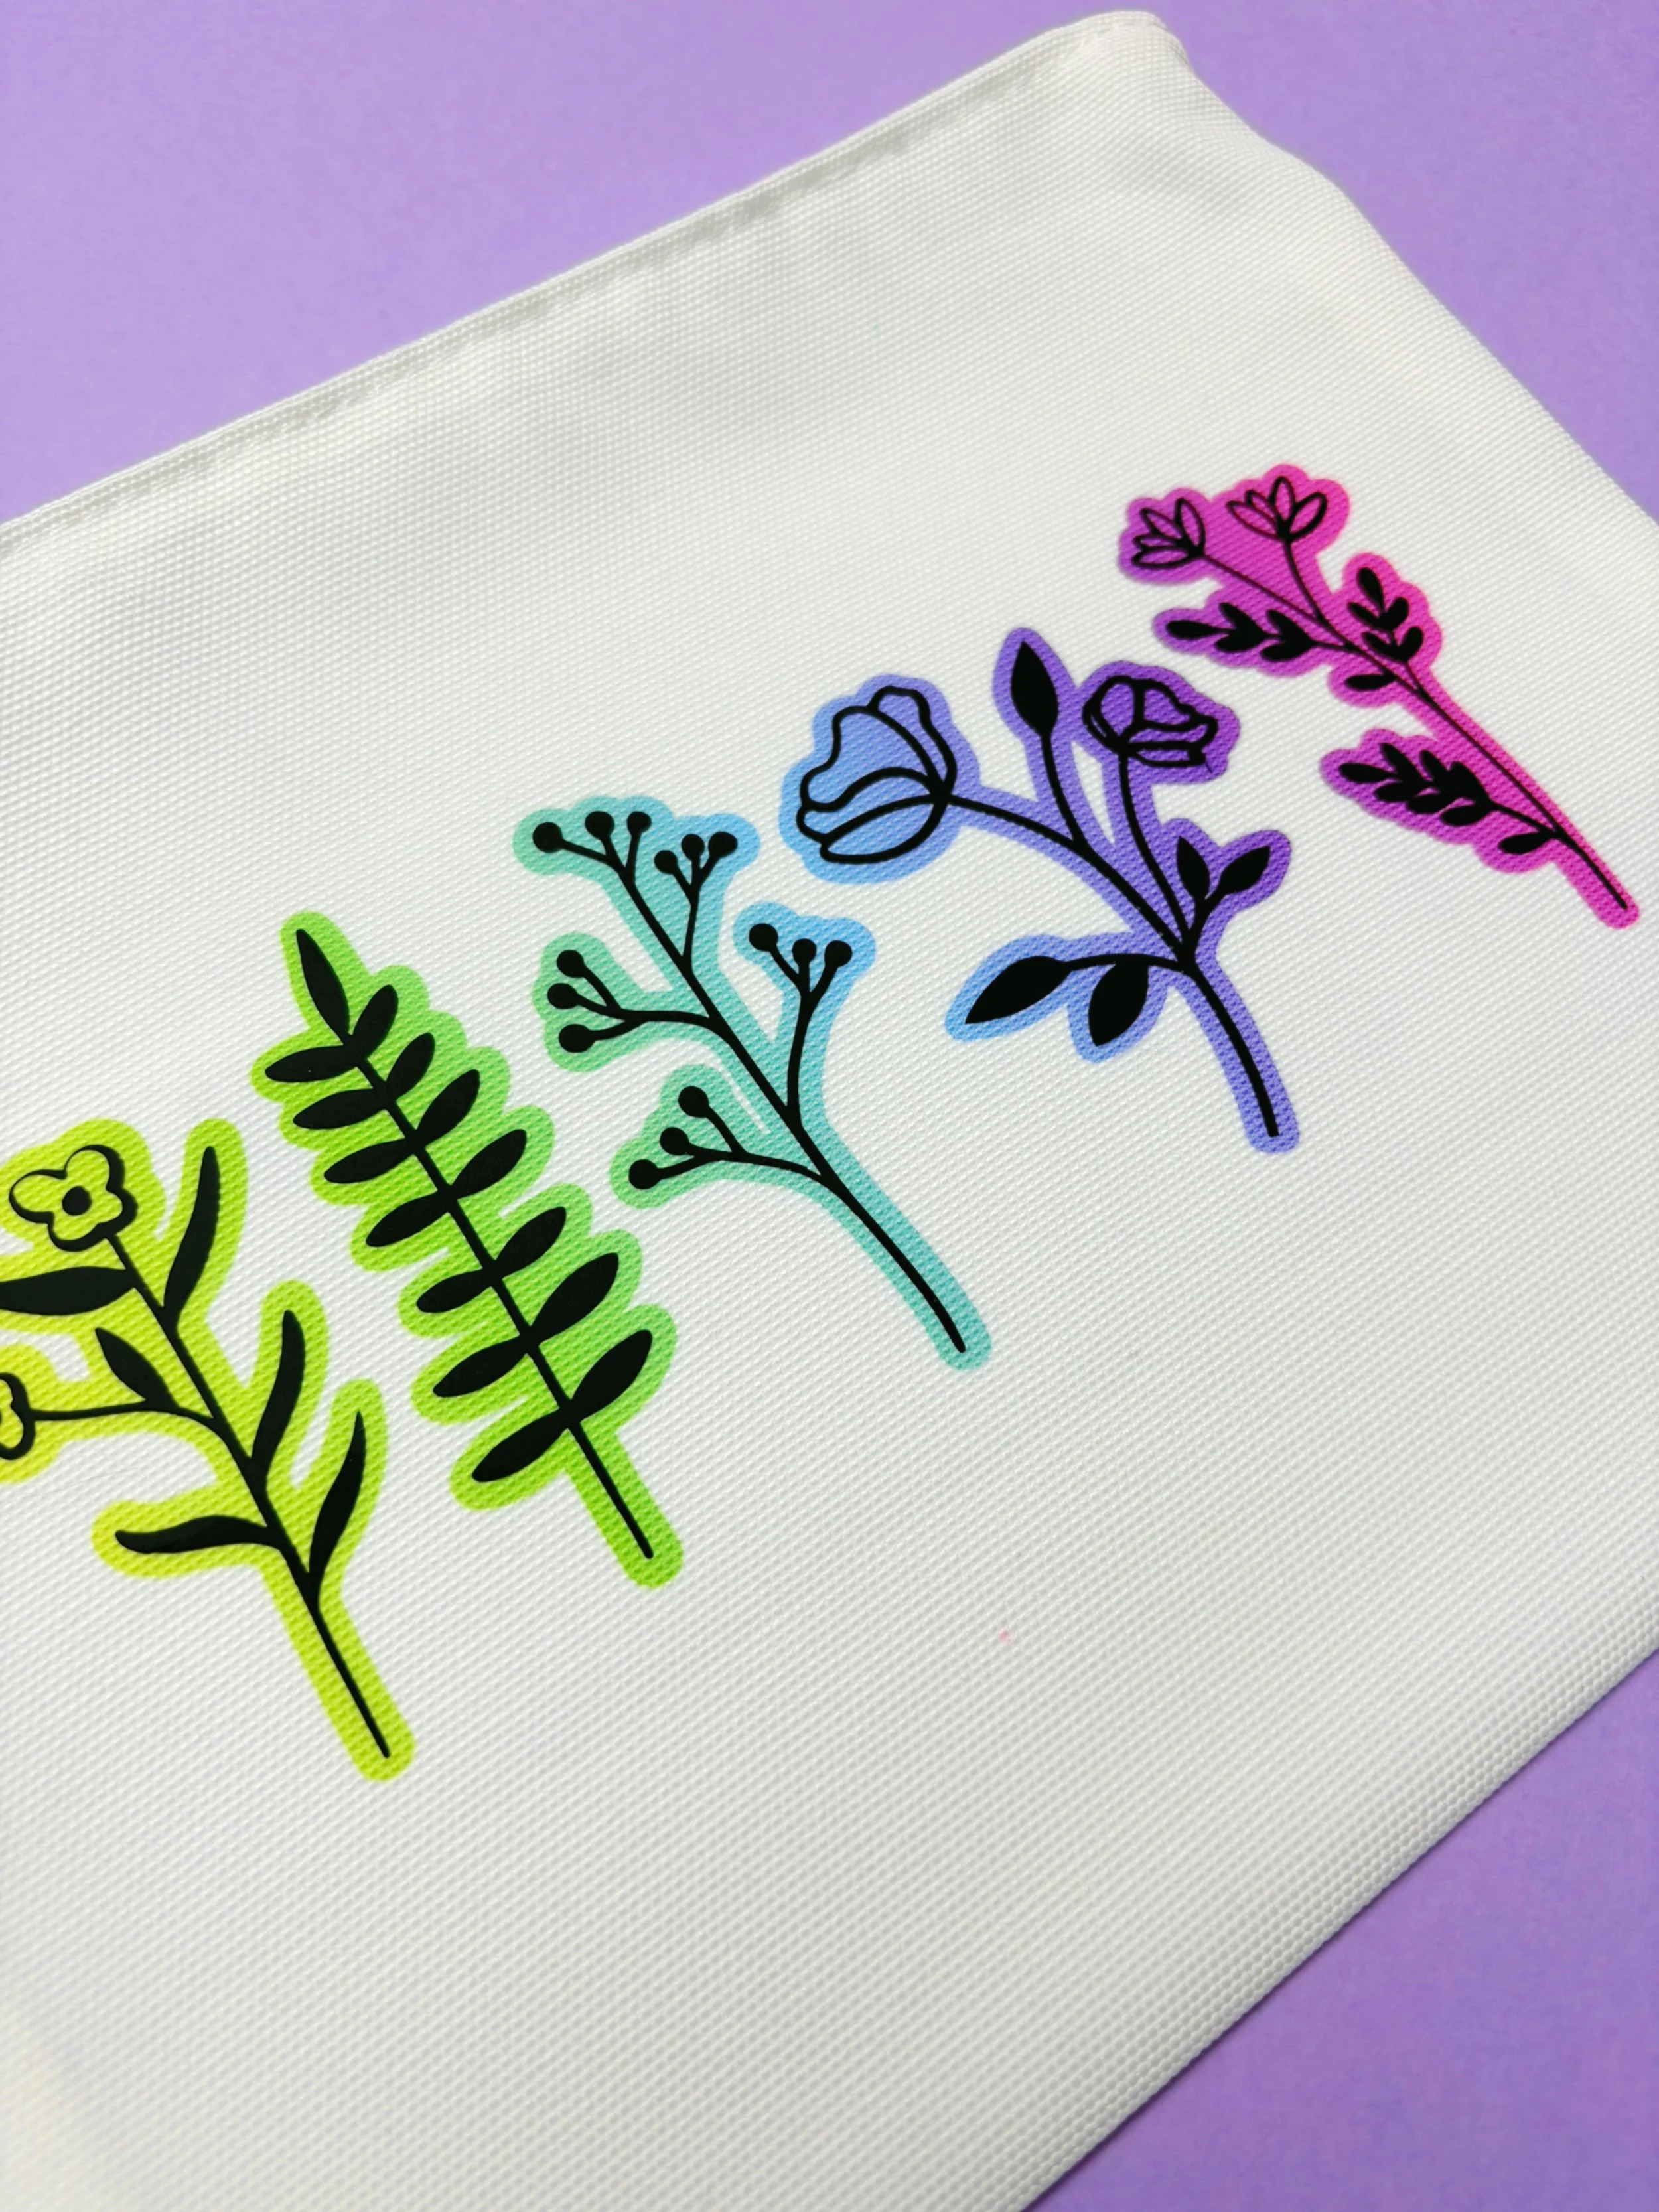
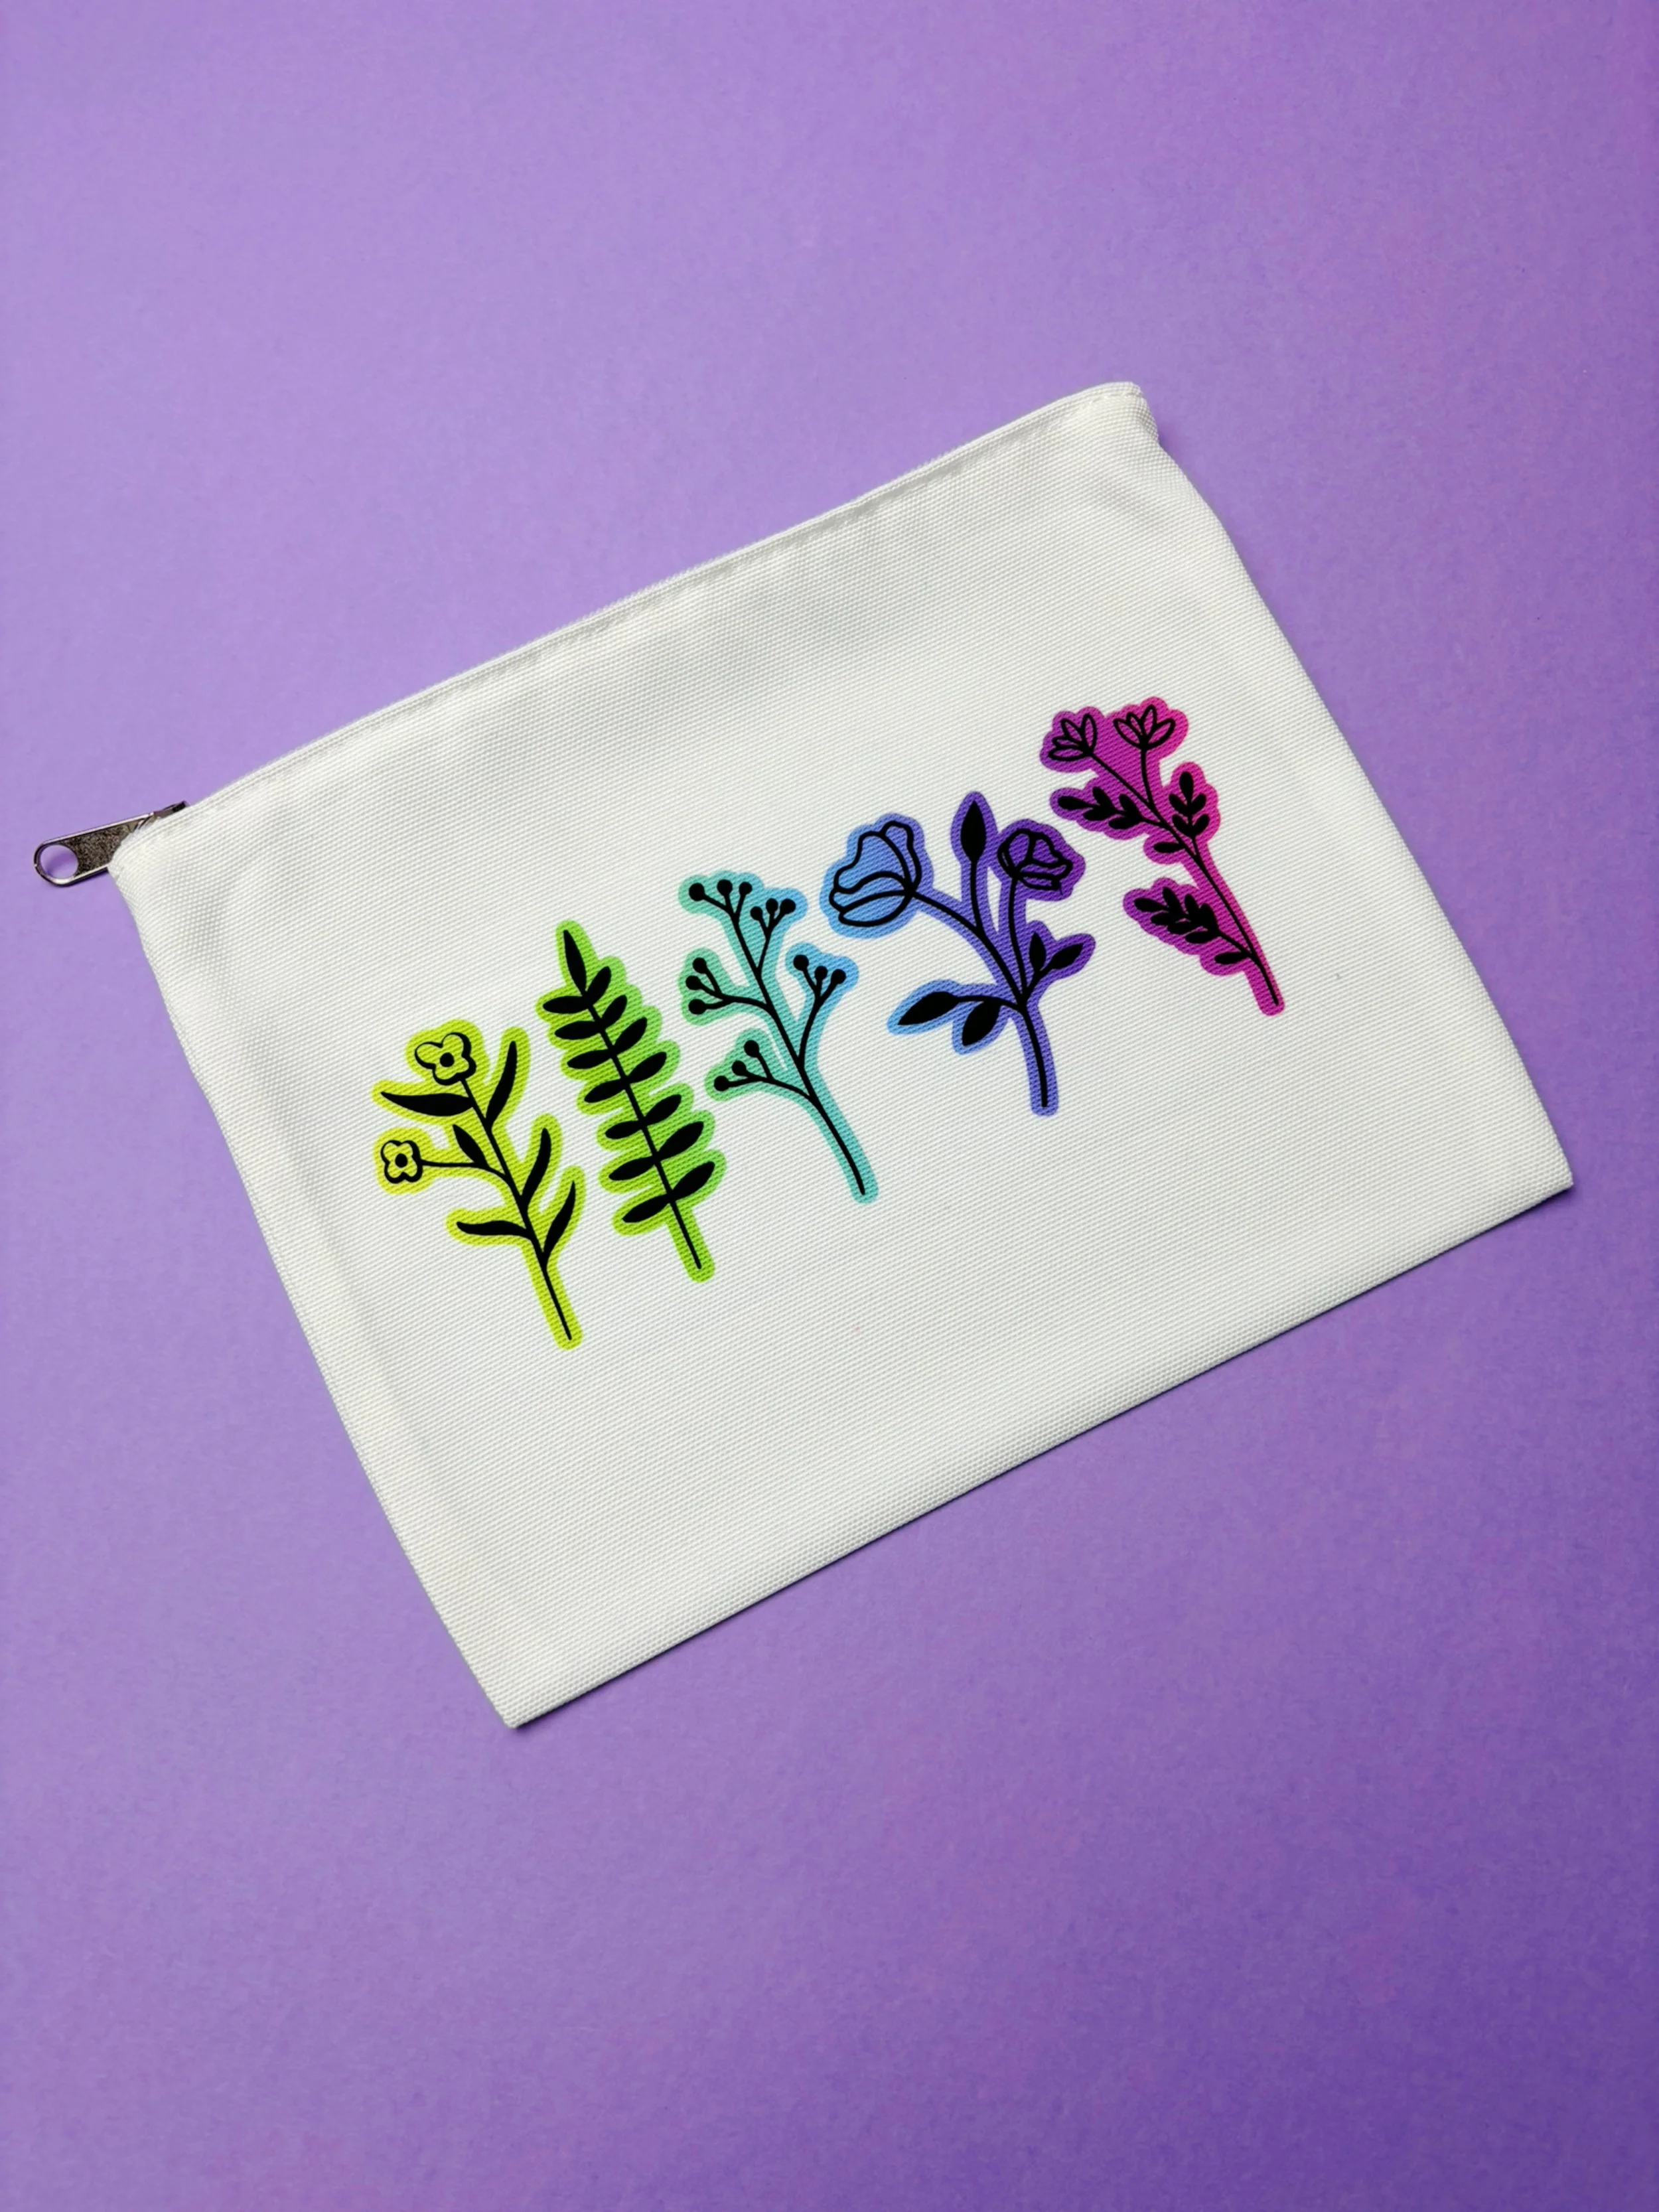
Bloom with Creativity: DIY Floral Makeup Bag for Crafters! 🌸💄
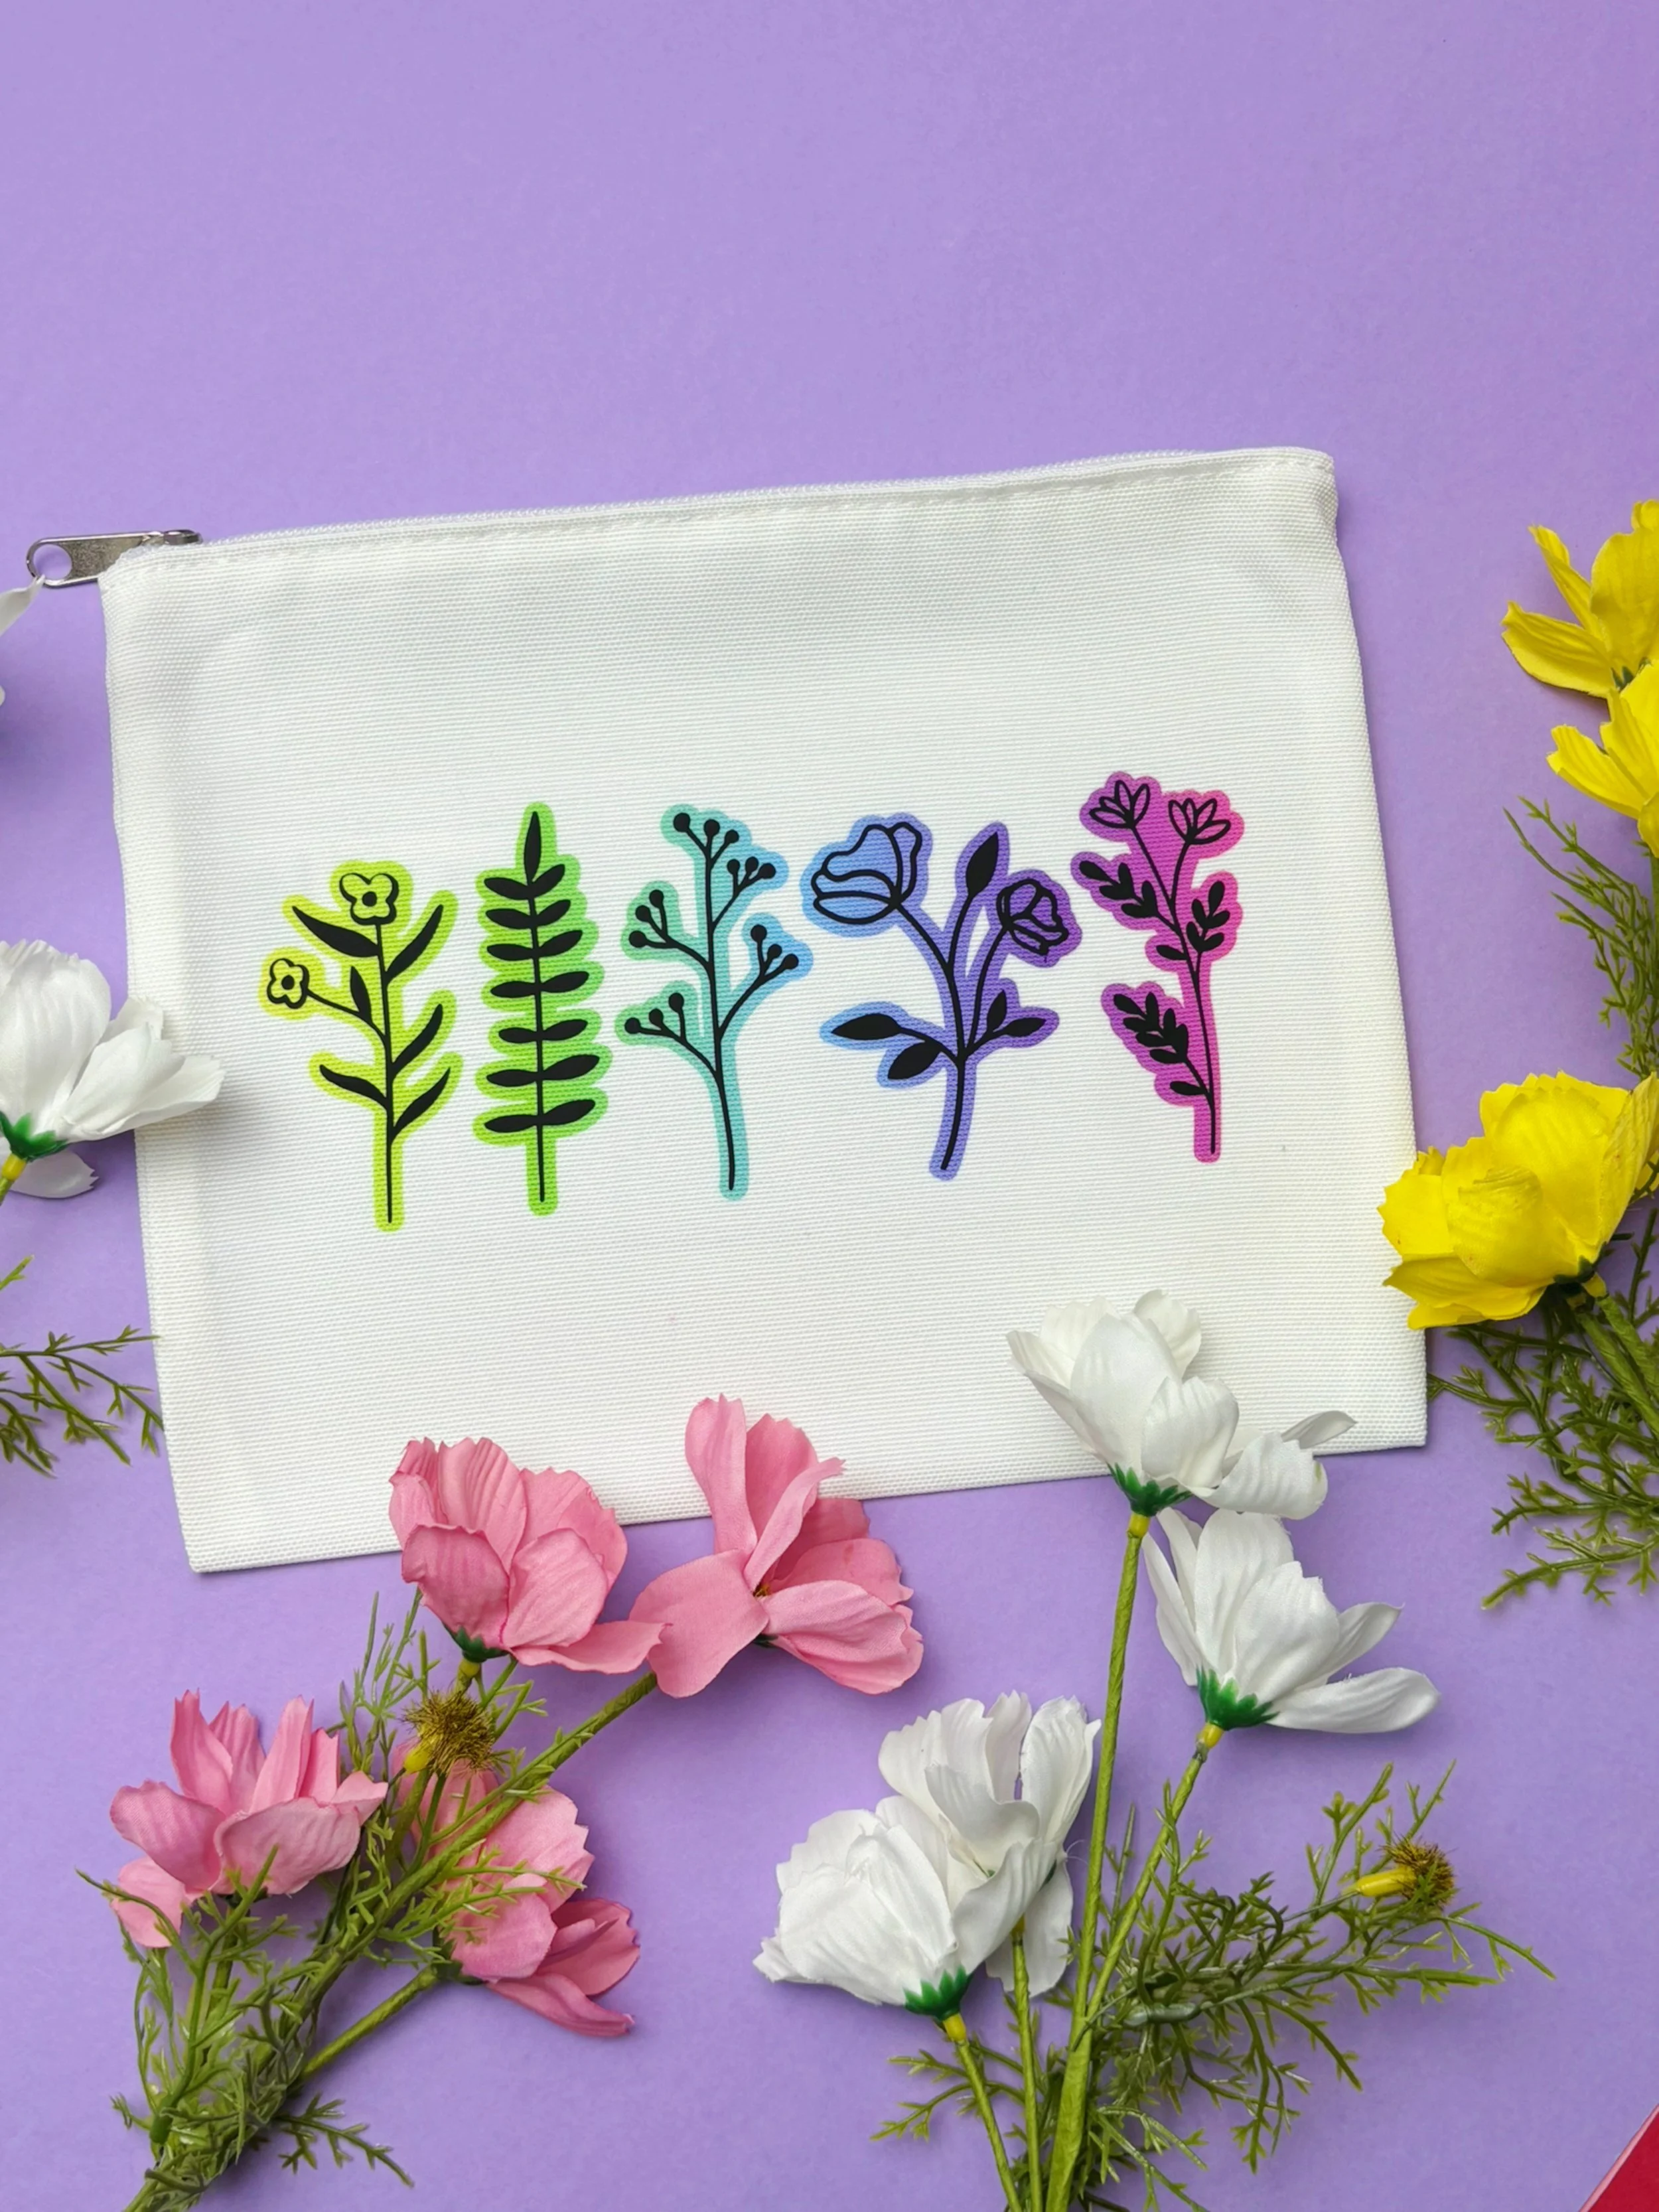
Ready to add a splash of floral charm to your handmade collection? Let me introduce you to this adorable DIY floral makeup bag! Whether you're crafting for personal use, preparing items for your craft stall, or looking to create a unique gift, this makeup bag is the perfect way to showcase your creativity. Ideal for crafters who love to blend practicality with a touch of vibrant, botanical beauty!
Why Crafters Will Love This Floral Makeup Bag 🌸💖
🌸 Charming Floral Design – Featuring a row of colourful, stylized flowers, adding a fresh and artistic touch to your makeup bag. 💄 Perfect for Organization – Ideal for holding makeup, toiletries, or crafting supplies in a stylish and organized way. 🎨 Customizable – Use your favourite colours, fabrics, and embellishments to match your unique style or theme. 💡 Easy to Make – Simple to assemble, making it a great project for crafters of all skill levels.
Follow Along with the Video Tutorial!
For a step-by-step guide, check out this helpful YouTube tutorial that walks you through the entire process. Follow along and enjoy creating your very own floral makeup bag!
📹 Watch the tutorial here: https://www.youtube.com/shorts/tfsrcbuvpr8
🖨️ Available on Cricut Design Space: 👉👉Cricut Design Space👈👈
Tips for Styling Your Floral Makeup Bag 🌸💄
🌸 Use it to organize your makeup or crafting supplies in style. ✨ Pair it with matching accessories for a cohesive look. 🌸 Create a set of different designs for variety in your craft inventory. ✨ Gift it to fellow crafters or customers for a heartfelt and practical surprise.
What You’ll Need to Create It 🛠️🌸
📄 Plain Canvas Makeup Bag – As the base for your design 🎨 Infusible Ink from Cricut – For the floral designs: 👉👉Shop Now👈👈 🖌️ Paintbrushes – Various sizes for detailing 🌸 Optional Embellishments – Sequins, beads, or embroidery thread for extra flair
Thinking about getting a Cricut? I use one for all my projects—it’s a total game-changer.
👉👉 Click here to get a Cricut Maker 4👈👈
Affiliate links help support our small creative business – thank you!
Make It Yours, Make It Beautiful!
This DIY Floral Makeup Bag is more than just a bag—it’s a celebration of your crafting skills and the joy of creating something truly unique and functional. Whether you’re crafting for your next market, a special occasion, or making a heartfelt surprise for someone special, this project is sure to bring smiles and a touch of creativity to your handmade items!
Ready to Get Crafting?
🌸 Gather your supplies, follow the tutorial, and let your creativity bloom!
I can’t wait to see your creations! Share your masterpieces with me @catmadeira on social media. Need more inspiration or have questions? Let’s connect—I’m here to help fuel your creative journey!
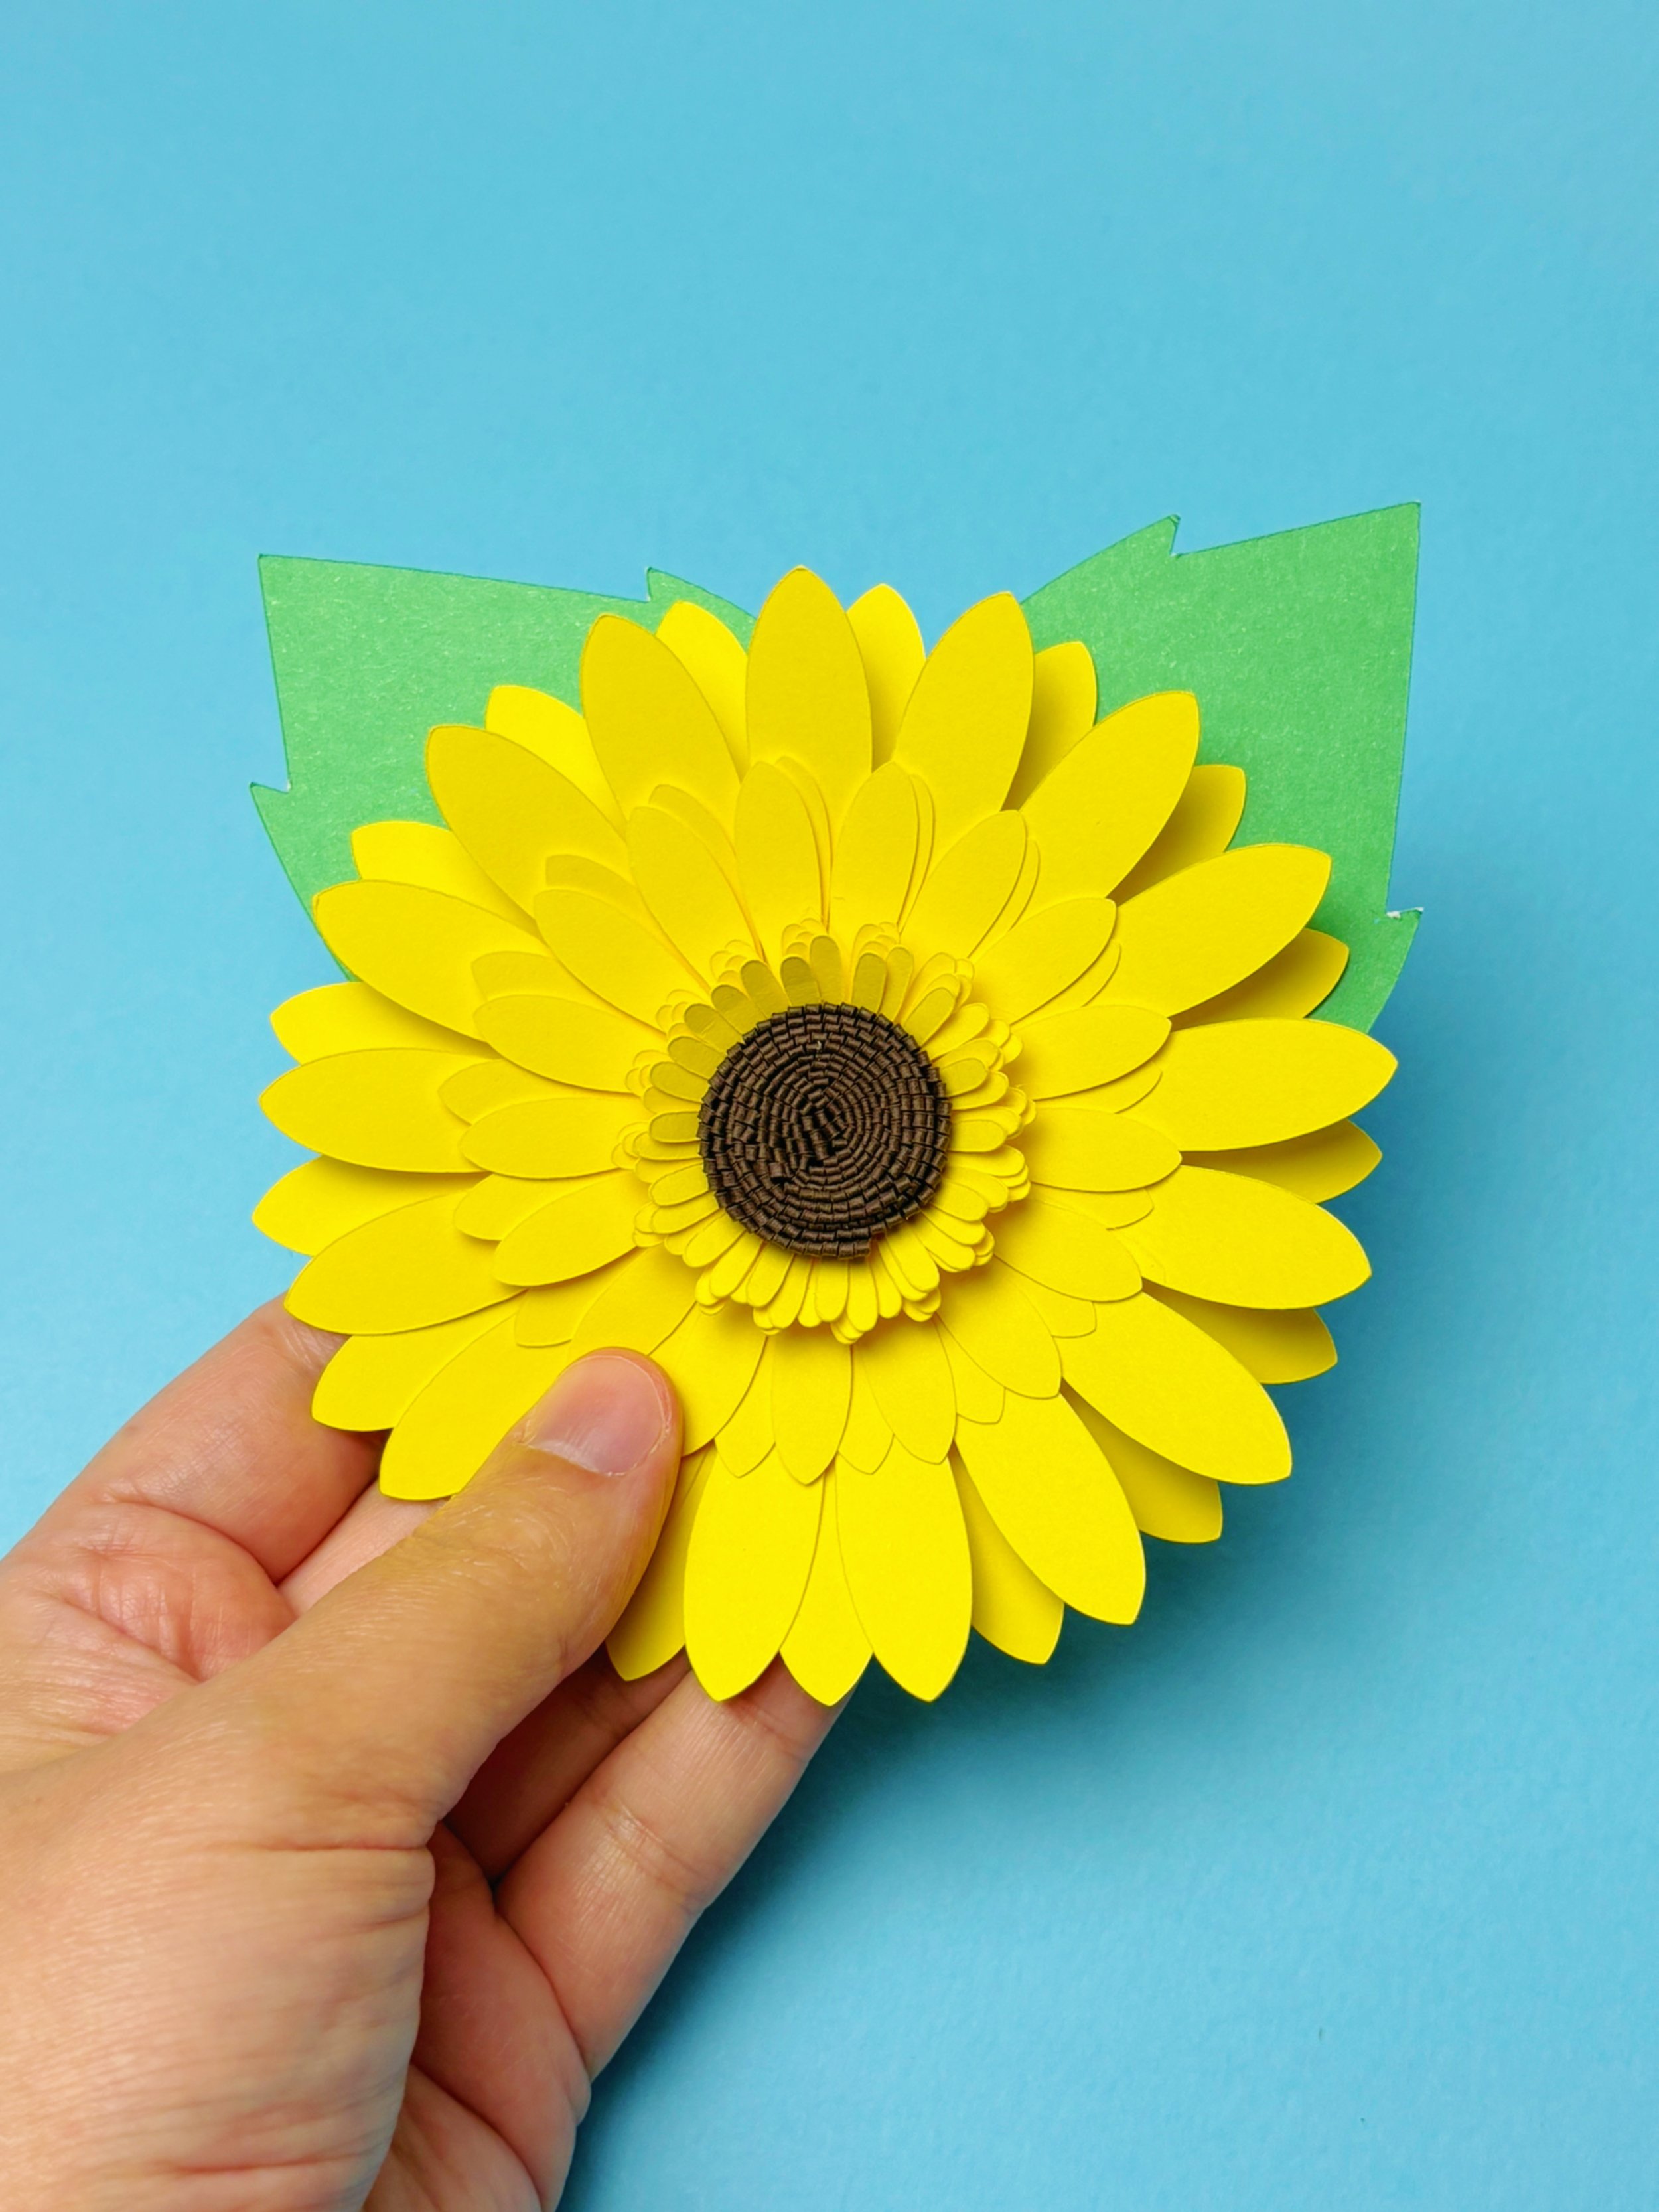
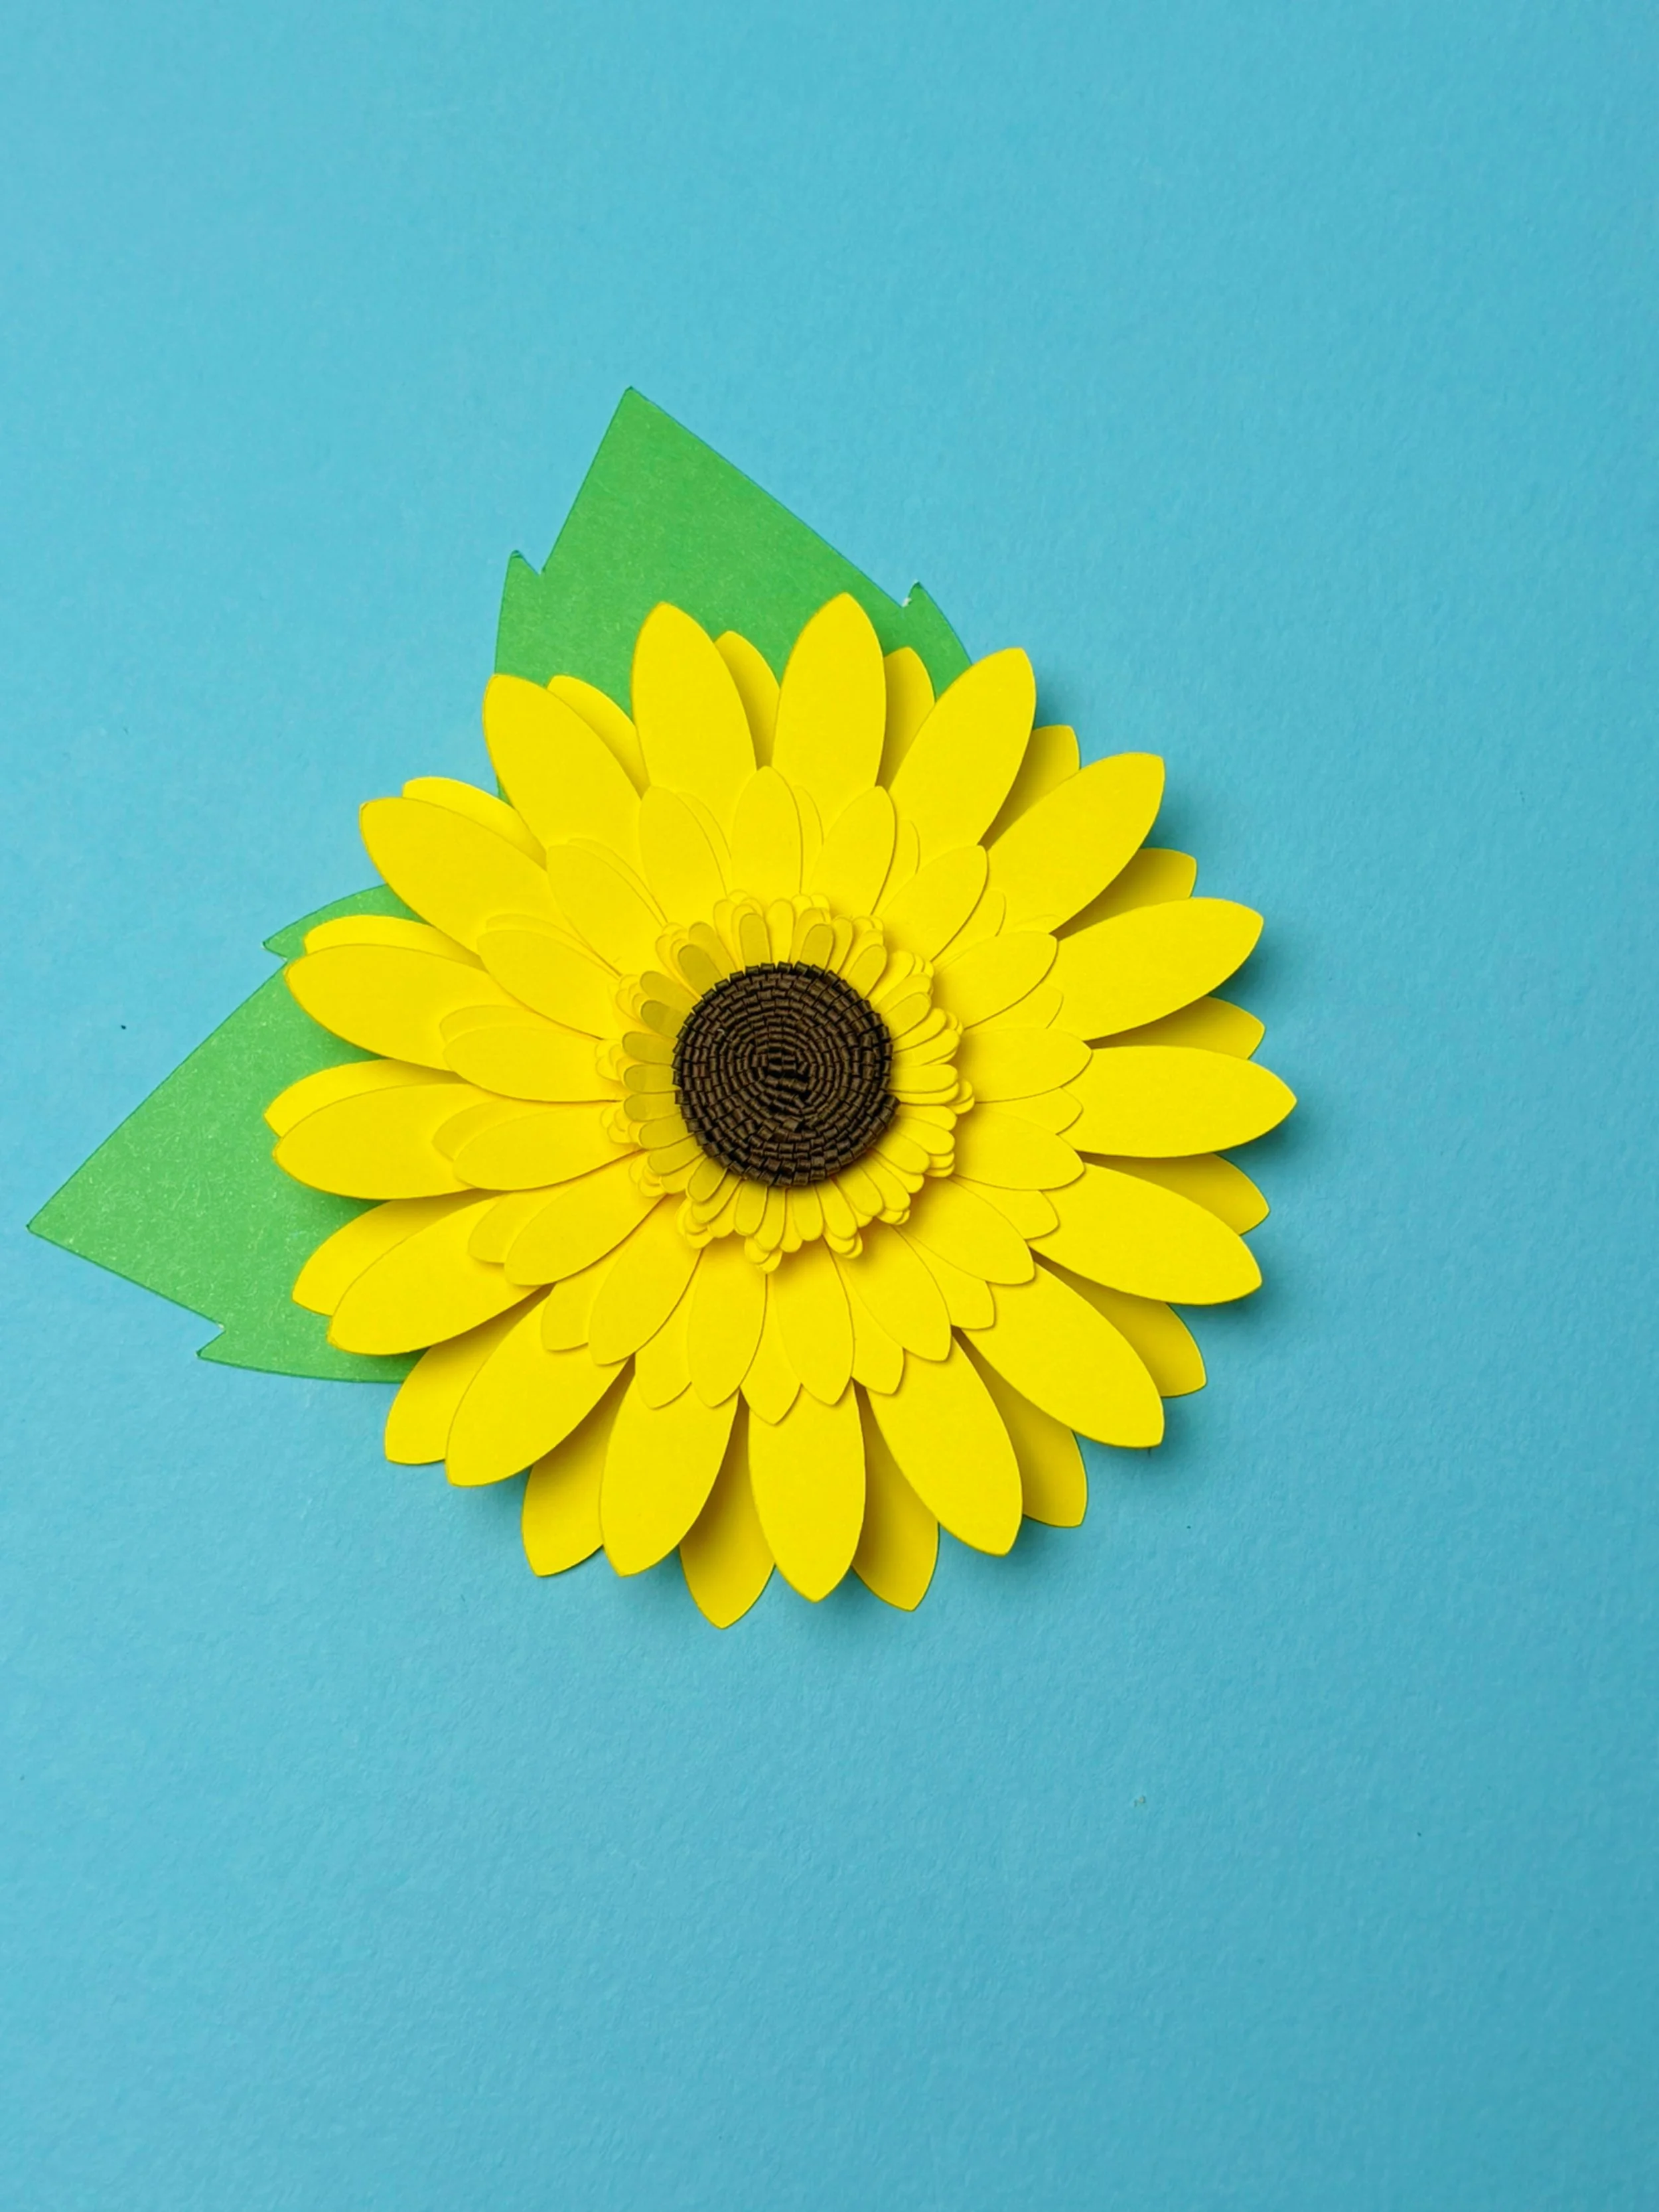
Sunshine Crafting: DIY Paper Sunflower for Bright and Cheerful Decor! 🌻✨
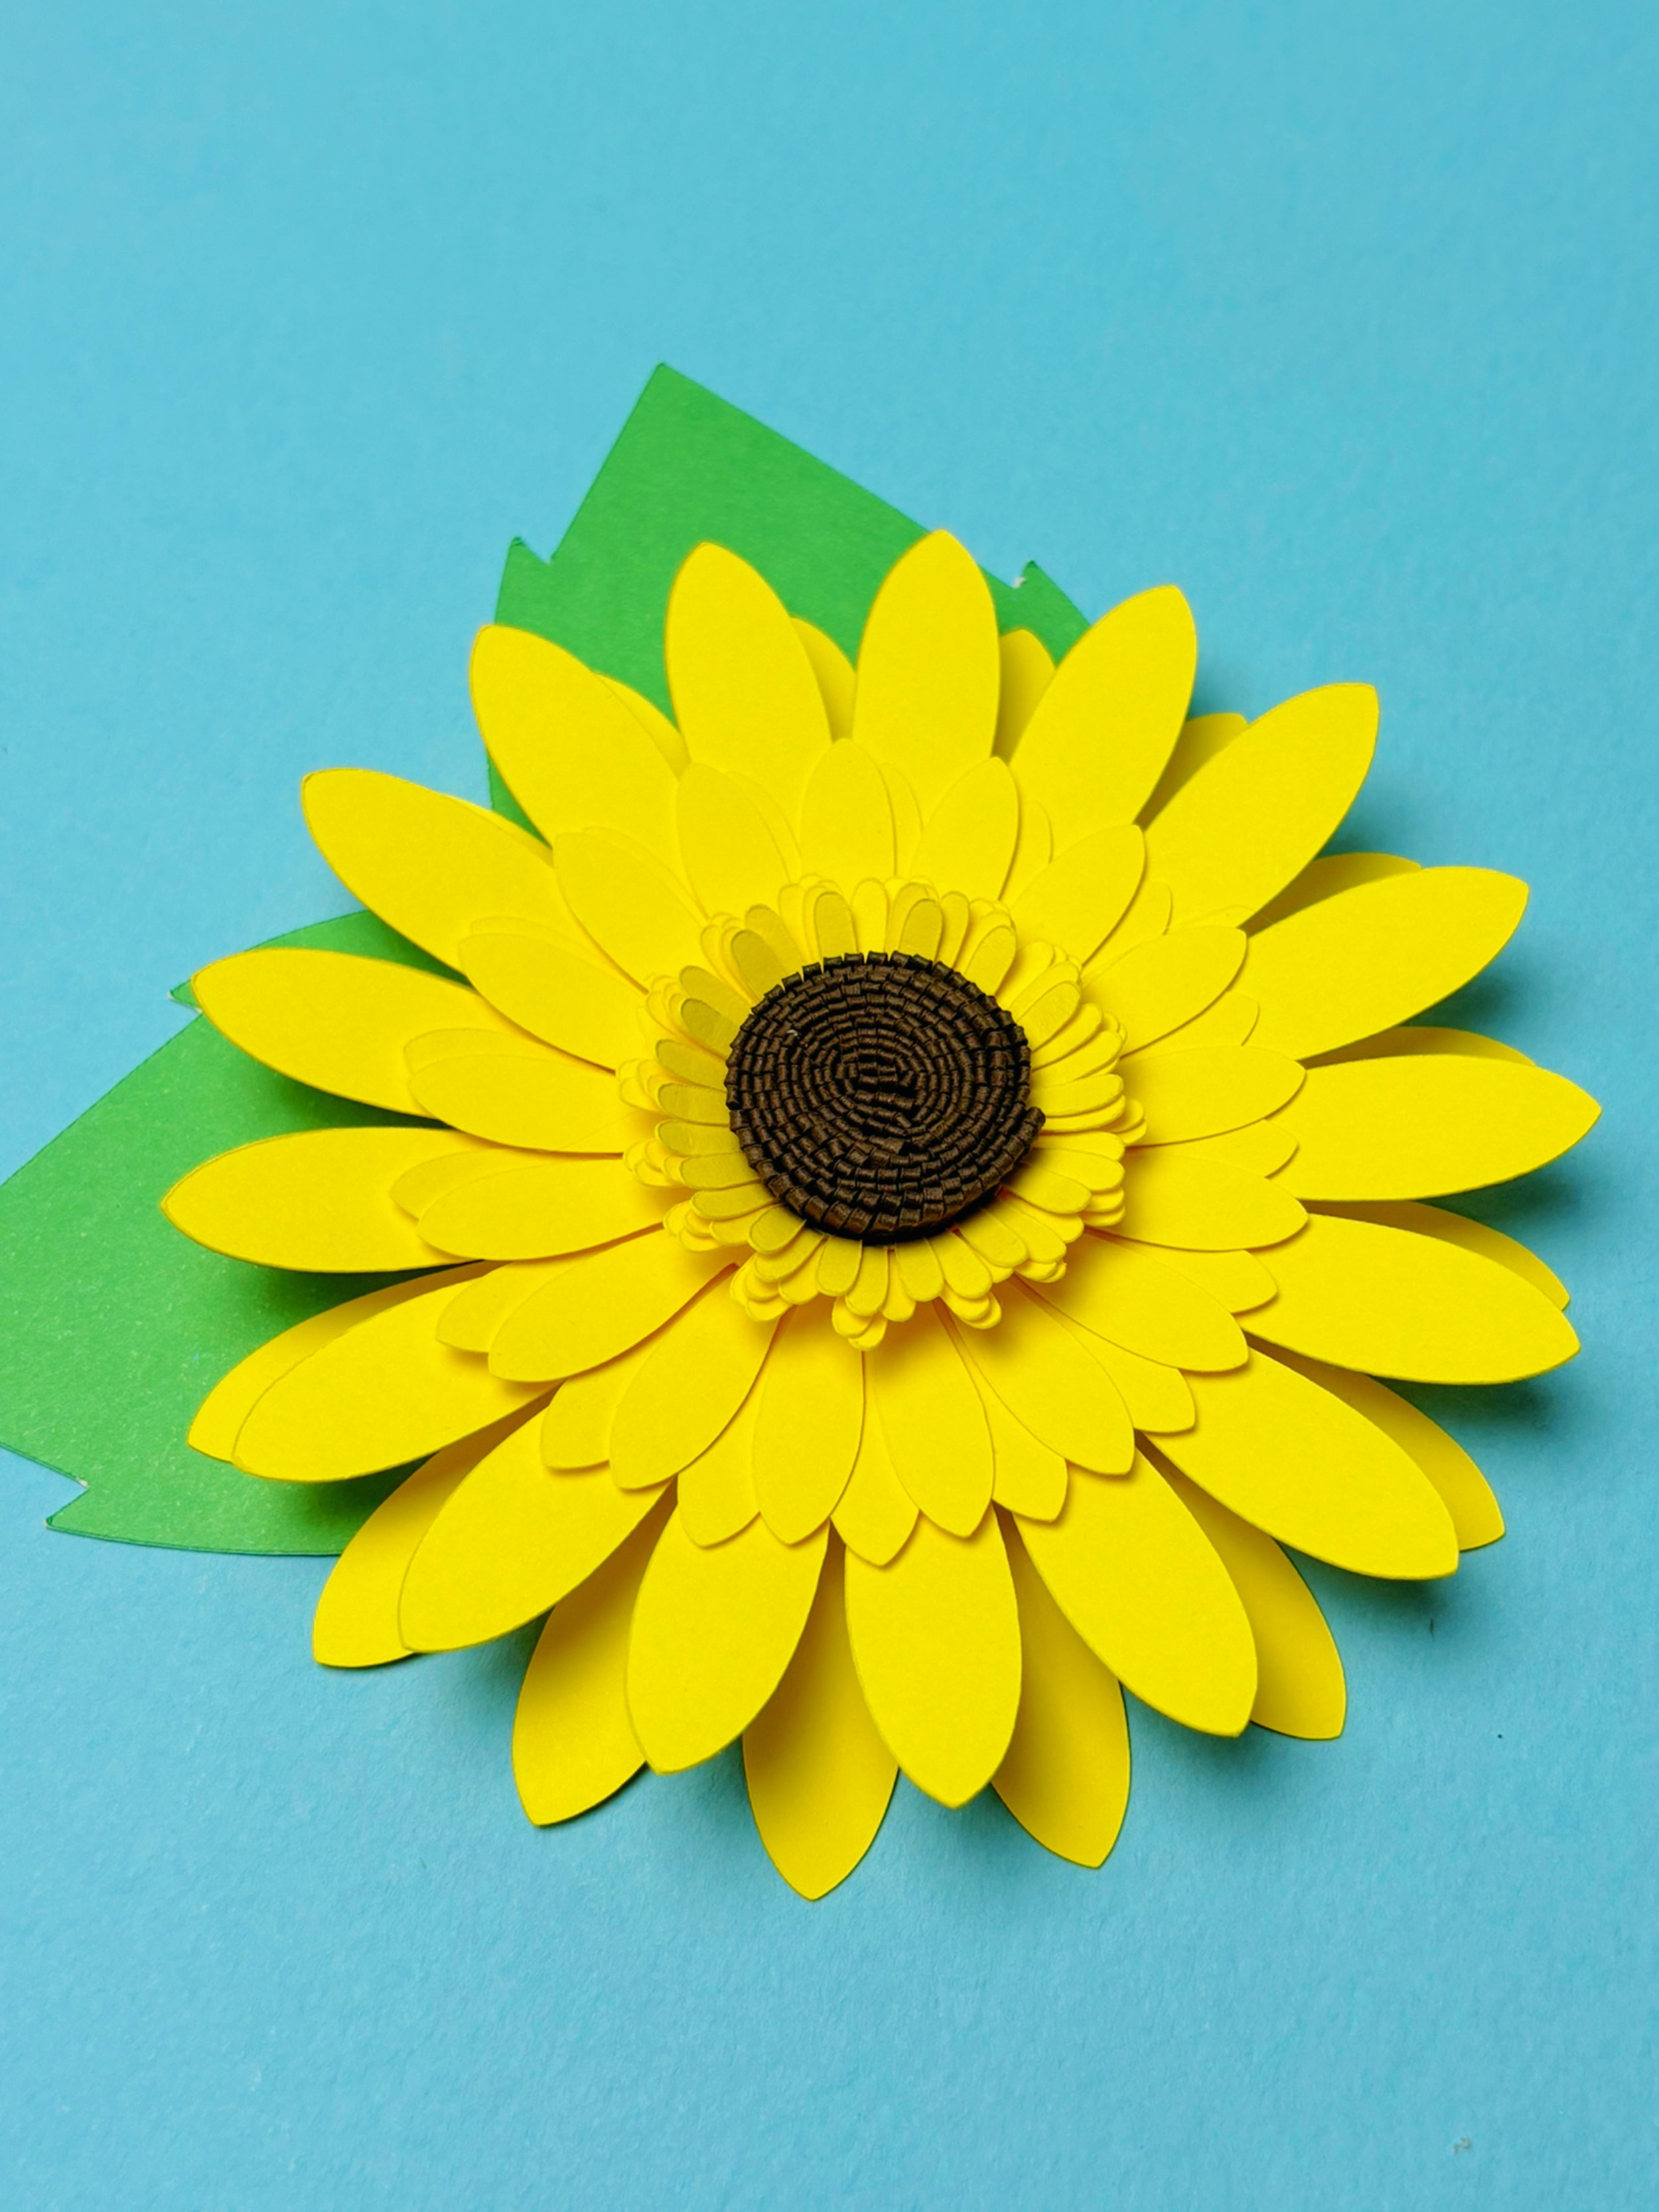
Ready to bring a burst of sunshine and creativity to your crafting projects? Let me introduce you to this stunning DIY paper sunflower! Whether you're decorating your home, preparing items for your craft stall, or looking to create a unique gift, this sunflower is the perfect way to showcase your crafting skills. Ideal for crafters who love to blend vibrant colours with a touch of nature-inspired charm!
Why Crafters Will Adore This Paper Sunflower 🌻💛
🌻 Vibrant Sunflower Design – Featuring bright yellow petals and a detailed brown centre, adding a cheerful and eye-catching touch to your decor. ✨ Perfect for Decor – Ideal for brightening up any space, whether it's your home, craft stall, or a special event. 🎨 Customizable – Use your favourite colours, patterns, and embellishments to match your unique style or theme. 💡 Easy to Make – Simple to assemble, making it a great project for crafters of all skill levels.
Follow Along with the Video Tutorial!
For a step-by-step guide, check out this helpful YouTube tutorial that walks you through the entire process. Follow along and enjoy creating your very own paper sunflower!
📹 Watch the tutorial here: https://www.youtube.com/shorts/UavnVgpVQ_Q
🖨️ Available on Cricut Design Space: 👉👉Cricut Design Space👈👈
Tips for Styling Your Paper Sunflower 🌻✨
🌻 Display it in your home for a cheerful and artistic touch. ✨ Pair it with other handmade decor for a cohesive look. 🌻 Create a set of different designs for variety in your craft inventory. ✨ Gift it to fellow crafters or customers for a heartfelt and vibrant surprise.
What You’ll Need to Create It 🛠️🌻
📄 Colored Cardstock – For the whole flower: 👉👉 Shop Now👈👈 🎨 Crafting Glue – To assemble the sunflower and attach the layers: 👉👉Shop Now👈👈 ✨ Optional Embellishments – Glitter, sequins, or metallic markers for extra sparkle
Thinking about getting a Cricut? I use one for all my projects—it’s a total game-changer.
👉👉 Click here to get a Cricut Maker 4👈👈
Affiliate links help support our small creative business – thank you!
Make It Yours, Make It Bright!
This DIY Paper Sunflower is more than just a decoration—it’s a celebration of your crafting skills and the joy of creating something truly unique and cheerful. Whether you’re crafting for your next market, a special occasion, or making a heartfelt surprise for someone special, this project is sure to bring smiles and a touch of creativity to your handmade creations!
Ready to Get Crafting?
🌻 Gather your supplies, follow the tutorial, and let your creativity shine!
I can’t wait to see your creations! Share your masterpieces with me @catmadeira on social media. Need more inspiration or have questions? Let’s connect—I’m here to help fuel your creative journey!
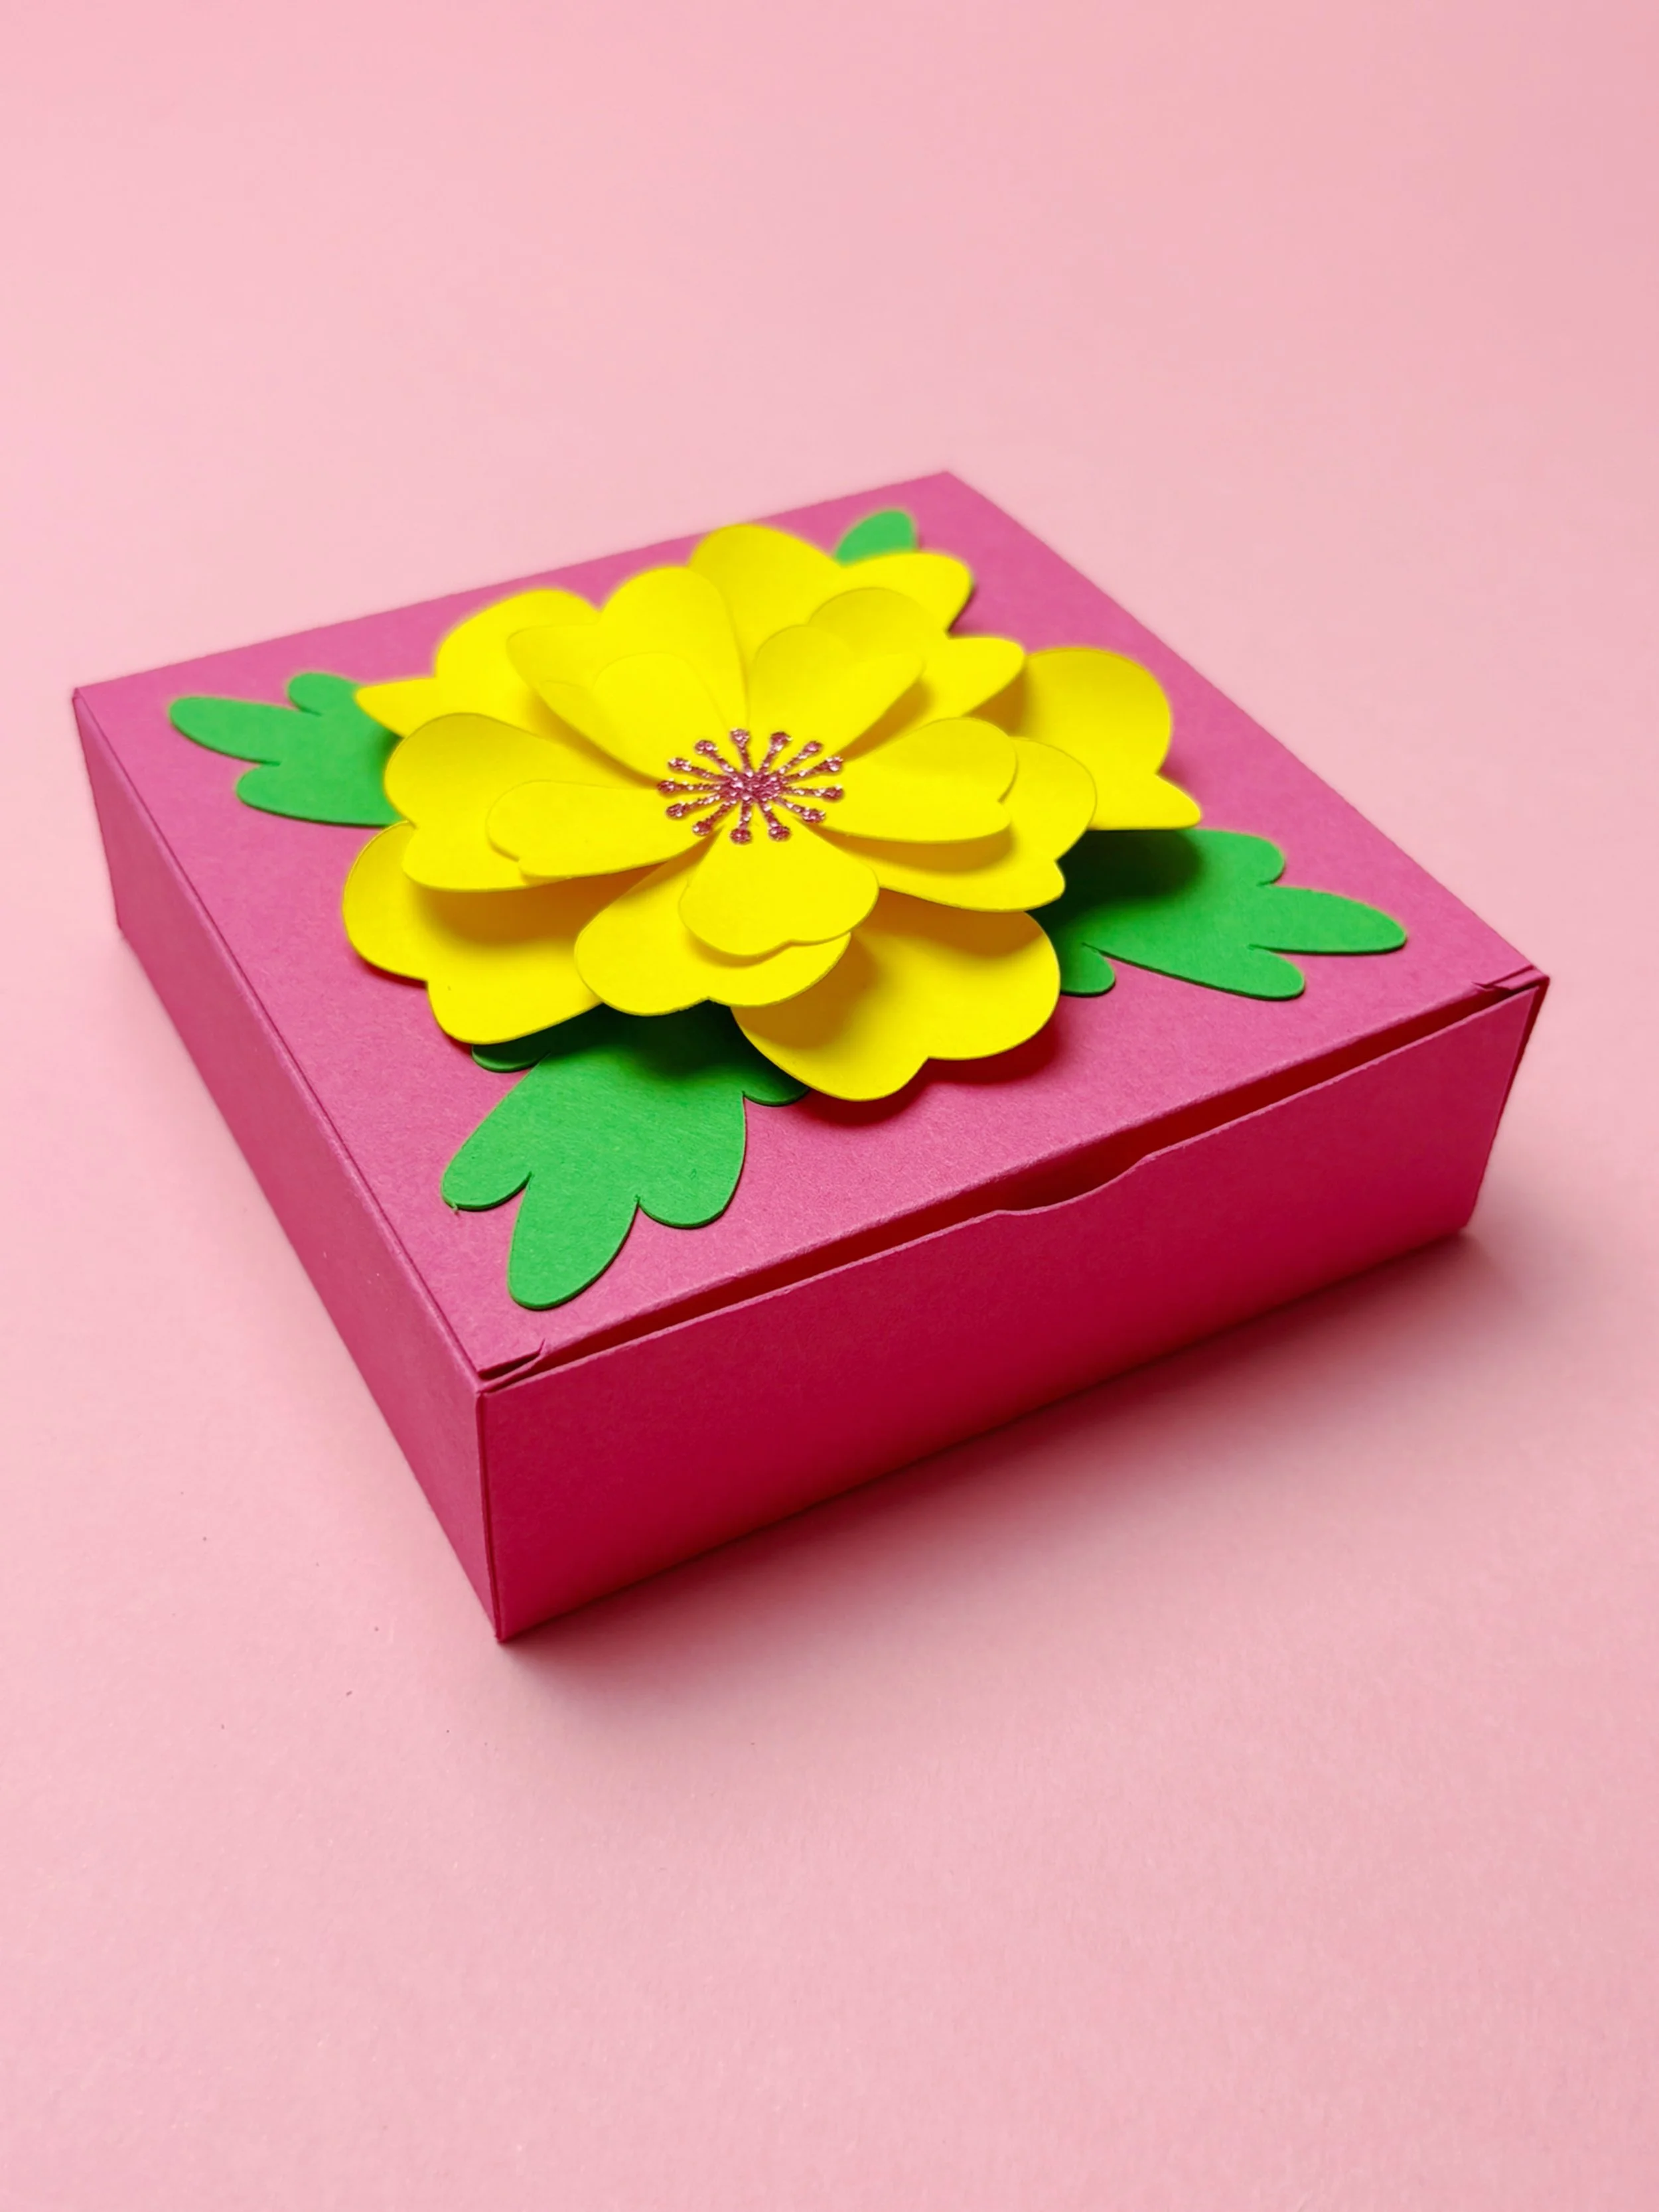
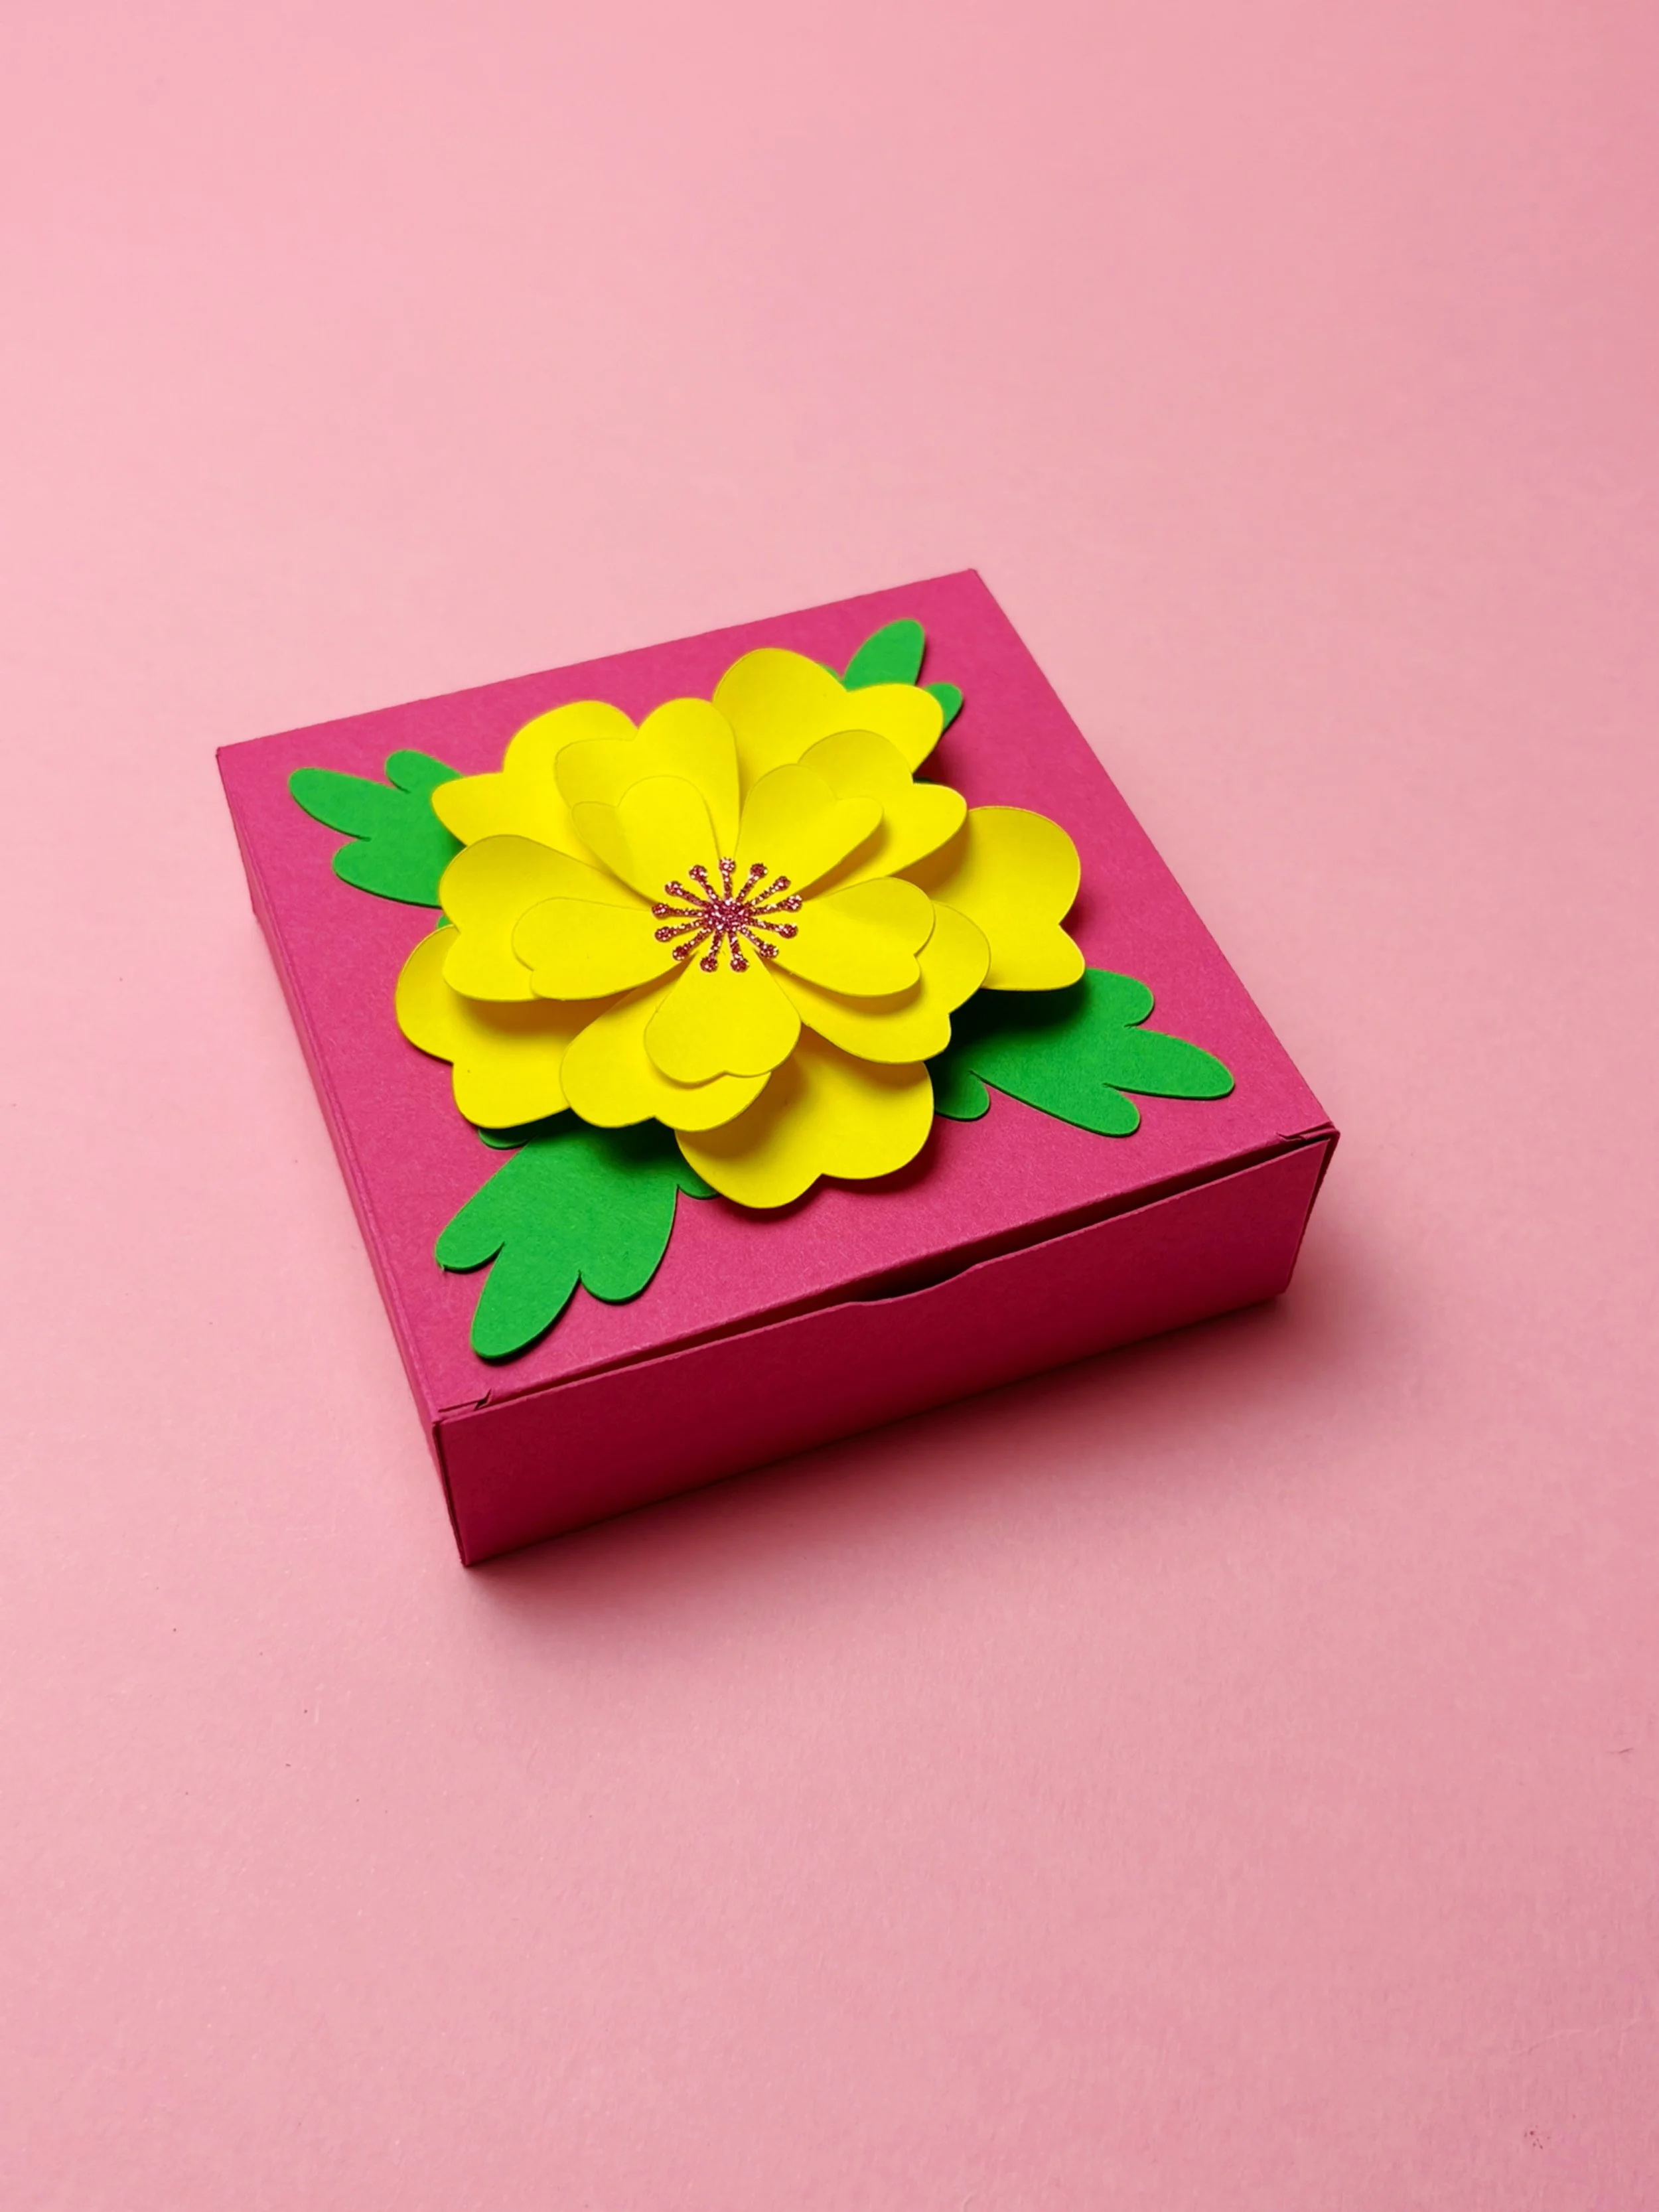
Bloom with Creativity: DIY Floral Gift Box for Handmade Charm! 🌼🎁
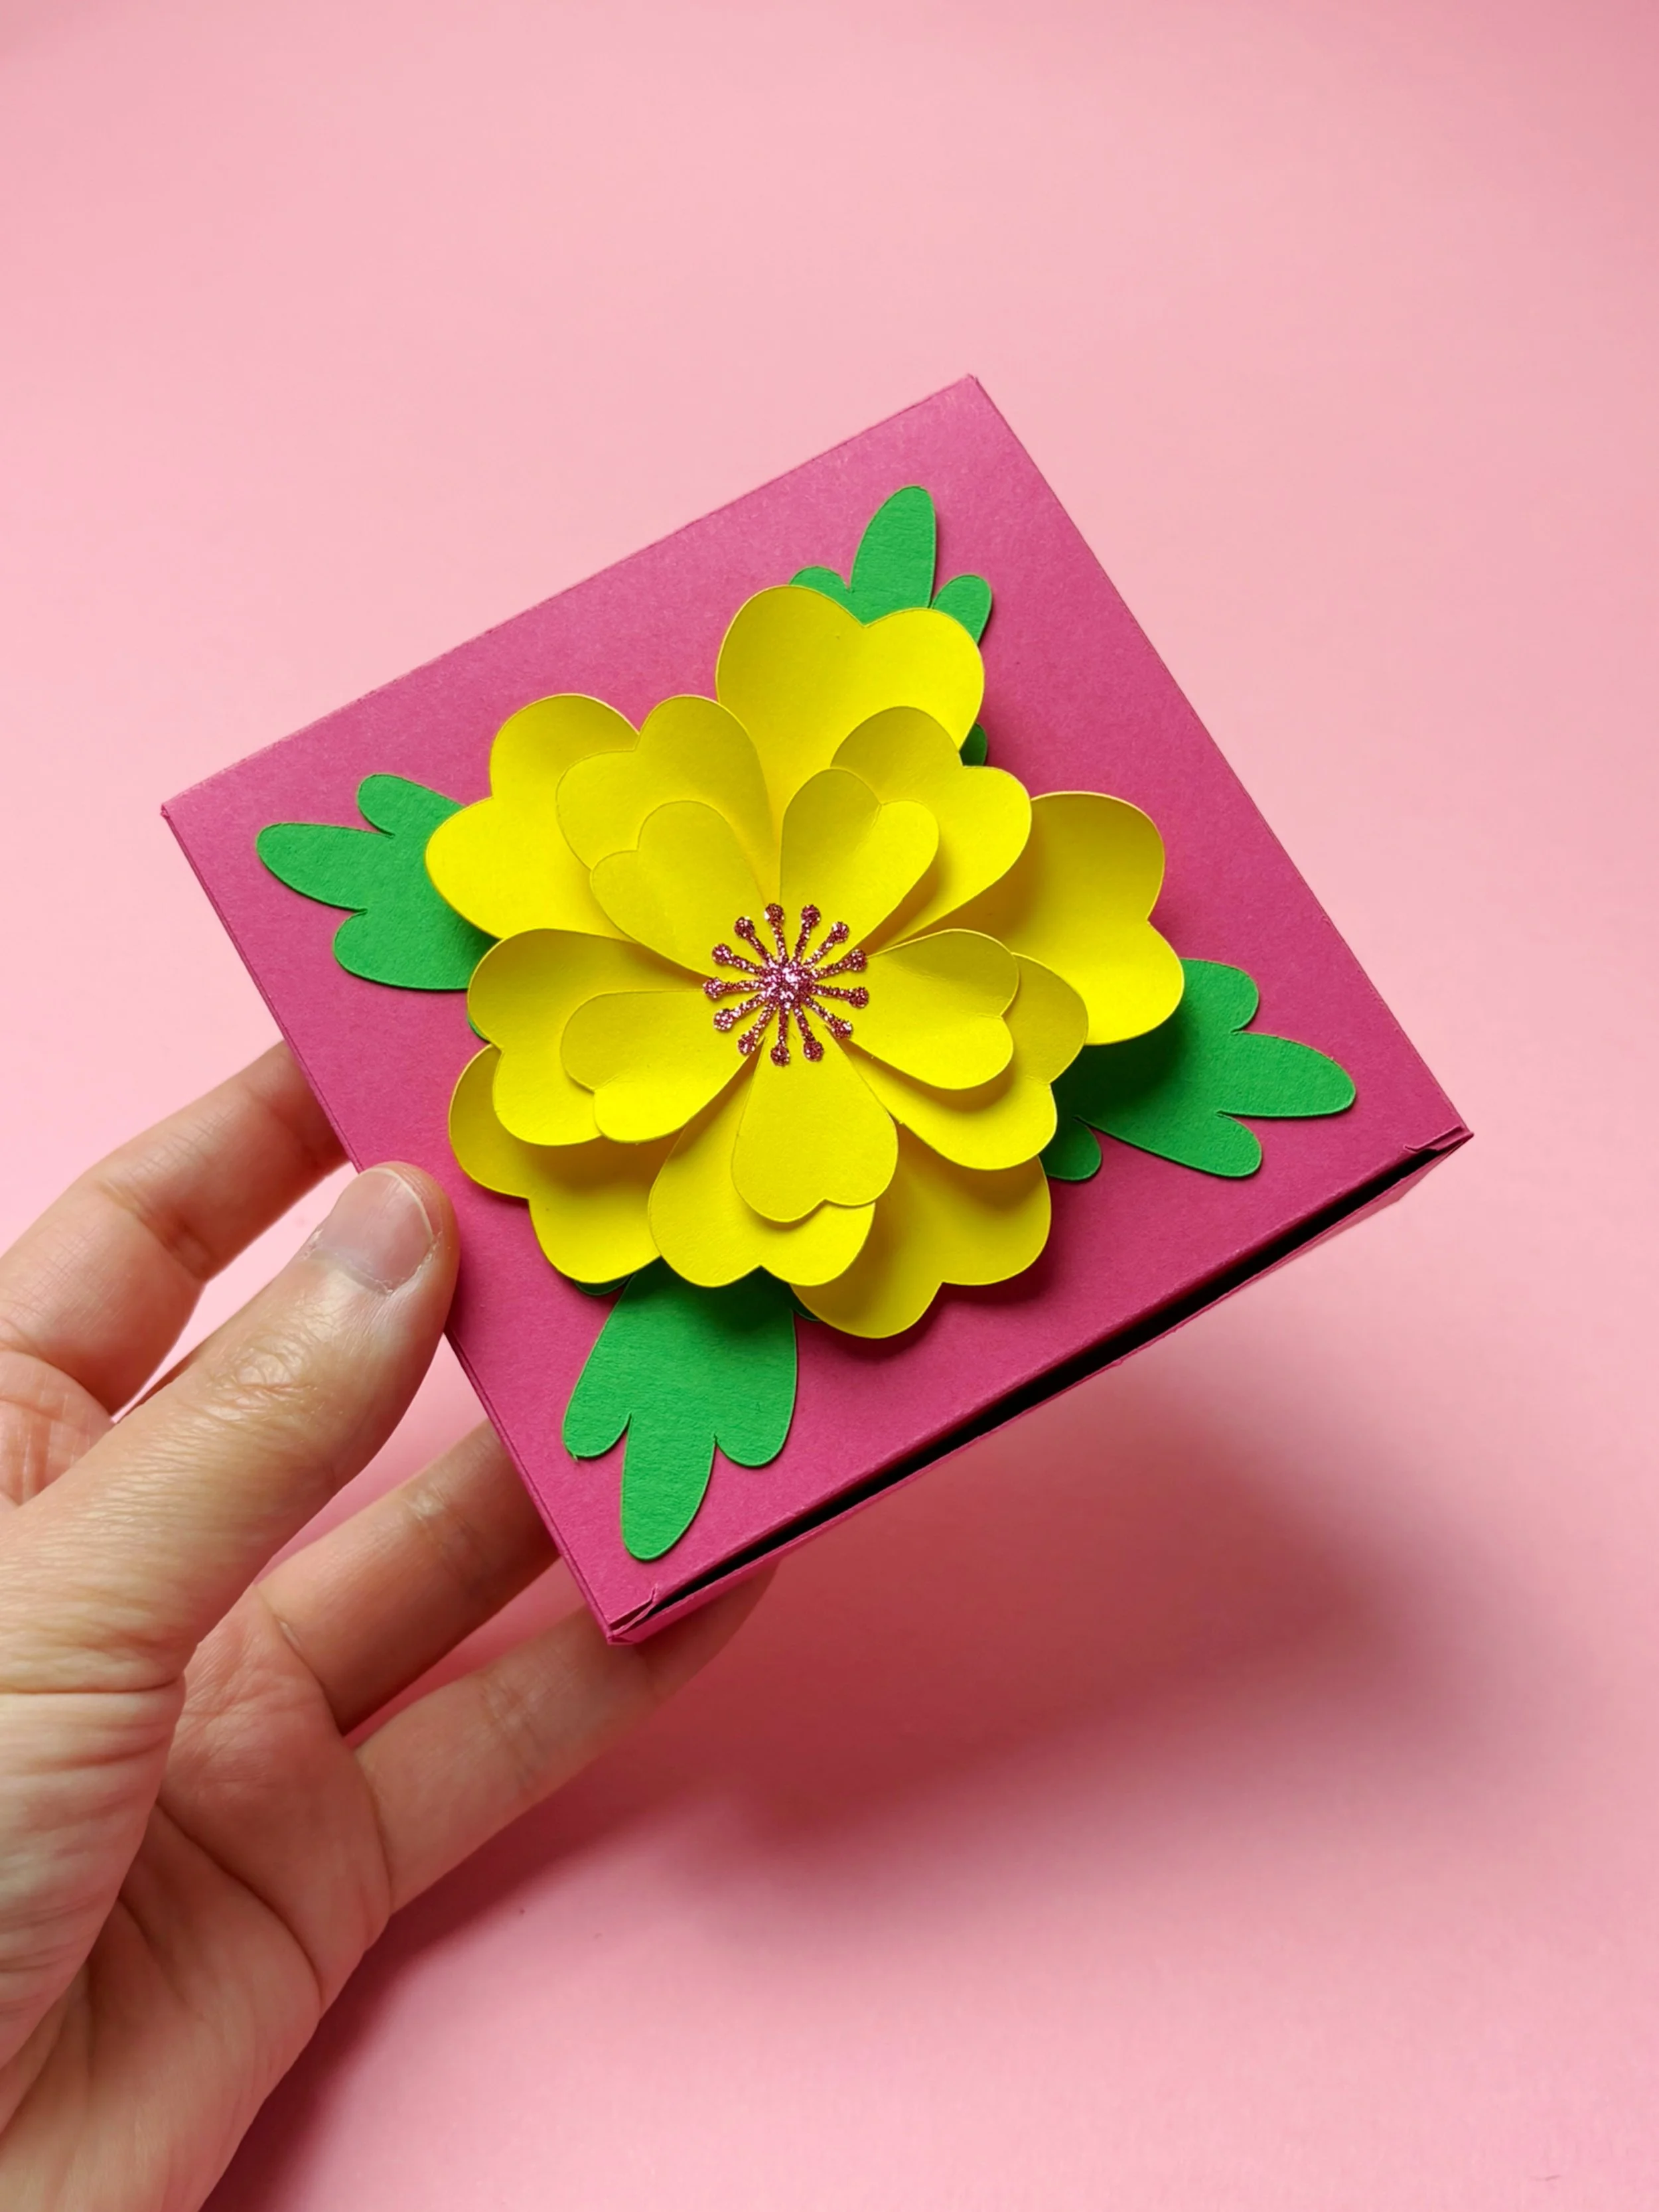
Ready to add a burst of colour and creativity to your gift-giving? Let me introduce you to this adorable DIY floral gift box! Whether you're preparing a special gift for a loved one, creating unique items for your craft stall, or just looking to brighten someone's day, this floral gift box is the perfect way to showcase your crafting skills. Ideal for crafters who love to blend practicality with a touch of vibrant, botanical beauty!
Why Crafters Will Love This Floral Gift Box 🌼💖
🌼 Vibrant Floral Design – Featuring a cheerful yellow flower with green leaves, adding a fresh and artistic touch to your gift box. 🎁 Perfect for Gifting – Ideal for holding small treats, jewellery, or handmade goodies in a stylish and personalized way. 🎨 Customizable – Use your favourite colours, patterns, and embellishments to match your unique style or theme. 💡 Easy to Make – Simple to assemble, making it a great project for crafters of all skill levels.
Follow Along with the Video Tutorial!
For a step-by-step guide, check out this helpful YouTube tutorial that walks you through the entire process. Follow along and enjoy creating your very own floral gift box!
📹 Watch the tutorial here: https://www.youtube.com/shorts/7oR9isBTHsU
🖨️ Available on Cricut Design Space: 👉👉Cricut Design Space👈👈
Tips for Styling Your Floral Gift Box 🌼🎁
🌼 Use it to package small gifts or treats for a cheerful presentation. ✨ Pair it with matching ribbons or tags for a cohesive look. 🌼 Create a set of different designs for variety in your craft inventory. ✨ Gift it to fellow crafters or customers for a heartfelt and vibrant surprise.
What You’ll Need to Create It 🛠️🌼
📄 Coloured Cardstock – For the box and flower: 👉👉 Shop Now👈👈 ✨Glitter Cardstock Paper: Add a sparkle to your crafts: 👉👉Shop Now👈👈 🎨 Crafting Glue –to keep it all together: 👉👉Shop Now👈👈 ✨ Optional Embellishments – Glitter, sequins, or metallic markers for extra sparkle
Thinking about getting a Cricut? I use one for all my projects—it’s a total game-changer.
👉👉 Click here to get a Cricut Maker 4👈👈
Affiliate links help support our small creative business – thank you!
Make It Yours, Make It Beautiful!
This DIY Floral Gift Box is more than just a box—it’s a celebration of your crafting skills and the joy of creating something truly unique and charming. Whether you’re crafting for your next market, a special occasion, or making a heartfelt surprise for someone special, this project is sure to bring smiles and a touch of creativity to your handmade gifts!
Ready to Get Crafting?
🌼 Gather your supplies, follow the tutorial, and let your creativity bloom!
I can’t wait to see your creations! Share your masterpieces with me @catmadeira on social media. Need more inspiration or have questions? Let’s connect—I’m here to help fuel your creative journey!
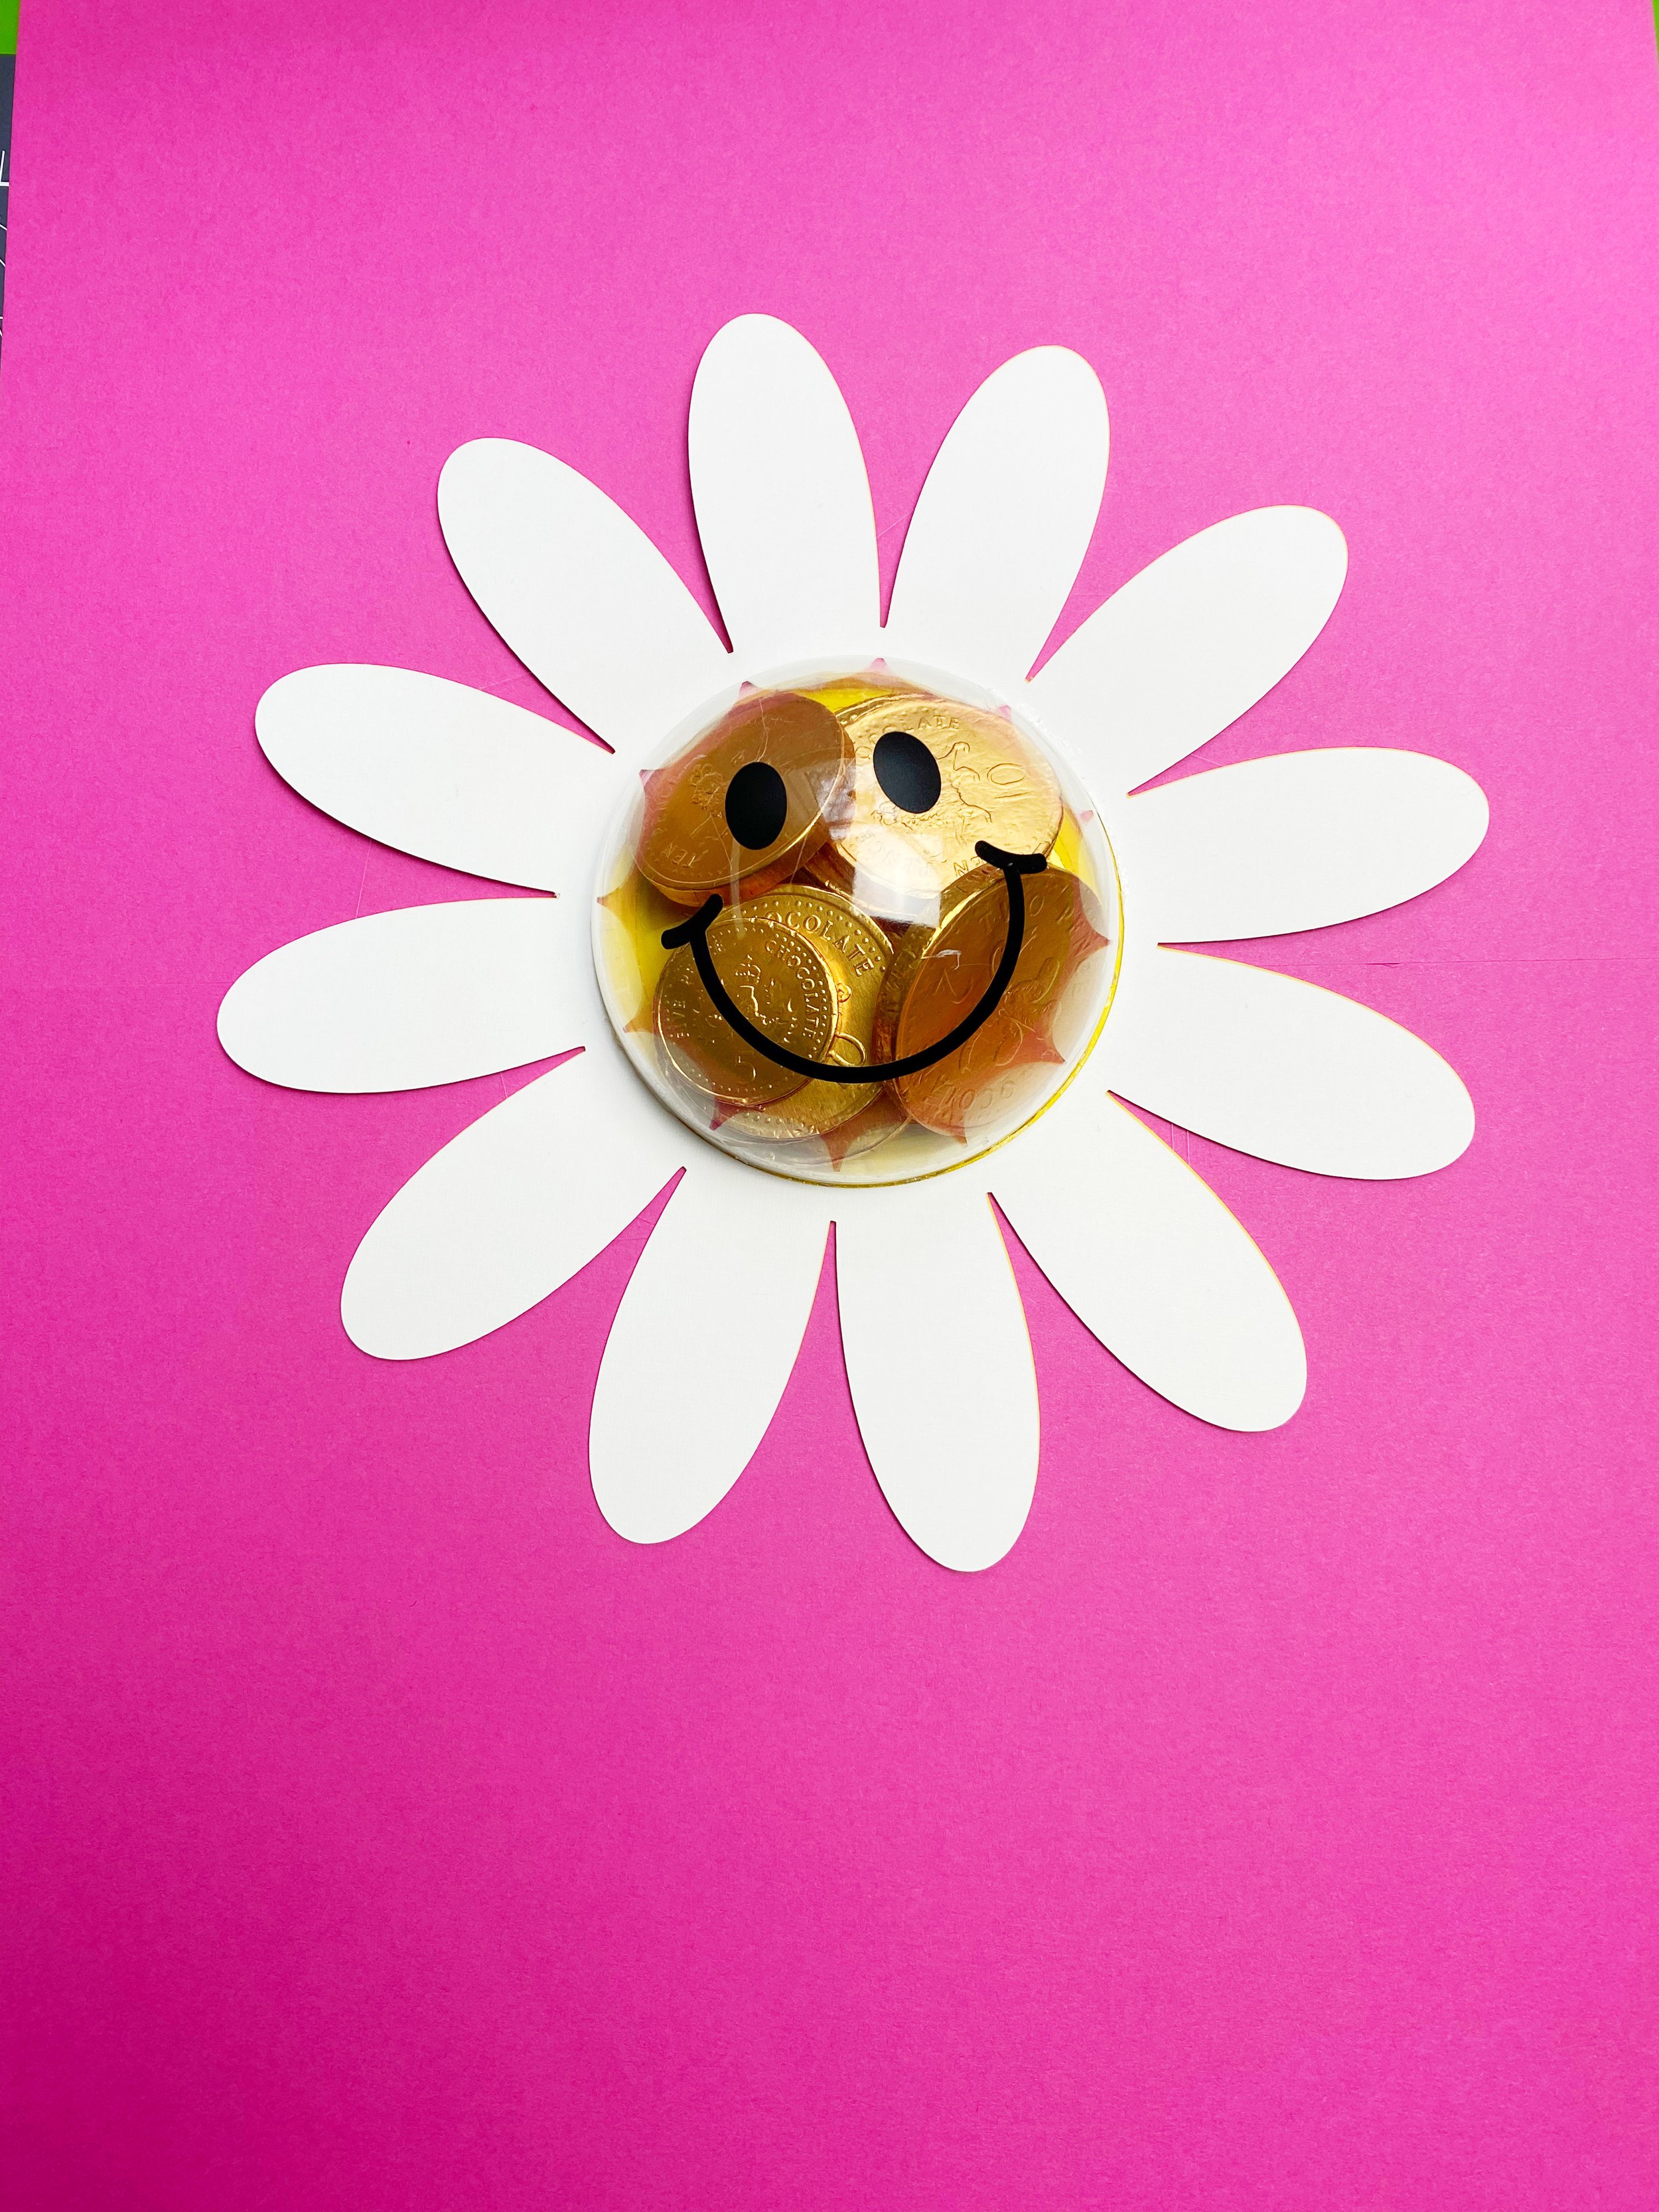
Sweet Smiles: DIY Happy Daisy Candy Dome for Cheerful Gifting! 🌼🍬
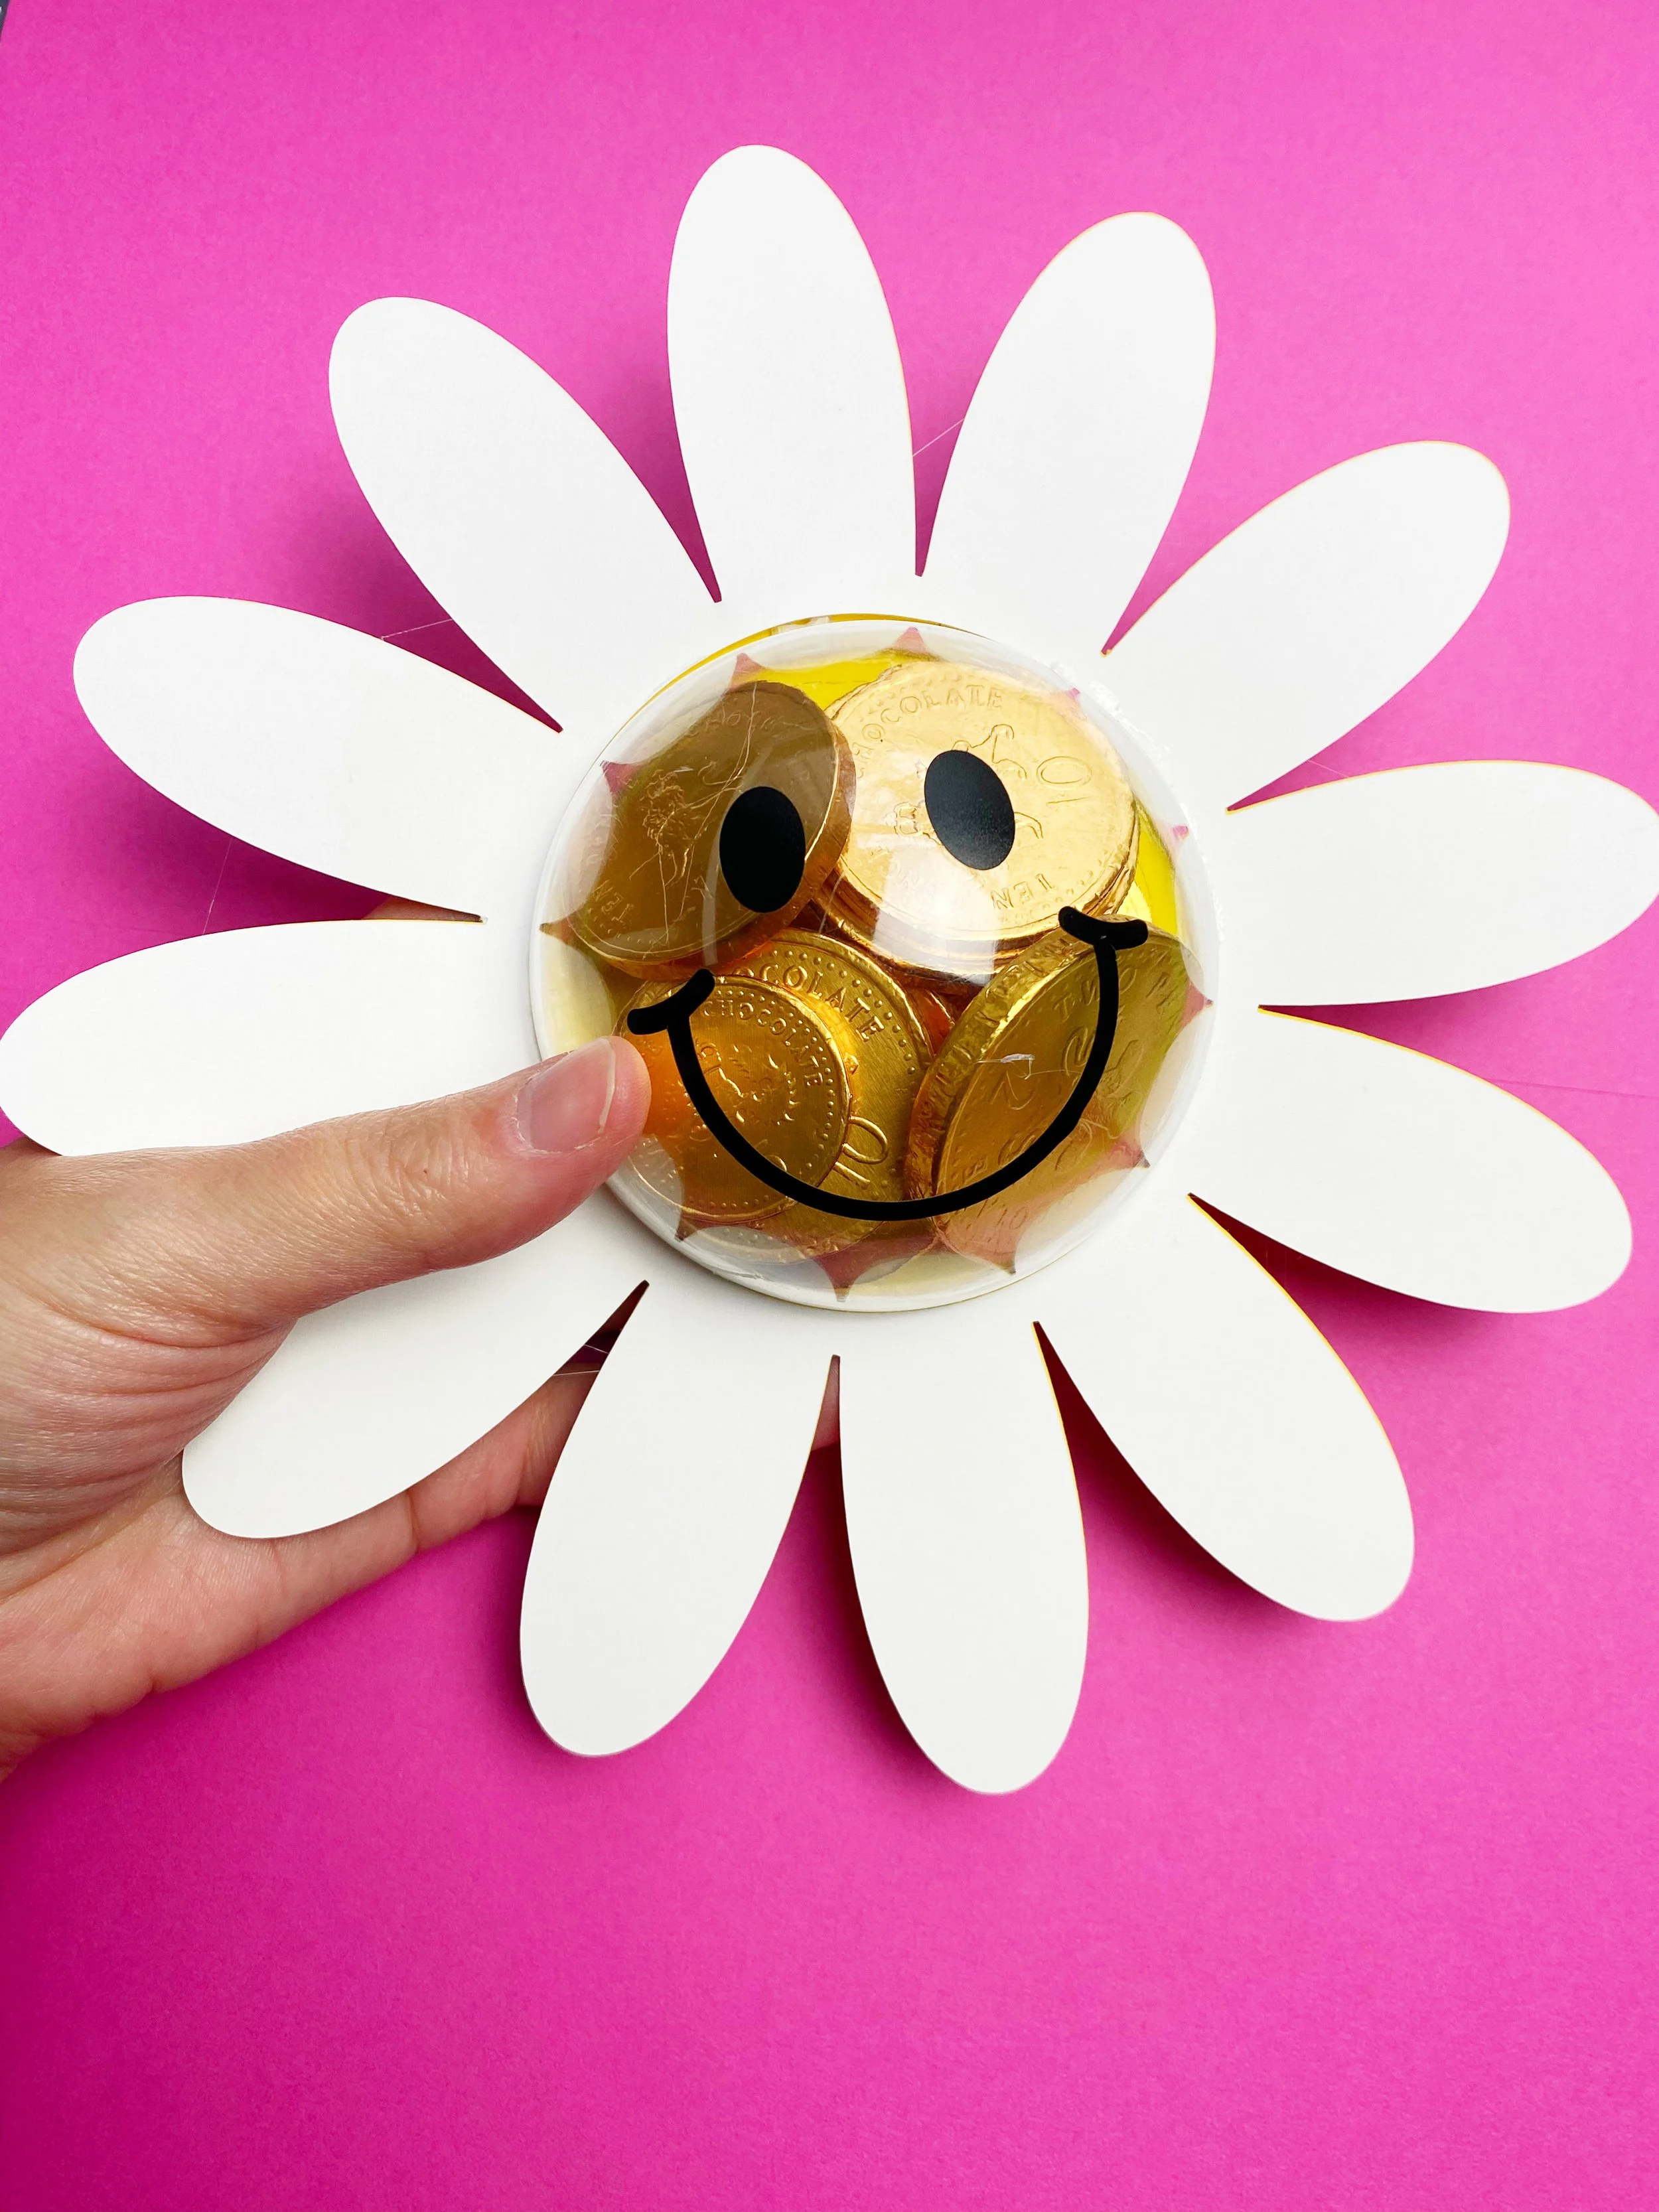
Ready to bring a dose of happiness and creativity to your handmade gifts? Let me introduce you to this delightful DIY Happy Daisy Candy Dome! Perfect for holding chocolates, candies, or small treats, this cheerful daisy design is an ideal way to showcase your crafting skills while spreading joy. Whether you're preparing gifts for loved ones, your craft stall, or a special workshop, this project is sure to bring smiles and a touch of handmade charm to your creations!
Why Crafters Will Love This Happy Daisy Candy Dome 🌼💛
🌼 Playful Daisy Design – Featuring a cheerful white daisy with a smiling face, adding a whimsical and joyful touch to your candy dome. 🍬 Perfect for Sweet Treats – Ideal for packaging chocolates, candies, or other small delights for any occasion. 🎨 Customizable – Use your favourite colours, patterns, and embellishments to match your unique style or theme. 💡 Easy to Make – Simple to assemble, making it a great project for crafters of all skill levels.
Follow Along with the Video Tutorial!
For a step-by-step guide, check out this helpful YouTube tutorial that walks you through the entire process. Follow along and enjoy creating your very own Happy Daisy Candy Dome!
📹 Watch the tutorial here: https://www.youtube.com/shorts/dw5r7IrANxA
🖨️ Available on Cricut Design Space: 👉👉Cricut Design Space👈👈

Tips for Styling Your Happy Daisy Candy Dome 🌼🍬
🌼 Use it to package candies or chocolates for a cheerful presentation. ✨ Pair it with matching ribbons or tags for a cohesive look. 🌼 Create a set of different designs for variety in your craft inventory. ✨ Gift it to fellow crafters or customers for a heartfelt and sweet surprise.
What You’ll Need to Create It 🛠️🌼
📄 Premium Cardstock – For the daisy: 👉👉 Shop Now👈👈 📄 Clear Plastic Dome – To hold the candies 🎨 Black vinyl – For the smiling face details: 👉👉 Shop Now👈👈 🎨 Crafting Glue –to keep it all together: 👉👉Shop Now👈👈 🍬 Candies or Chocolates – To fill the dome ✨ Optional Embellishments – Glitter, sequins, or metallic markers for extra sparkle
Thinking about getting a Cricut? I use one for all my projects—it’s a total game-changer.
👉👉 Click here to get a Cricut Maker 4👈👈
Affiliate links help support our small creative business – thank you!
Make It Yours, Make It Joyful!
This DIY Happy Daisy Candy Dome is more than just a candy holder—it’s a celebration of your crafting skills and the joy of creating something truly special and cheerful. Whether you’re crafting for your next market, a special occasion, or making a heartfelt surprise for someone special, this project is sure to bring smiles and a touch of creativity to your handmade gifts!
Ready to Get Crafting?
🌼 Gather your supplies, follow the tutorial, and let your creativity bloom!
I can’t wait to see your creations! Share your masterpieces with me @catmadeira on social media. Need more inspiration or have questions? Let’s connect—I’m here to help fuel your creative journey!
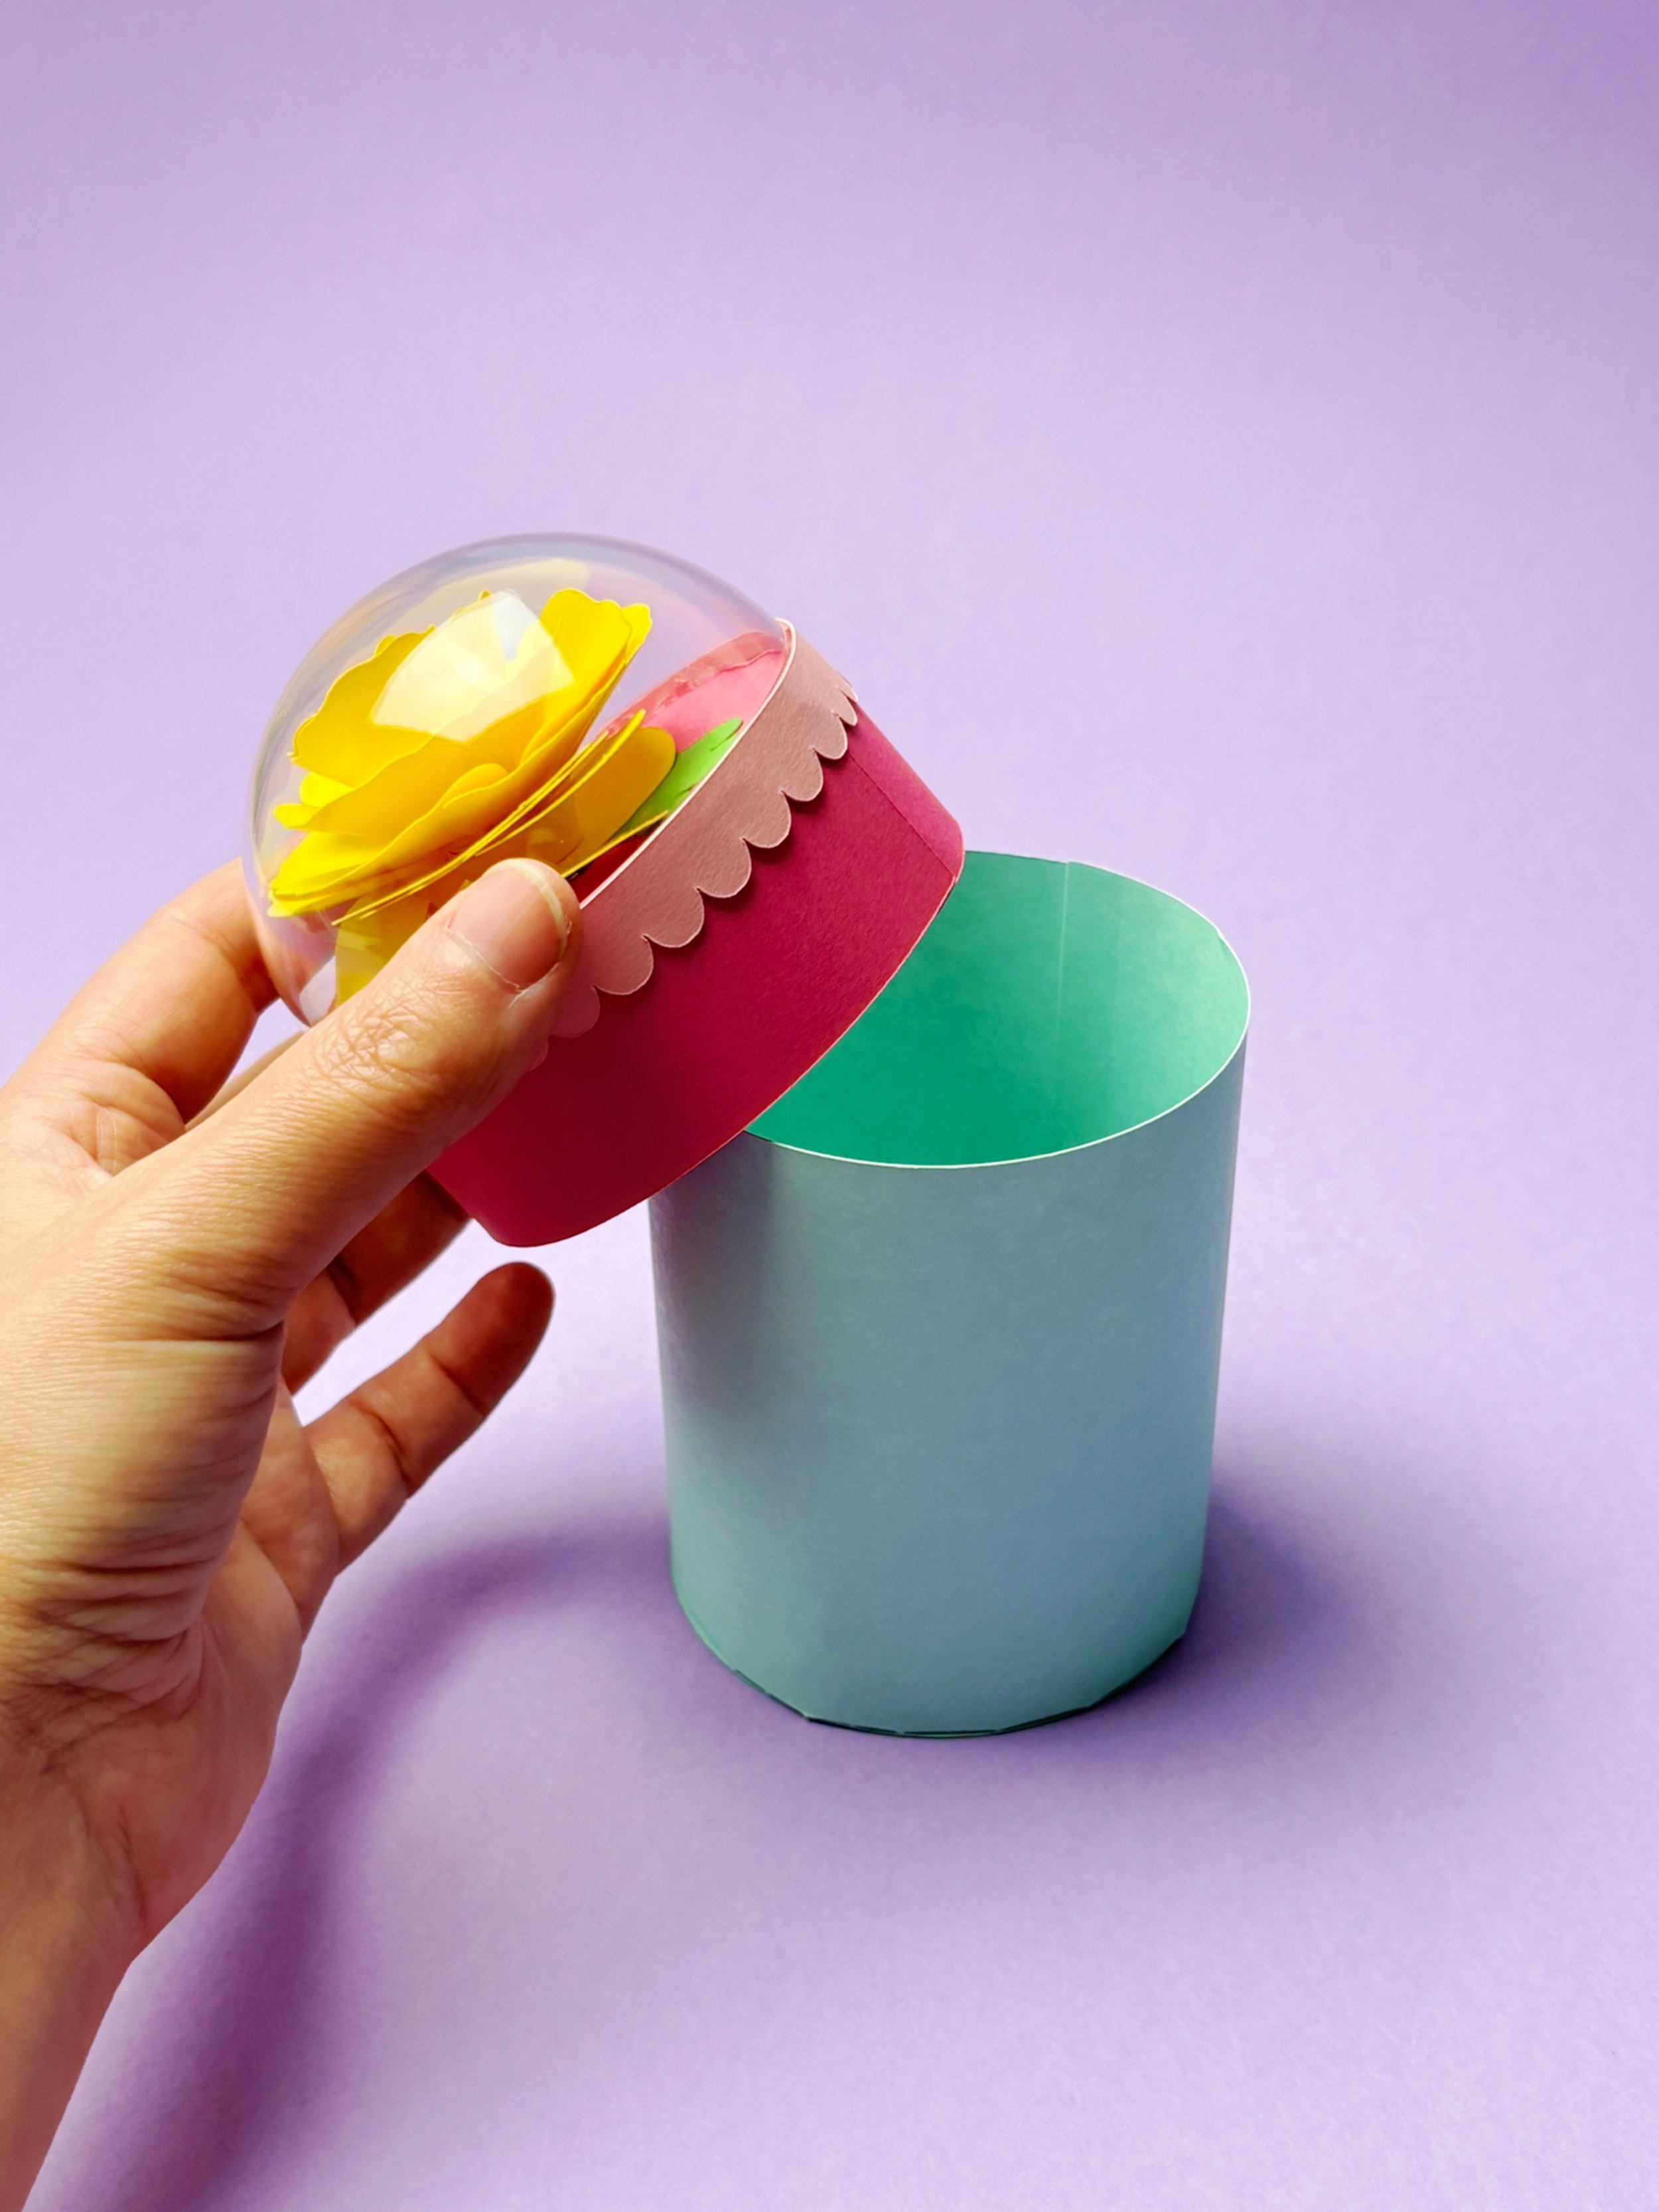
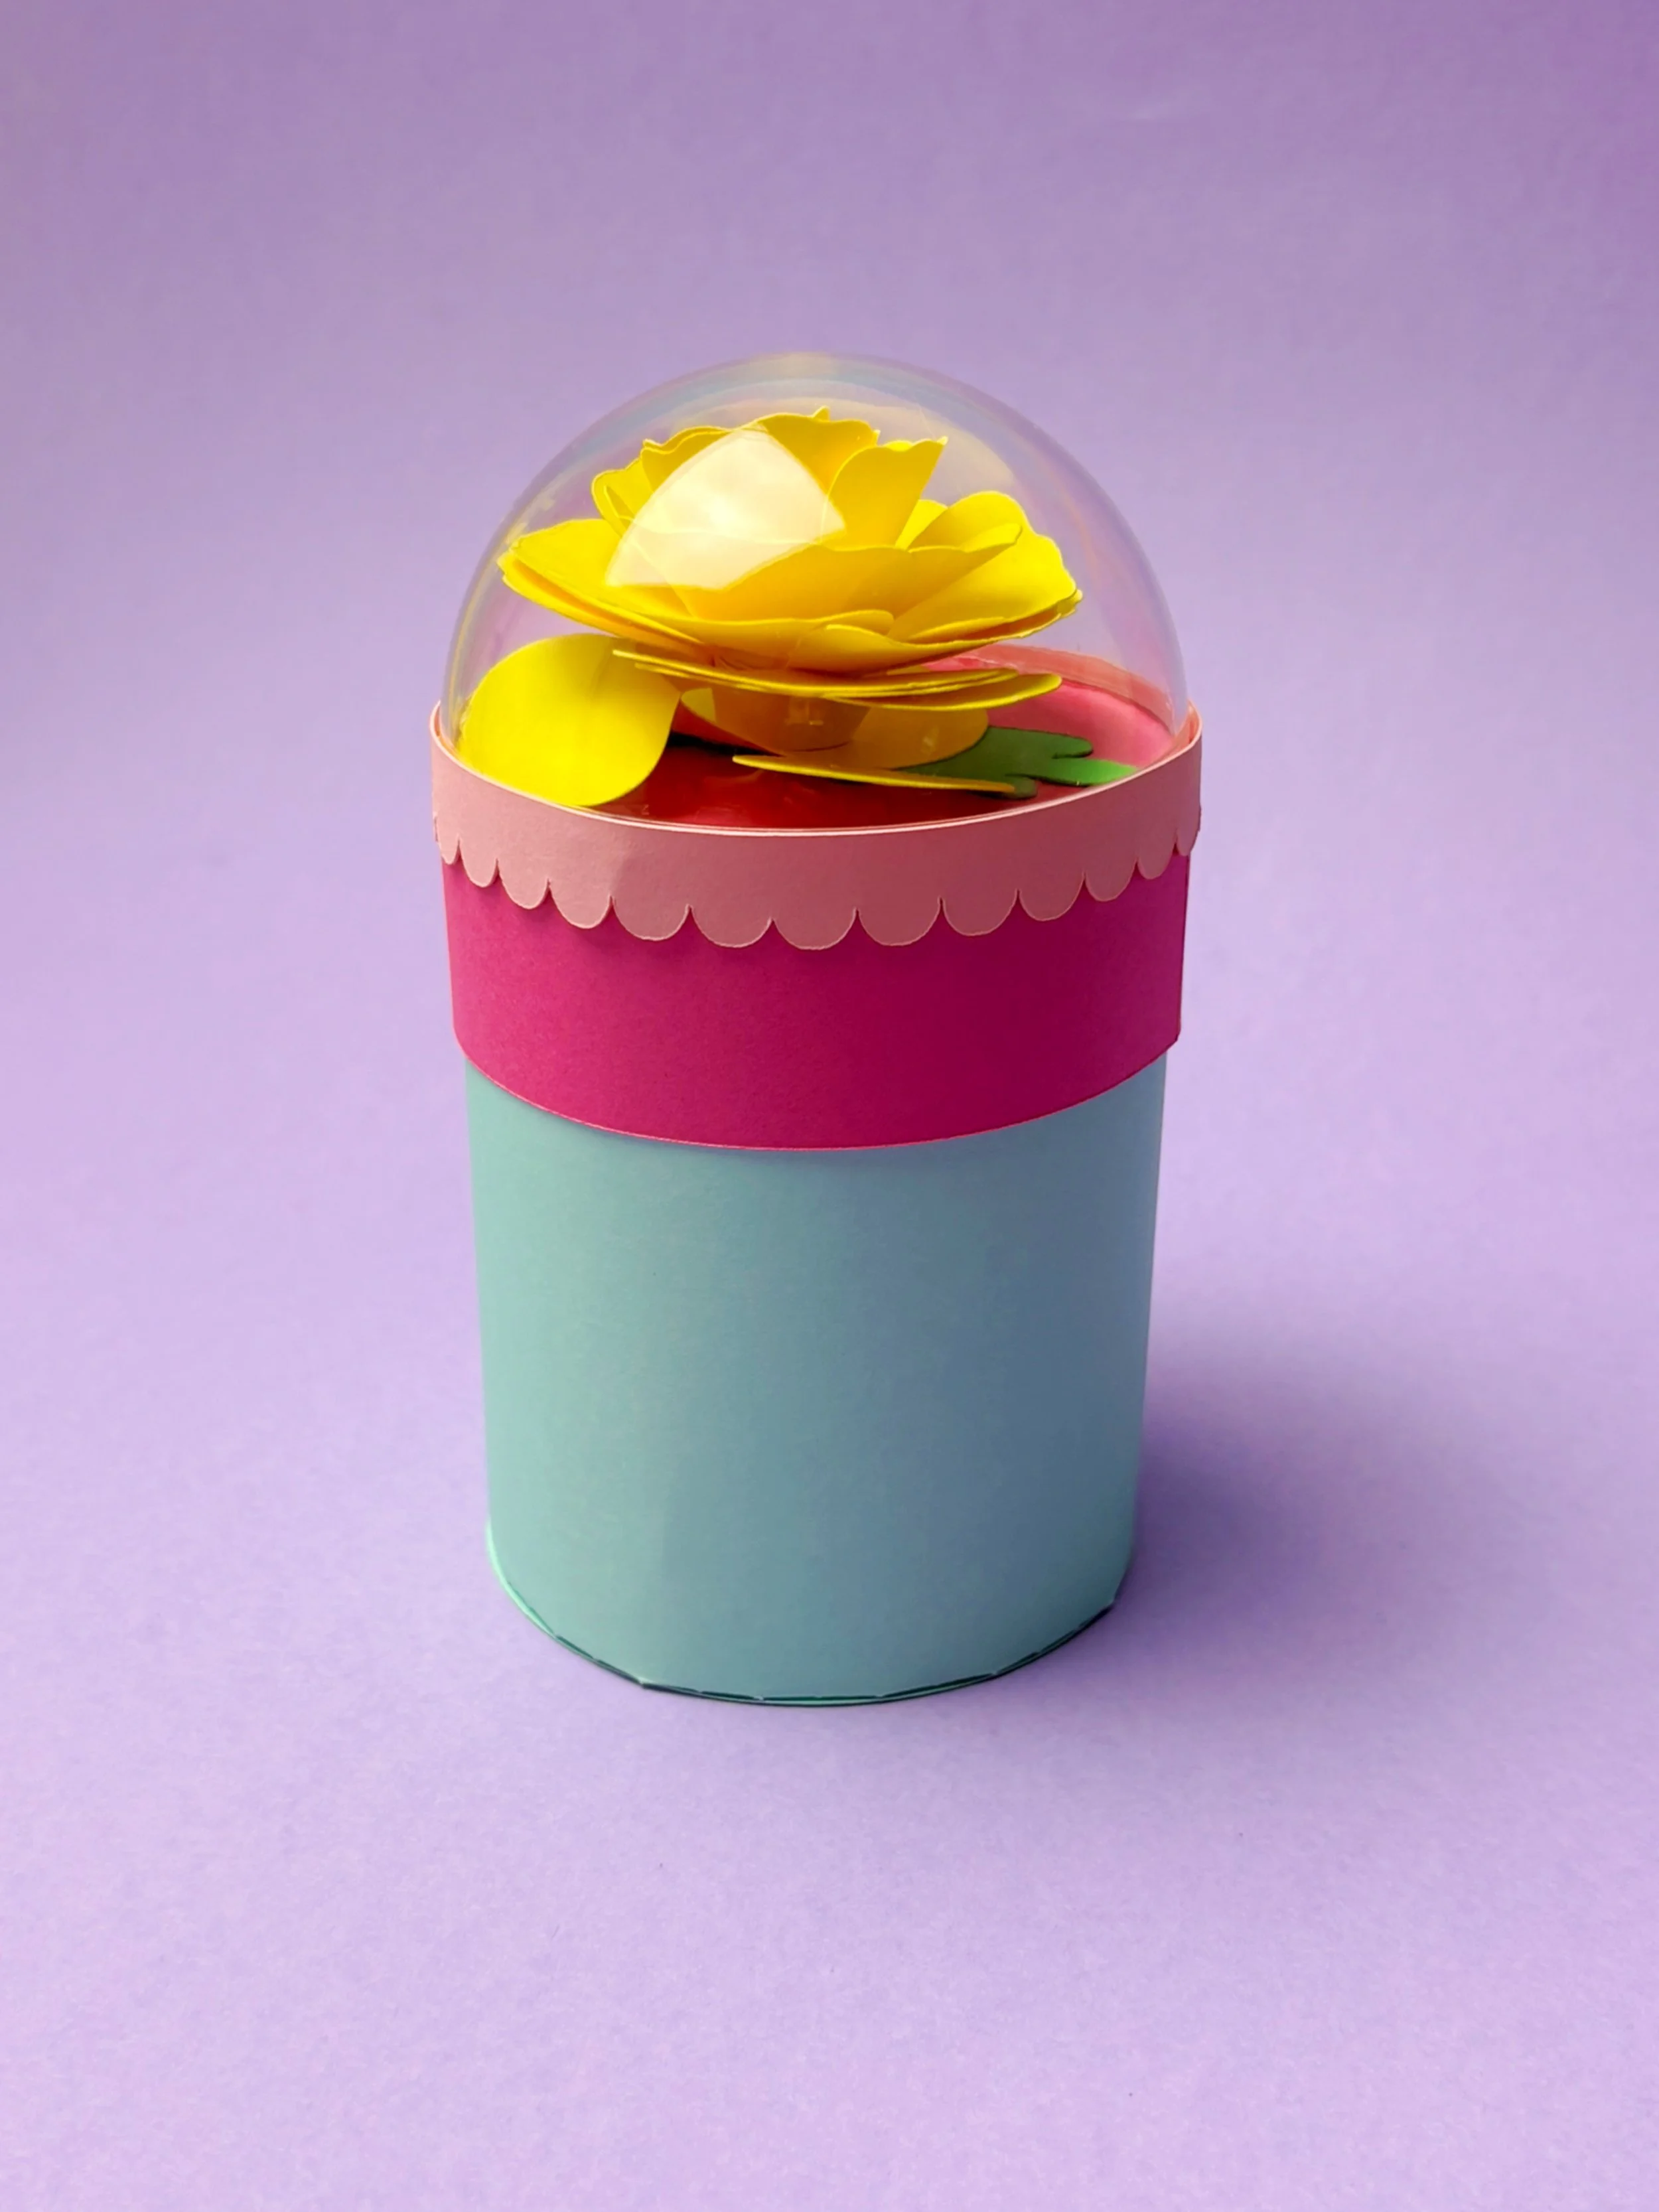
Blooming Creativity: DIY Floral Dome Gift Box for Handmade Elegance! 🌷🎁
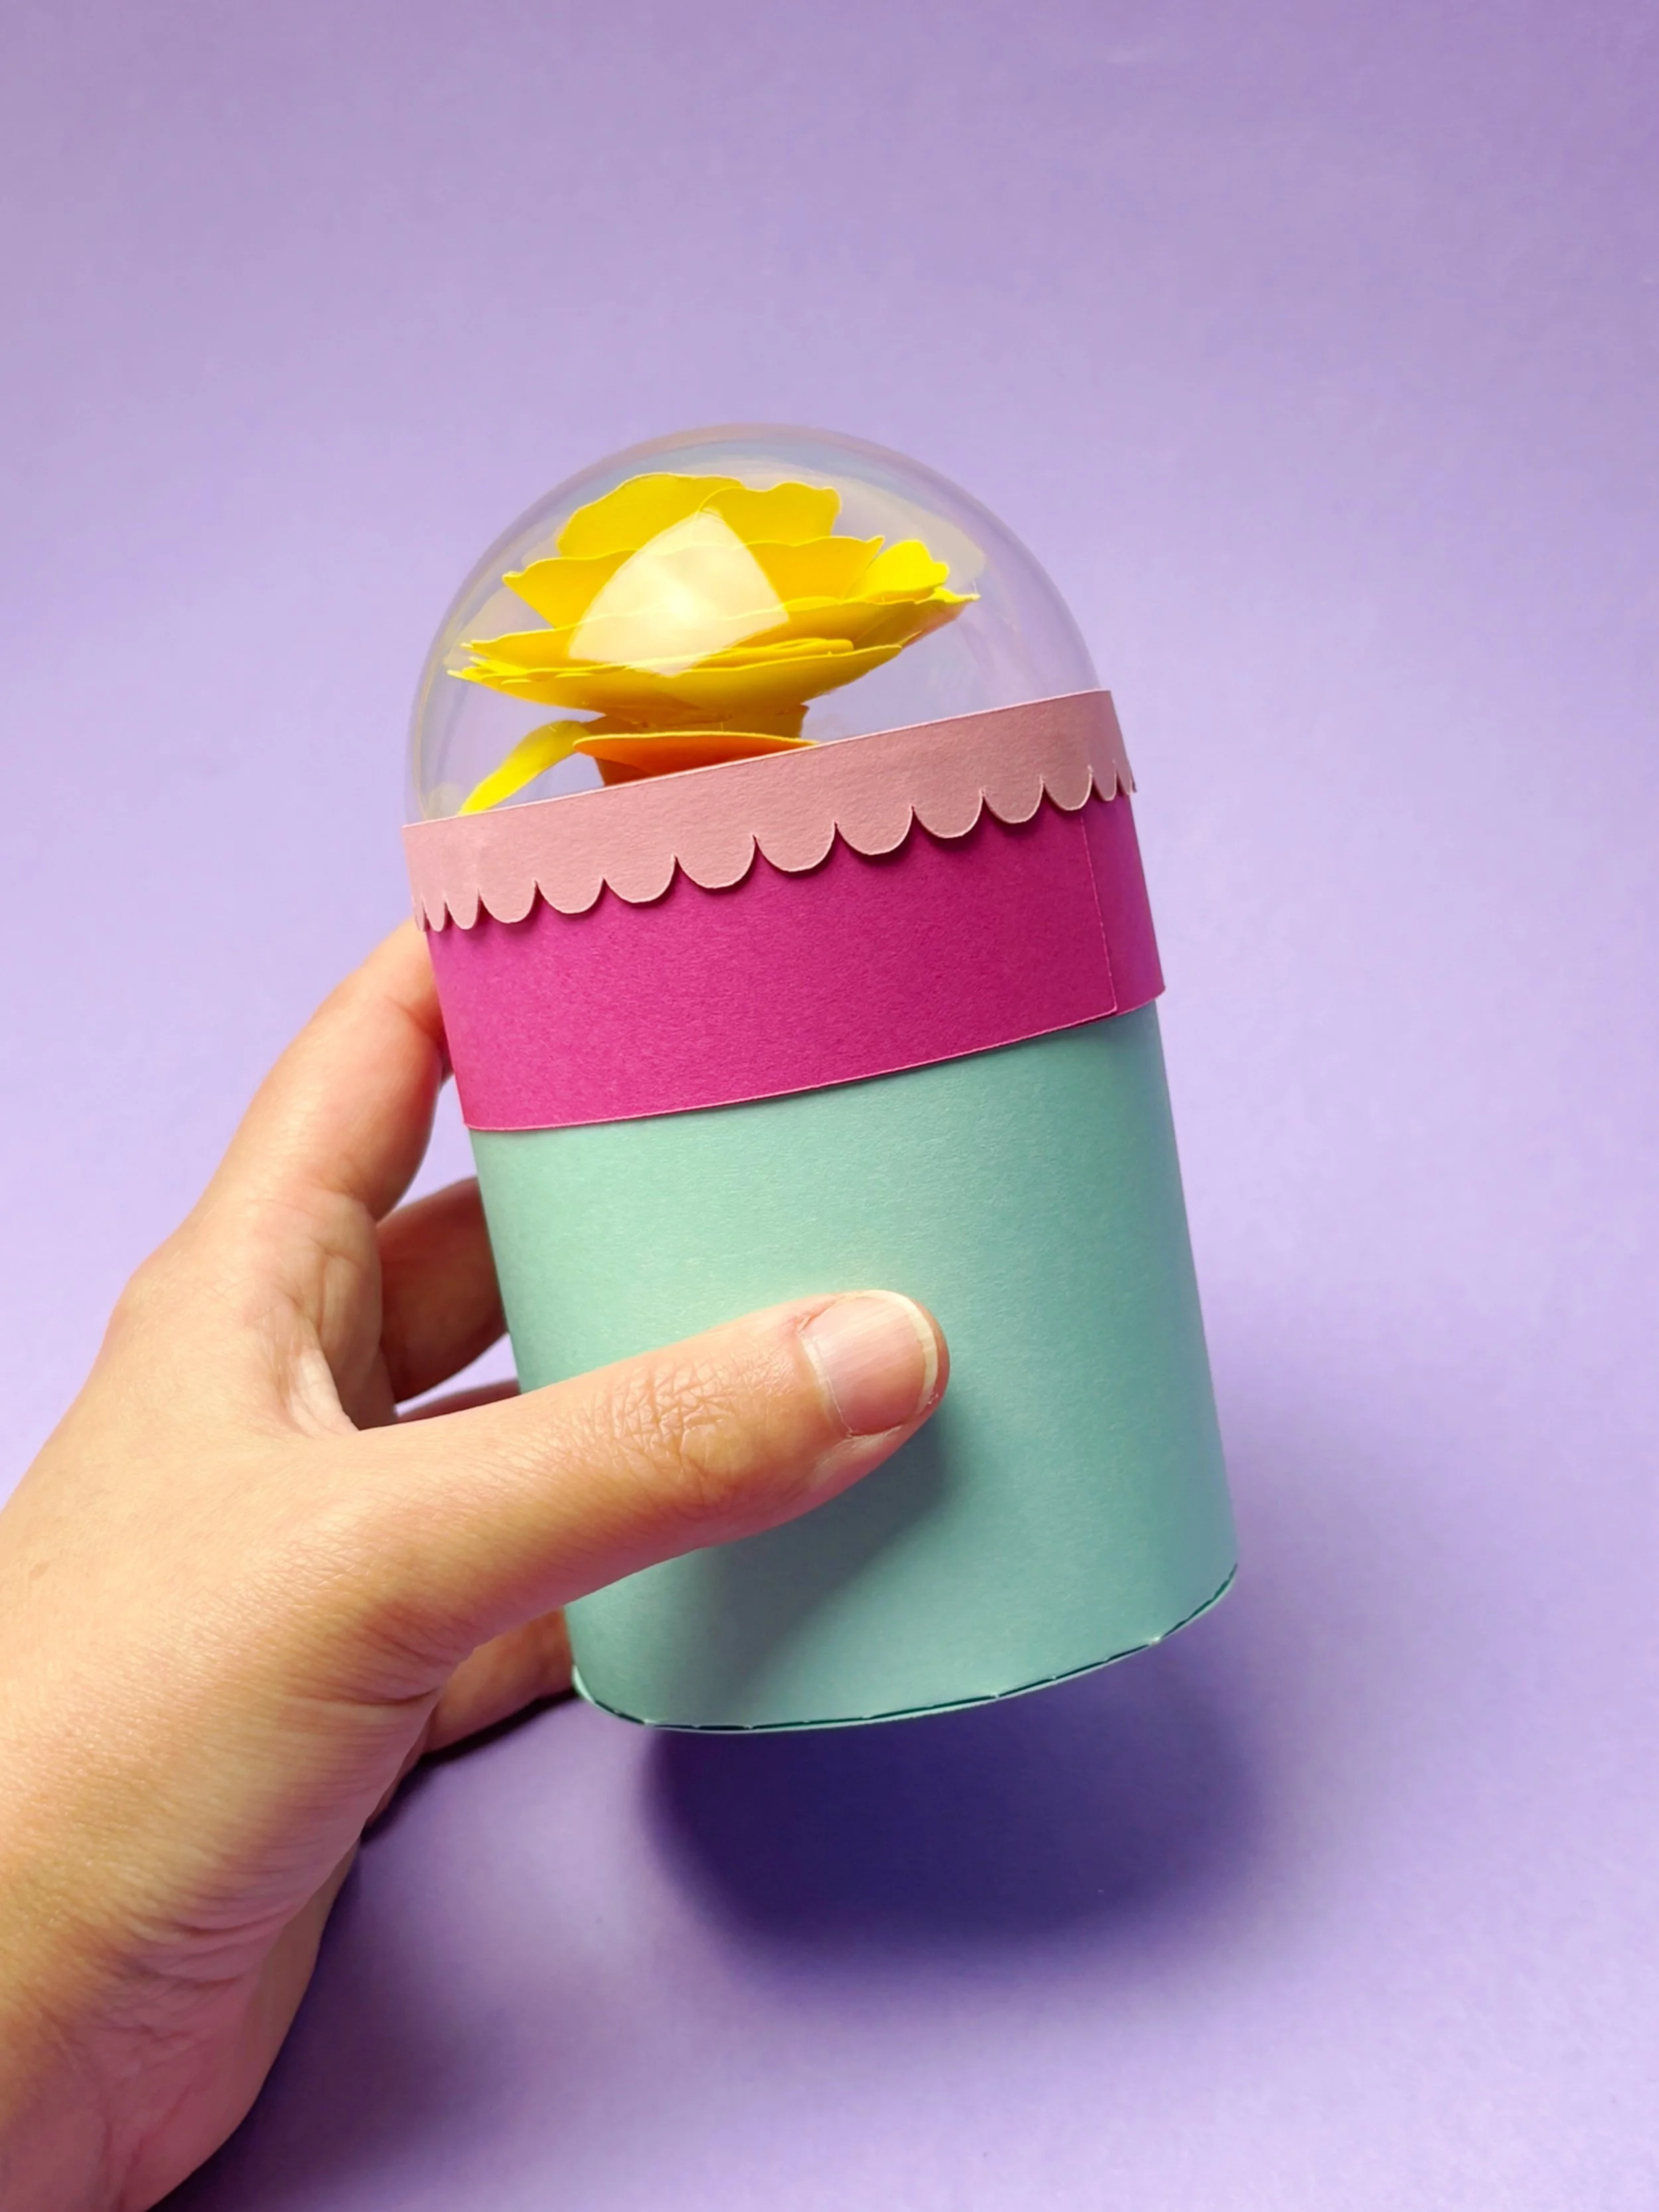
Ready to add a touch of elegance and creativity to your gift-giving? Let me introduce you to this charming DIY Floral Dome Gift Box! Perfect for holding small treats, jewellery, or handmade goodies, this floral dome box is an ideal way to showcase your crafting skills. Whether you're preparing gifts for loved ones, your craft stall, or a special workshop, this project is sure to bring smiles and a touch of handmade charm to your creations!
Why Crafters Will Love This Floral Dome Gift Box 🌷💖
🌷 Elegant Floral Design – Featuring a vibrant yellow flower encased in a clear dome, adding a fresh and artistic touch to your gift box. 🎁 Perfect for Gifting – Ideal for presenting small items in a stylish and eye-catching way. 🎨 Customizable – Use your favourite colours, patterns, and embellishments to match your unique style or theme. 💡 Easy to Make – Simple to assemble, making it a great project for crafters of all skill levels.
Follow Along with the Video Tutorial!
For a step-by-step guide, check out this helpful YouTube tutorial that walks you through the entire process. Follow along and enjoy creating your very own Floral Dome Gift Box!
📹 Watch the tutorial here: https://www.youtube.com/shorts/Wg_Q0uT7UCE
🖨️ Available on Cricut Design Space: 👉👉Cricut Design Space👈👈
Tips for Styling Your Floral Dome Gift Box 🌷🎁
🌷 Use it to package small gifts or treats for a sophisticated presentation. ✨ Pair it with matching ribbons or tags for a cohesive look. 🌷 Create a set of different designs for variety in your craft inventory. ✨ Gift it to fellow crafters or customers for a heartfelt and elegant surprise.
What You’ll Need to Create It 🛠️🌷
📄 Coloured Cardstock – for the box base, the dome rim, and the flower: 👉👉 Shop Now👈👈 🎨 Clear Plastic Dome – To encase the flower 🖌️ Glue or Hot Glue Gun – To assemble the box: 👉👉Shop Now👈👈 ✨ Optional Embellishments – Glitter, sequins, or metallic markers for extra sparkle
Thinking about getting a Cricut? I use one for all my projects—it’s a total game-changer.
👉👉 Click here to get a Cricut Maker 4👈👈
Affiliate links help support our small creative business – thank you!
Make It Yours, Make It Beautiful!
This DIY Floral Dome Gift Box is more than just a box—it’s a celebration of your crafting skills and the joy of creating something truly unique and charming. Whether you’re crafting for your next market, a special occasion, or making a heartfelt surprise for someone special, this project is sure to bring smiles and a touch of creativity to your handmade gifts!
Ready to Get Crafting?
🌷 Gather your supplies, follow the tutorial, and let your creativity bloom!
I can’t wait to see your creations! Share your masterpieces with me @catmadeira on social media. Need more inspiration or have questions? Let’s connect—I’m here to help fuel your creative journey!
Happy crafting! 🌷🎁